
Turning your dusty, forgotten basement into a cozy guest suite or a private retreat for your teenager is a dream for many homeowners here in Southwest Michigan. But before you start picking out paint colors and flooring, there’s a non-negotiable rule you absolutely must know: every single basement bedroom requires a dedicated, code-compliant emergency exit. These basement bedroom egress requirements aren't just bureaucratic red tape; they're a life-saving mandate designed to ensure everyone can get out safely during an emergency.
Why Egress Is Your Basement's Most Important Feature

When you're planning a basement remodel in places like Portage or Kalamazoo, it's easy to get swept up in the exciting details. You're thinking about layouts, lighting, and creating the perfect space. However, the single most critical feature you'll install is the one that puts safety first: an egress point.
At its heart, "egress" is just a formal word for "a way out." For a basement, it means having a direct and clear path to the outside that doesn't rely on the main stairs.
It's a Lifeline, Not Just a Window
Picture this: a fire starts in the middle of the night. Smoke and flames quickly make the main staircase impassable. If someone is sleeping in the basement, they're trapped. An egress window or door is their only way out—a vital second escape route. This is precisely why building codes, including the International Residential Code (IRC) that Michigan follows, are so strict on this.
The rules are built around two life-or-death functions:
- A quick escape for anyone inside: The window or door has to be big enough and low enough for an average person to climb through easily, without needing special knowledge or a stepladder.
- An entry point for first responders: A firefighter, loaded down with gear, needs to be able to get inside to help. The required dimensions ensure they have enough room to do their job.
This dual purpose is why your old, small basement hopper window just won't cut it. It has to meet modern size and operation standards to count as a true egress point.
The Real Dangers of Non-Compliant Spaces
The importance of these rules is backed by some sobering facts. An analysis of residential fires from 2005 to 2014 showed there were nearly 13,000 house fires annually that started in basements, leading to 140 deaths each year. The lack of easy escape routes makes these fires particularly dangerous. You can discover more insights about these fire safety findings and understand why code compliance is so crucial for basement living areas.
An egress window isn't just a building code item to check off a list. It's the fundamental safety feature that transforms a potential trap into a safe, livable part of your home. It's what separates a storage room from a legal, secure bedroom.
Unlocking Your Basement's Full Potential
Beyond the absolute necessity of safety, meeting basement bedroom egress requirements is also how you legally and financially protect your investment. Without a proper egress point, you can't legally list or count that basement room as a bedroom when you sell. This can seriously hurt your home's appraised value and make it less attractive to buyers.
By following the code, you're not just protecting your family—you're making a smart financial move. A compliant basement adds valuable square footage and creates a highly desirable living space. As you start planning, it's a good idea to get a handle on the budget. Our instant pricing tool can give you a solid preliminary estimate for your project, helping you plan for a basement that's both beautiful and safe.
Egress Code Dimensions and Clearances: The Nitty-Gritty Numbers
When it comes to the safety of a basement bedroom, the numbers are everything. You can't just eyeball it or hope for the best—every single inch matters. The International Residential Code (IRC), which Michigan and most states follow, lays out the exact blueprint for these life-saving dimensions.
Think of it like a recipe. If you miss a crucial ingredient or mess up the measurements, the final dish just won’t work. Let's break down this technical "recipe" into plain language so you can see the simple logic behind each requirement.
The Window Opening Itself
The heart of the matter is the window's net clear opening. This isn’t about the size of the glass or the frame. It’s the actual, wide-open space you can climb through when the window is fully opened. For a basement bedroom, this opening has to be big enough for an average-sized adult—or a firefighter in full gear—to get through without a struggle.
For any basement remodel in Kalamazoo, knowing these precise dimensions can be the difference between a legal, safe project and one that fails inspection. The IRC sets a firm minimum for the net clear opening at 5.7 square feet (or 820 square inches). It also has to be at least 20 inches wide and 24 inches tall.
On top of that, the sill—the bottom of the opening—can't be more than 44 inches off the finished floor. It also has to be easily opened from the inside without any special tools or keys. If you want to dive deeper into these critical measurements, you can explore basement egress window requirements further.
The "net clear opening" is the true test of an egress window. It's the free and clear space available for escape after the window has been opened to its fullest extent. This is the single most important measurement inspectors will check.
To put it in perspective, a 44-inch sill height is roughly the same height as your kitchen counter. This ensures most people can hoist themselves up and out quickly, even in a state of panic.
The Exterior Window Well
If your egress window sits below ground level, which is the case for most basements, it has to open into a window well. This isn't just a hole dug in the dirt; it's an engineered space specifically designed to give you a clear path out.
And just like the window, the well has its own set of rules:
- Surface Area: The well must have at least 9 square feet of clear floor area. Picture a 3-foot by 3-foot space—enough room for a person to stand and maneuver.
- Projection: It has to project at least 36 inches straight out from the foundation wall. This keeps the window from opening into a cramped, useless hole.
What if the well is deep? If it goes more than 44 inches down from ground level, the code says you must install a permanently attached ladder or steps. The ladder needs to be easy to climb and can't get in the way of that required 9-square-foot clear area.
IRC Egress Requirements At a Glance
Keeping all these numbers straight can feel a bit overwhelming, so we've put together a simple table that summarizes the key IRC requirements for you.
This table provides a quick summary of the essential dimensional requirements for basement egress windows and wells according to the International Residential Code (IRC).
| Component | Requirement | Minimum Dimension |
|---|---|---|
| Window Opening | Net Clear Opening Area | 5.7 square feet (820 sq in) |
| Window Opening | Minimum Opening Height | 24 inches |
| Window Opening | Minimum Opening Width | 20 inches |
| Window Sill Height | From Finished Floor | 44 inches maximum |
| Window Well | Horizontal Area | 9 square feet |
| Window Well | Projection from Wall | 36 inches |
| Window Well Ladder | Required if Depth > 44" | Must be permanently affixed |
These dimensions form the essential foundation for a safe and compliant project. While they give you a solid starting point for your plans, the next step is figuring out what it all means for your budget. For a personalized cost breakdown based on your home's specific layout, our instant pricing tool is a great way to get a realistic estimate quickly.
Applying Egress Rules to Your Basement Layout
Knowing the specific dimensions for an egress window is one thing, but figuring out how those rules apply to your actual basement floor plan is where the real work begins. It’s the classic "theory versus reality" moment. The most common question we get from homeowners is, "So, where exactly do I need to put an egress point?" Getting this right from the start is crucial—it affects your design, your budget, and the safety of the entire space.
Let's walk through a few real-world scenarios to help you map out the basement bedroom egress requirements for different layouts. This will help you sidestep costly mistakes and make sure your new basement is both beautiful and, most importantly, legal.
The Foundational Rule of Egress Placement
The main principle is pretty straightforward: any finished basement needs at least one primary way out. But the second you frame in a bedroom, the rules get much more specific and a lot stricter.
Every single bedroom in a basement must have its own dedicated egress point. A shared egress window in a common area is not sufficient for a separate, enclosed sleeping room.
This is the most critical detail to grasp. Building codes treat bedrooms as high-risk areas, and for good reason. When someone is asleep behind a closed door, a fire in the hallway could easily trap them. An egress point in the main family room is useless if you can't get to it.
This flowchart breaks down the essential dimensions for any single egress point, whether it's for a common area or a bedroom.
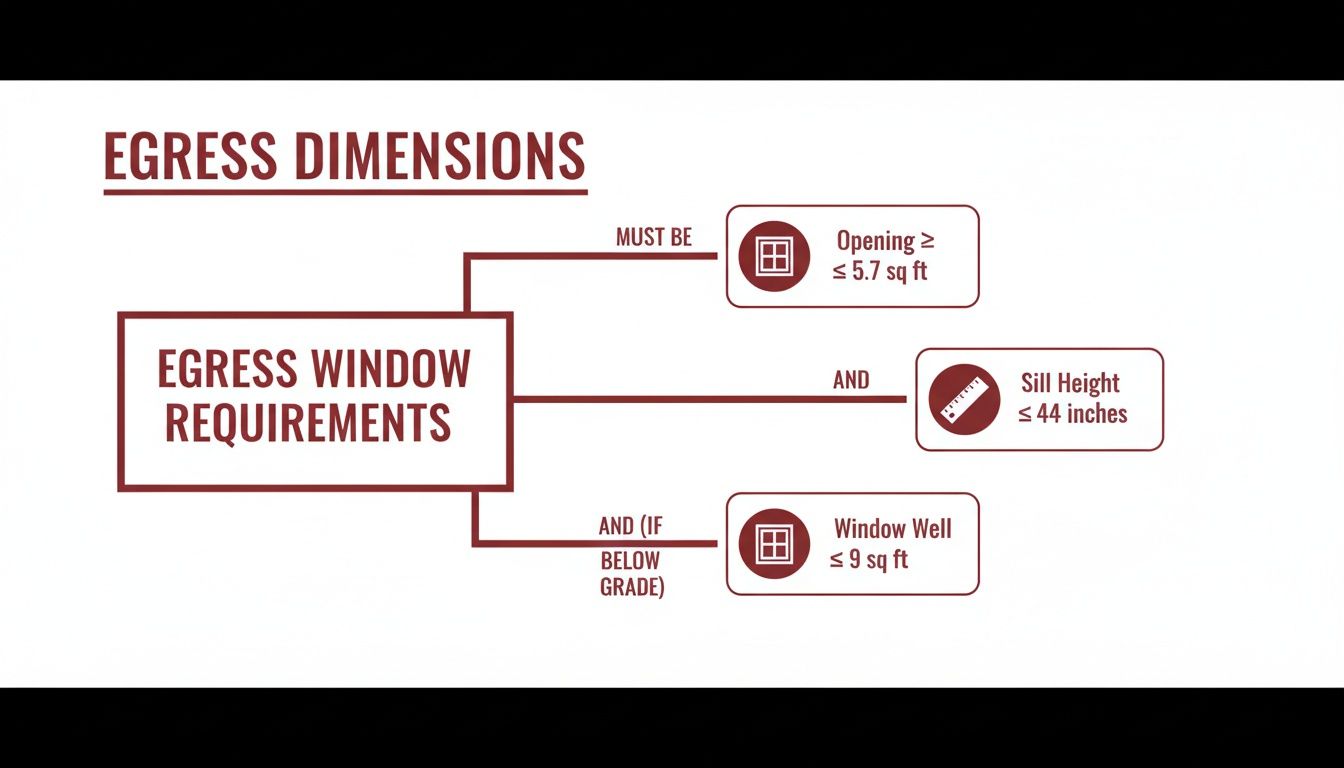
As you can see, there are three non-negotiable measurements for a compliant egress window: the size of the opening, how high it is from the floor, and the dimensions of the exterior well.
Egress Scenarios for Common Layouts
So, how does this play out in practice? Let's look at a few common basement finishing plans to see exactly how many egress points you would need.
Scenario 1: The Open-Concept Family Room
You’re finishing the basement as one large, open space—think family room, game room, or home gym. In this case, you generally need only one code-compliant egress point (a window or a door) for the entire basement. Easy enough.Scenario 2: Family Room + One Bedroom
You decide to add a guest bedroom off the main family room. Now, your egress requirements have just doubled. You will need two separate egress points: one inside the bedroom itself and one for the remaining basement area.Scenario 3: Family Room + Two Bedrooms
If your plan includes a family room and two separate bedrooms, the count goes up again. You'll need a total of three egress points: one in Bedroom A, one in Bedroom B, and a third for the main living area.
The number of egress points is directly tied to the number of sleeping rooms you create. This is because the International Residential Code (IRC) requires at least one egress route for any finished basement, but adds that each individual bedroom gets its own. You can discover more about how the IRC treats habitable spaces to understand why every bedroom needs its own private exit strategy.
Do Walk-Out Basements Change the Rules?
What if your basement has a walk-out door leading directly outside? That's fantastic news! A walk-out door that can be opened from the inside without keys or special tools fully satisfies the egress requirement for the common area of the basement.
However—and this is a big "however"—it does not get you off the hook for the bedrooms. Even with a walk-out door just down the hall, each enclosed bedroom must still have its own separate egress window.
Planning the number and location of your egress points is a fundamental first step in any basement remodel. Thinking through these scenarios early will save you a ton of time, money, and headaches down the road. Once you have a clearer picture of your needs, you can begin to estimate costs. For a quick ballpark figure based on your project, our instant pricing tool is a great way to get a preliminary budget.
The Egress Window Installation Process from Start to Finish

Adding an egress window to your basement foundation probably seems like a massive project. And it's true—it involves heavy machinery, concrete cutting, and some serious construction work. But when you understand the process from start to finish, it feels a lot less intimidating.
Let's walk through what actually happens when we install an egress window, from the first shovel in the ground to the final finishing touches. This way, you'll know exactly what to expect.
Step 1: Initial Planning and Site Preparation
Before we move any dirt, the first order of business is figuring out the perfect spot for your new window. This isn't a random choice. We have to consider your basement's layout, any obstacles outside (like AC units or utility lines), and local zoning rules. A seasoned pro can help you find that sweet spot that balances safety, function, and your home’s structural integrity.
Once the location is locked in, we prep the site. This means marking the dig area and laying down protection for your lawn and landscaping. It's all about careful planning to make sure the rest of the job goes smoothly.
Step 2: Excavation and Foundation Cutting
Now for the heavy lifting. We bring in a mini-excavator to carefully dig out the earth for the window well. The hole needs to be big enough for the well itself and give our crew a safe space to work. The depth is determined by exactly where the window will sit on your foundation wall.
Next up is the most critical part: cutting the opening in your foundation. Whether you have poured concrete or block walls, this requires a specialized wet concrete saw to make incredibly clean, precise cuts. This is absolutely not a DIY job. One wrong move can compromise your home’s structure. A professional ensures the cut is exact and properly supported.
Think of cutting into a foundation as surgery for your home. It demands absolute precision to avoid structural damage, which is why you should only entrust this task to an experienced, insured team.
As you plan the dig, it's also a great time to think about ways to prevent basement flooding and protect your new investment from water damage.
Step 3: Window and Well Installation
With the opening ready, we build and install the new window frame, often called a "buck." This frame is meticulously leveled, squared, and anchored directly into the foundation. It provides the solid structure for the window and is crucial for creating a permanent, watertight seal.
The window itself is then set into the frame. Our crew applies high-quality sealants and flashing around the entire window to make it completely weatherproof. At the same time, the window well is attached to the outside of your foundation. We add a layer of stone at the bottom of the well and connect a drain to your home’s drainage system to properly manage water.
Step 4: Final Touches and Finishing
The last stage is all about putting everything back together. We backfill the soil around the new window well, compacting it in layers to prevent it from settling over time. If your well is deeper than 44 inches, we install a permanent ladder inside to ensure it meets code.
The final piece of the puzzle is usually a lightweight well cover. This keeps leaves, debris, and rain out of the well but is still easy for anyone to open from inside in an emergency.
This whole process really underscores why professional installation is so important for meeting all basement bedroom egress requirements. The expertise needed for structural cuts and proper waterproofing is something you can't fake. Curious what a project like this might cost? You can get a solid preliminary budget by using our instant pricing tool to see estimates for your home.
How Much Does an Egress Window Cost? Let's Talk Budget.

Alright, you understand the process and the requirements. Now we get to the big question everyone has: "How much is this going to cost?" The truth is, the final price for adding an egress window can swing quite a bit. It’s not a one-size-fits-all project; the cost is tied directly to the unique conditions of your home and property.
In Southwest Michigan, most professional installations land within a predictable range. But your specific quote will depend on the details. Think of it like buying a car—the base model has a sticker price, but extras like a sunroof or a premium sound system will adjust the final total. Your egress project is no different.
Key Factors That Drive Your Project Cost
The cost goes far beyond just the window unit itself. A lot of what you're paying for involves the specialized labor and on-site conditions that make the installation safe, secure, and up to code.
Here are the main cost drivers we see on every job:
- Your Foundation Type: This is one of the biggest variables. Cutting through solid poured concrete is a tough, time-consuming job that requires heavy-duty equipment. It's a completely different ballgame than cutting through concrete blocks, which is simpler. That difference in labor and machinery directly impacts the price.
- Digging Conditions and Access: What’s the ground like where we need to dig? Hard-packed clay or rocky soil will slow down the excavation and require more effort than soft, sandy loam. Also, if the work area is squeezed by fences, decks, or mature landscaping, it makes getting equipment in and out more complex, adding to the labor hours.
- Window and Well Quality: Egress systems come in different tiers. A standard, builder-grade vinyl window is perfectly functional and budget-friendly. But if you want a high-performance fiberglass window or a decorative well that looks like natural stone, the material costs will be higher.
- Drainage Solutions: Proper drainage is non-negotiable for keeping your basement dry. The cost can vary depending on what your property needs. A simple French drain might be enough, but if we need to tie into your home’s existing drain tile or sump pump system for a guaranteed solution, the project scope and cost will increase.
A common misconception is that the window is the most expensive part of the project. In reality, the excavation, concrete cutting, and labor often account for the largest portion of the total cost. These steps are critical for structural integrity and waterproofing—you definitely don't want to cut corners here.
Getting a Realistic Estimate for Your Home
While these factors give you a good idea of what’s involved, every home in Kalamazoo, Portage, and the surrounding areas is different. The only way to nail down a precise number is to have a professional evaluate your specific situation.
For a great starting point, check out our instant pricing tool. It's a fantastic tool that can give you a reliable cost estimate based on the typical projects we complete right here in Southwest Michigan. It will help you move from a vague idea to a solid financial plan.
Ultimately, investing in a professionally installed egress window is about more than just a renovation. It's a direct investment in your family's safety and your home's long-term value, turning your basement into a legal, safe, and truly valuable living space.
Navigating Permits and Inspections for Your Project
So, you've got your project planned out and a contractor lined up. Now comes the part that many homeowners find a little intimidating: the permits and inspections. It might feel like a lot of red tape, but this is the official process that makes your project safe and fully compliant with local building codes, whether you're in Kalamazoo, Portage, or a surrounding township. Think of it as the final green light for your investment.
Let's be clear: cutting a massive hole in your foundation isn't a weekend DIY project—it's a major structural change. For that reason, adding a new egress window almost always requires a building permit from your local city or township. This permit is your official permission to begin work, and it's proof that your plans meet the legal safety standards from the get-go.
Why You Need a Permit
A building permit is basically your project's insurance policy against code violations. It triggers a formal review of your plans to make sure they align with basement bedroom egress requirements before anyone picks up a tool. This crucial step protects you, your home's structural integrity, and its future resale value.
It's also important to know that even a project like an egress window might require more than just a simple application. There's often a need for a site plan to show how the work impacts your property. This is where a professional contractor becomes your best friend. They handle all this, submitting the right drawings and paperwork to the building department for you, saving you a huge headache.
What to Expect During the Inspection
After the window is installed, a city building inspector will schedule a visit to your home for a final review. This isn't just a quick glance. The inspector has a very specific checklist and will verify that every single component of the project meets code. Having an experienced contractor who knows exactly what inspectors look for is priceless at this stage.
Here's a breakdown of what the inspector will check:
- Window Operation: They will physically open and close the window themselves. It has to operate smoothly from the inside without needing any keys, special tools, or a secret handshake.
- Clear Opening Dimensions: Out comes the tape measure. They will confirm the opening's height and width add up to the minimum 5.7 square feet of clear space.
- Sill Height: They'll measure the distance from the finished floor to the bottom of the window sill, making sure it doesn't exceed 44 inches.
- Window Well Size: The inspector will measure the interior of the window well to ensure it has at least 9 square feet of floor area and projects a minimum of 36 inches out from the foundation.
- Ladder Requirements: If the window well is deeper than 44 inches, they will check for a permanently attached ladder that’s easy and safe to climb.
The final inspection is the moment of truth. A passing grade means your project is officially documented as safe and code-compliant, while a failure can lead to costly rework and delays. This is why professional installation is so critical.
A good contractor sees this inspection coming from a mile away. They do the work correctly the first time to make sure you sail right through. This expertise gives you the peace of mind that your new basement bedroom isn't just beautiful—it's genuinely safe and legal.
As you budget for the total investment, don't forget to factor in permit fees. You can get a head start on planning your finances by using our instant pricing tool to estimate your project costs with confidence.
Common Questions About Basement Egress Requirements
As you start putting the final touches on your basement renovation plans, a few key questions almost always come up. Getting clear, straightforward answers can help you move forward confidently, making sure your project meets all basement bedroom egress requirements and avoids any costly surprises down the road.
Let’s walk through some of the most common questions we hear from homeowners just like you.
Do I Need an Egress Window if I Have a Walk-Out?
This is a fantastic question, and the answer gets to the heart of what building codes are trying to accomplish. A walk-out door is an excellent, and often required, escape route for the main living area of your basement—think of the family room or general rec space.
However, that walk-out door does not count for an enclosed bedroom. The code is written with a specific scenario in mind: someone is sleeping in a bedroom with the door closed, and a fire breaks out in the main basement area, blocking their path to the walk-out. For this very reason, every single basement bedroom must have its own separate, direct means of escape. A window in the room is non-negotiable, even if a walk-out door is just a few feet away.
Can I Install an Egress Window Myself?
We love the DIY spirit, but installing an egress window is a complex job where the stakes are incredibly high. This is one of those projects where bringing in a professional is not just recommended; it's essential.
Here’s why we strongly advise against a DIY installation:
- Structural Integrity: You're not just cutting a hole in drywall; you're cutting a massive opening into your home's foundation. One wrong move or improper support framing can seriously compromise the structural stability of your entire house.
- Waterproofing: Creating a permanent, watertight seal around the window and well is a science. Professionals use specialized techniques and materials to prevent leaks. A failed seal is a nightmare, leading to chronic water damage, mold, and foundation issues that are far more expensive to fix than the initial installation.
- Code Compliance: An experienced contractor knows exactly what local inspectors are looking for—from the height of the sill to the size of the window well. It’s heartbreaking to see a DIY project fail inspection, forcing the homeowner to tear it all out and start over.
What Happens if I Don't Install a Proper Egress Window?
Trying to save a few bucks by skipping a required egress window might seem tempting, but the long-term consequences are severe. First and most importantly, you’re creating a life-threatening safety hazard for anyone sleeping in that room.
Beyond the immediate danger, you'll face major headaches later on. When you go to sell your home, that space cannot be legally advertised or valued as a bedroom. This can drastically lower your home's market value. A home inspector will immediately flag the non-compliant room, which could kill the sale entirely or force you into expensive, last-minute fixes to close the deal.
Planning your project and understanding the costs involved are the first steps toward a successful and safe remodel. To get a reliable project cost estimate tailored to your specific home, we encourage you to use our free instant pricing tool. It's a great way to build a realistic budget and move forward with confidence.

