
Walk into almost any beautifully updated bathroom, from Portage to Kalamazoo, and you're bound to see a familiar friend: the humble subway tile. But don't mistake its popularity for being a "safe" choice. This simple, rectangular classic is actually one of the smartest and most versatile foundations you can build a design on. For over a hundred years, it's proven it has serious staying power.
The Enduring Appeal of Bathroom Subway Tile
So, why has this one tile stuck around for so long while countless other trends have come and gone? It all comes down to its incredible adaptability. Think of it like a classic white t-shirt—you can dress it up for a fancy night out or keep it casual. It just works.
Whether you're aiming for a modern farmhouse vibe or a super sleek, contemporary powder room, subway tile provides a clean, orderly backdrop that never overpowers the rest of your design. It plays well with everything, from the natural warmth of a cherry wood vanity to the cool, crisp look of a quartz countertop. In a bathroom, that sense of clean geometry brings a feeling of calm and order that's hard to beat.
A Foundation for Any Style
The real magic of subway tile is how it completely changes its personality based on how you use it. It isn't a single look; it's a launchpad for your creativity. The exact same tile can feel totally different just by changing the elements around it.
Just look at the possibilities:
- Modern Farmhouse: Go with the classic white 3×6 tiles but use a dark, contrasting grout. Pair them with matte black fixtures and some rustic wood, and you've nailed the look.
- Sleek Contemporary: Try a larger format tile, maybe a 4×12, and install it in a vertical stacked pattern. Add some minimalist fixtures and a frameless glass shower door for a clean, modern feel.
- Spa-Like Retreat: Choose a tile in a soft, neutral color—think light gray or beige—with a glossy finish. Using a matching grout line makes the tile blend together for a seamless, tranquil vibe.
Here's the key takeaway: Subway tile doesn't dictate a style; it reflects it. Its timelessness means your bathroom won't feel dated a few years down the road, which is a huge plus for your home's value.
More Than Just a White Rectangle
While the iconic 3×6 inch white tile is what everyone pictures, the world of subway tile has exploded with options. Today, you can find a whole palette of sizes, colors, and textures that let you get incredibly personal with your design.
There are long, skinny tiles that feel more modern, tiles with beveled edges that add a bit of shadow and dimension, and colors that range from subtle, misty grays to deep, dramatic emerald greens.
This isn't just a local trend, either. The global market for subway tiles was valued at a massive USD 2.3 billion in 2023 and is expected to climb to USD 3.9 billion by 2032. Right here in the U.S., bathroom remodels using subway tile jumped by 25% between 2020 and 2024. It’s clear this classic isn't going anywhere. You can even explore more about future tile trends to see how it continues to adapt.
Choosing Your Perfect Subway Tile
Once you've decided to go with bathroom subway tile, the real fun begins. Now you get to pick the size, material, color, and finish that will truly shape the personality of your space. This isn't just about picking out a tile; it's about crafting a specific feeling, whether that's a bright and airy retreat or a bold, dramatic statement.
Think of it like putting together an outfit. The tile size is the silhouette of your clothes—it sets the overall style. The material is the fabric, dictating texture and how it holds up. Color is the main hue, obviously, and the finish is that final sheen that catches the light. Every choice you make works with the others to create a look that feels complete.
Decoding Tile Size and Scale
The size of your subway tile has a surprisingly powerful effect on the room's overall vibe. The classic 3×6 inch tile is a timeless and versatile choice, but playing with different proportions can completely change the visual impact.
- Classic Tradition (3×6 inch): This is the go-to for a reason. It just feels balanced and familiar, working well in almost any bathroom to create a look that will never feel dated.
- Modern Elongation (4×12 or 3×12 inch): Longer, sleeker tiles give off a more contemporary feel. Their extended lines can trick the eye, making a wall seem wider or taller depending on how you lay them out. It’s an easy way to add a touch of modern sophistication.
- Petite and Detailed (2×4 or 2×8 inch): Smaller subway tiles mean more grout lines, which creates a subtle texture and a more intricate, handcrafted look. They're perfect for adding a bit of detail to smaller areas, like a sink backsplash.
The right size really comes down to your goal. If you want a timeless backdrop that lets other design elements shine, the classic 3×6 is a perfect choice. For a space that feels distinctly modern and clean, an elongated tile will deliver that architectural edge.
Choosing the Right Material
The material of your bathroom subway tile doesn't just affect how it looks—it's also crucial for how it performs in a moisture-rich environment like a bathroom. Each option has its own set of benefits.
- Ceramic: This is the most common and budget-friendly choice. Ceramic tile is a workhorse—it's easy to clean and comes in a nearly endless variety of colors and finishes. It’s an excellent all-around option for shower walls and backsplashes.
- Porcelain: Think of porcelain as ceramic’s tougher older sibling. It’s denser and less porous, making it exceptionally durable and water-resistant. This makes it ideal for high-traffic bathroom floors and busy shower surrounds.
- Glass: Glass tiles are fantastic at bouncing light around, which can make a small bathroom feel much brighter and more open. They offer a luminous, modern aesthetic and are completely waterproof, though they can be a bit more challenging to install correctly.
- Natural Stone: Materials like marble or travertine bring a luxurious, organic feel to a bathroom. However, they are porous and require regular sealing to prevent staining and water damage, so they are a higher-maintenance choice.
This simple decision tree can help you narrow down a tile style that fits your vision, whether you're leaning modern or classic.
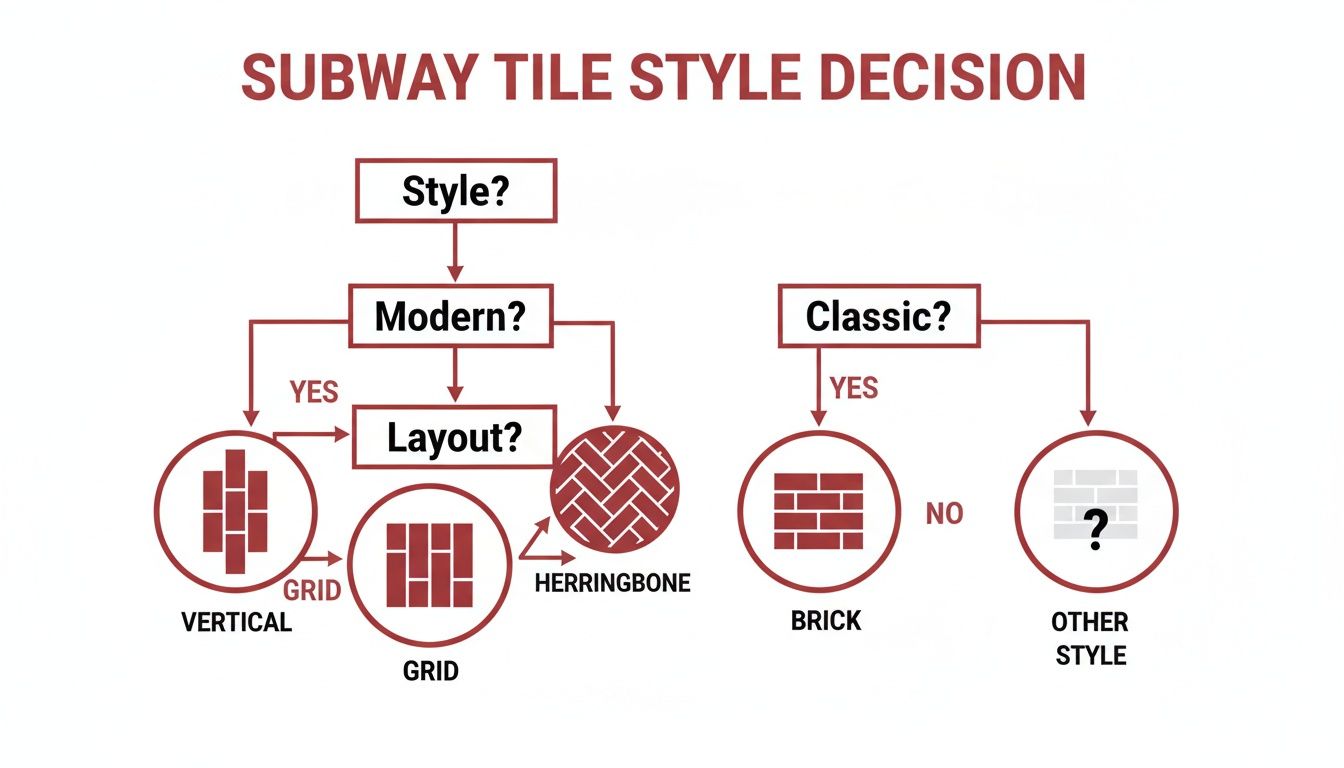
As you can see, even simple choices in the layout can lead to very different design outcomes, which just goes to show how versatile subway tile really is.
Exploring Color and Finish
While white subway tile is a classic for a reason, the world of color is wide open. Soft neutrals like a light gray, beige, or even a pale blue can create a calming, spa-like atmosphere. If you want to make more of a statement, deep greens, rich navies, or even black can turn a simple shower into a dramatic focal point.
The tile’s finish is the final piece of the puzzle. It controls how the tile interacts with light, and it makes a big difference.
- Glossy: This high-sheen finish reflects the most light, making your bathroom feel brighter and bigger. It's also incredibly easy to wipe clean, which is a huge plus.
- Matte: A matte finish absorbs light, giving you a soft, modern, and understated look. It’s also excellent at hiding water spots and fingerprints.
- Crackle: This finish has fine, web-like cracks in the glaze, giving the tile an aged, artisanal character. It’s perfect for vintage-inspired or rustic designs.
As you mull over your tile options, remember that everything in the bathroom works together to create the final look. For more on how to coordinate all the different pieces, you might find this comprehensive Kitchen Bathroom Lighting Buyers Guide helpful.
Creating a Statement with Subway Tile Patterns
Once you've landed on the perfect subway tile, the real fun begins. The layout—the specific pattern you choose for the installation—is your secret weapon for turning a simple material into a stunning focal point. Think of it like this: the individual tile is a single word, but the pattern is the story it tells. It sets the tone, the rhythm, and the whole mood of your bathroom.
The very same bathroom subway tile can feel traditional, ultra-modern, or incredibly luxurious, all based on how it's arranged. This is where your personality truly shines through in the design, letting you create a space that feels like it was made just for you.
Let's dive into some of the most popular patterns and see what kind of magic each one can work.
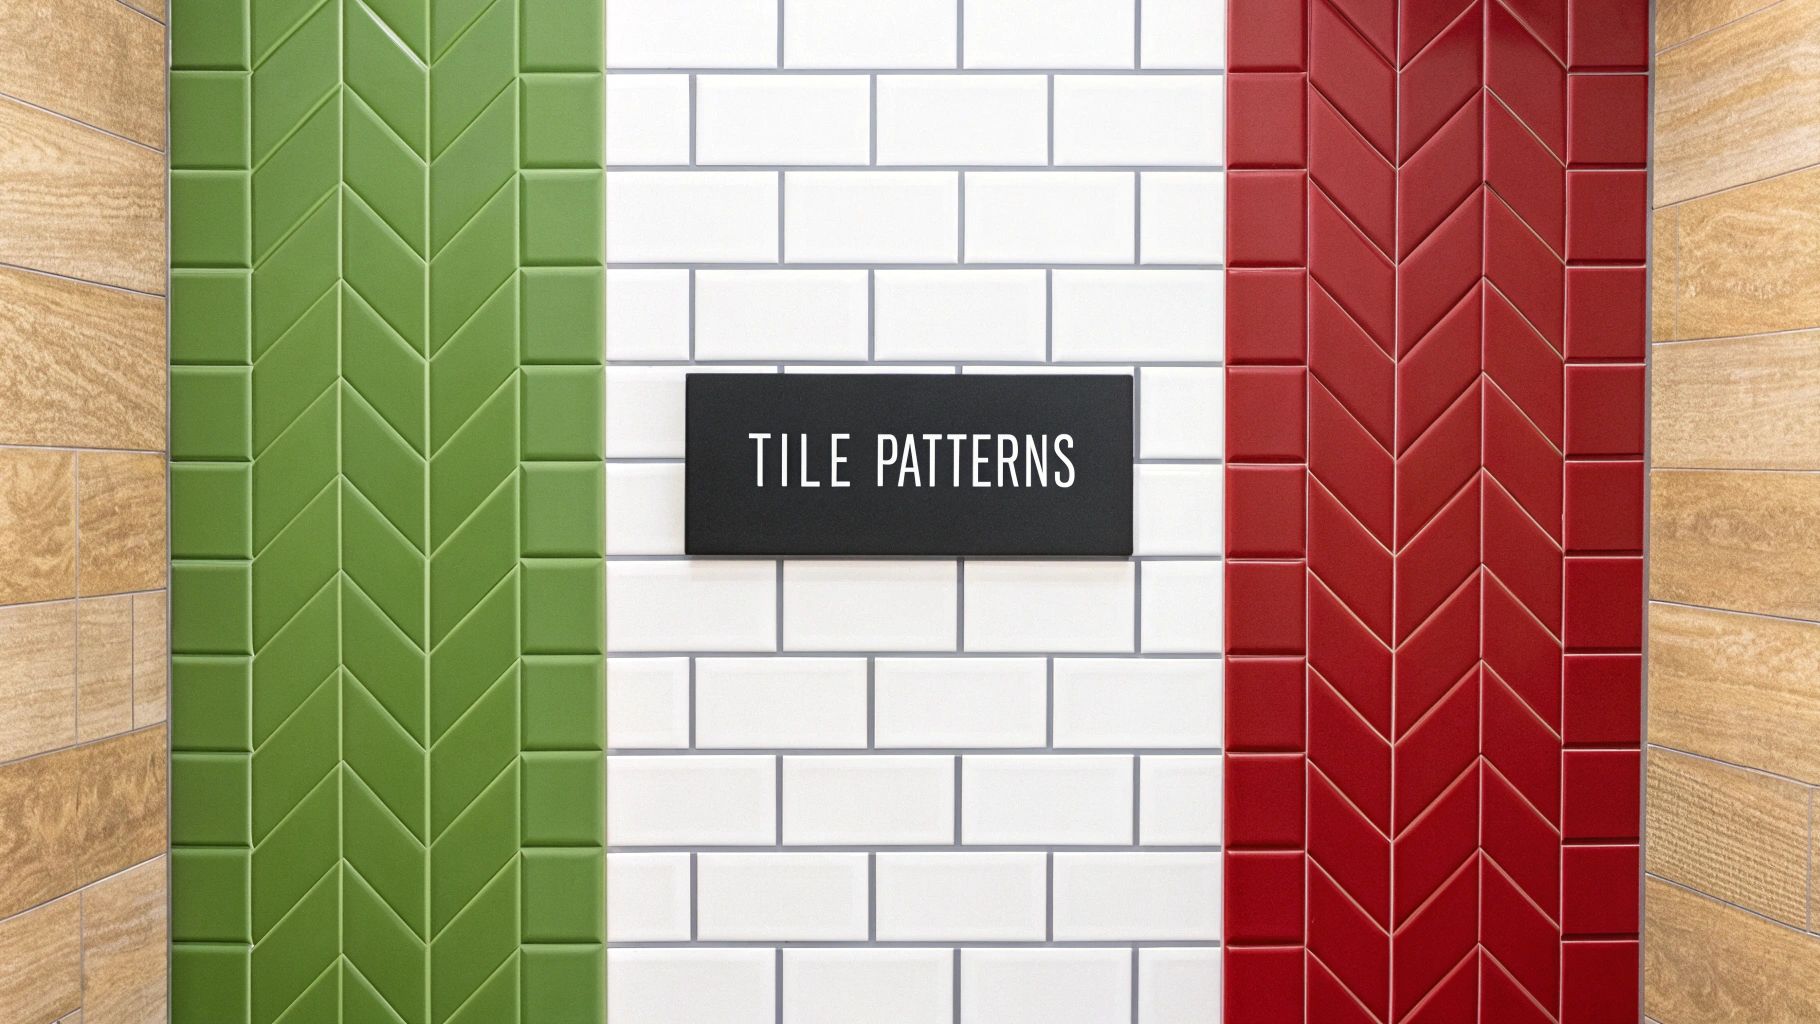
The Timeless Classic: Running Bond
This is the one. When you close your eyes and picture "subway tile," this is almost certainly the pattern you see. Also known as a brick pattern, the running bond layout offsets each tile by 50%, creating those familiar staggered lines. It's a look that's been around forever, yet it never feels dated.
The effect is subtle and clean, providing a balanced backdrop that lets other elements—like a beautiful vanity or striking fixtures—take center stage. It’s incredibly versatile, feeling right at home in everything from a rustic farmhouse bathroom to a more transitional space. As a bonus, it's also the most forgiving pattern to install, which is something to keep in mind for any project.
The Modern Grid: Stacked Bond
If you're after a look that’s clean, geometric, and unapologetically modern, the stacked bond is your answer. Here, the tiles are lined up in a perfect grid, creating crisp, clean lines that feel organized and intentional. This simple change from the classic offset completely transforms the tile's character.
You can run this pattern in two different directions, and each one creates a totally different effect:
- Horizontal Stack: Laying the tiles horizontally emphasizes the width of a room. This makes a narrow bathroom feel wider and more open, giving it a calm, architectural vibe.
- Vertical Stack: Flipping the tile on its end and stacking it vertically draws your eye upward. It’s a brilliant trick for making low ceilings feel taller, adding a touch of drama and a sense of soaring height.
A stacked bond pattern is a bit of an optical illusion. Those straight, unbroken grout lines guide the eye, subtly reshaping how you perceive the room's dimensions. It's a powerful tool for making smaller bathrooms feel much bigger.
The Dynamic Design: Herringbone Pattern
Ready to make a statement? The herringbone pattern is how you do it. This layout arranges rectangular tiles in a zigzag "V" shape, creating a feeling of movement, texture, and pure sophistication. It instantly elevates bathroom subway tile from a basic wall covering to a work of art.
There’s no getting around it—herringbone is a more complex pattern to install, demanding precision and a lot of angled cuts. But the payoff is huge. You get a luxurious, high-end look that can turn a simple shower wall or the space behind a vanity into the undeniable centerpiece of the room. It’s proof that even a classic tile can be used to create something truly bold and exciting.
A Quick Guide to Subway Tile Patterns
Not sure which layout is right for you? This table breaks down the key differences to help you find the perfect style for your bathroom's look and feel.
| Pattern Name | Visual Effect | Best For | Installation Complexity |
|---|---|---|---|
| Running Bond | Classic, timeless, balanced | Traditional, farmhouse, and transitional styles | Low |
| Stacked Bond | Modern, clean, geometric | Making small rooms feel larger or taller | Low to Medium |
| Herringbone | Dynamic, sophisticated, textured | Creating a high-impact feature wall or accent | High |
Each pattern offers a unique personality. Choosing the right one is all about matching the tile's layout to the overall vision you have for your new bathroom.
The Finishing Touches: Grout and Trim
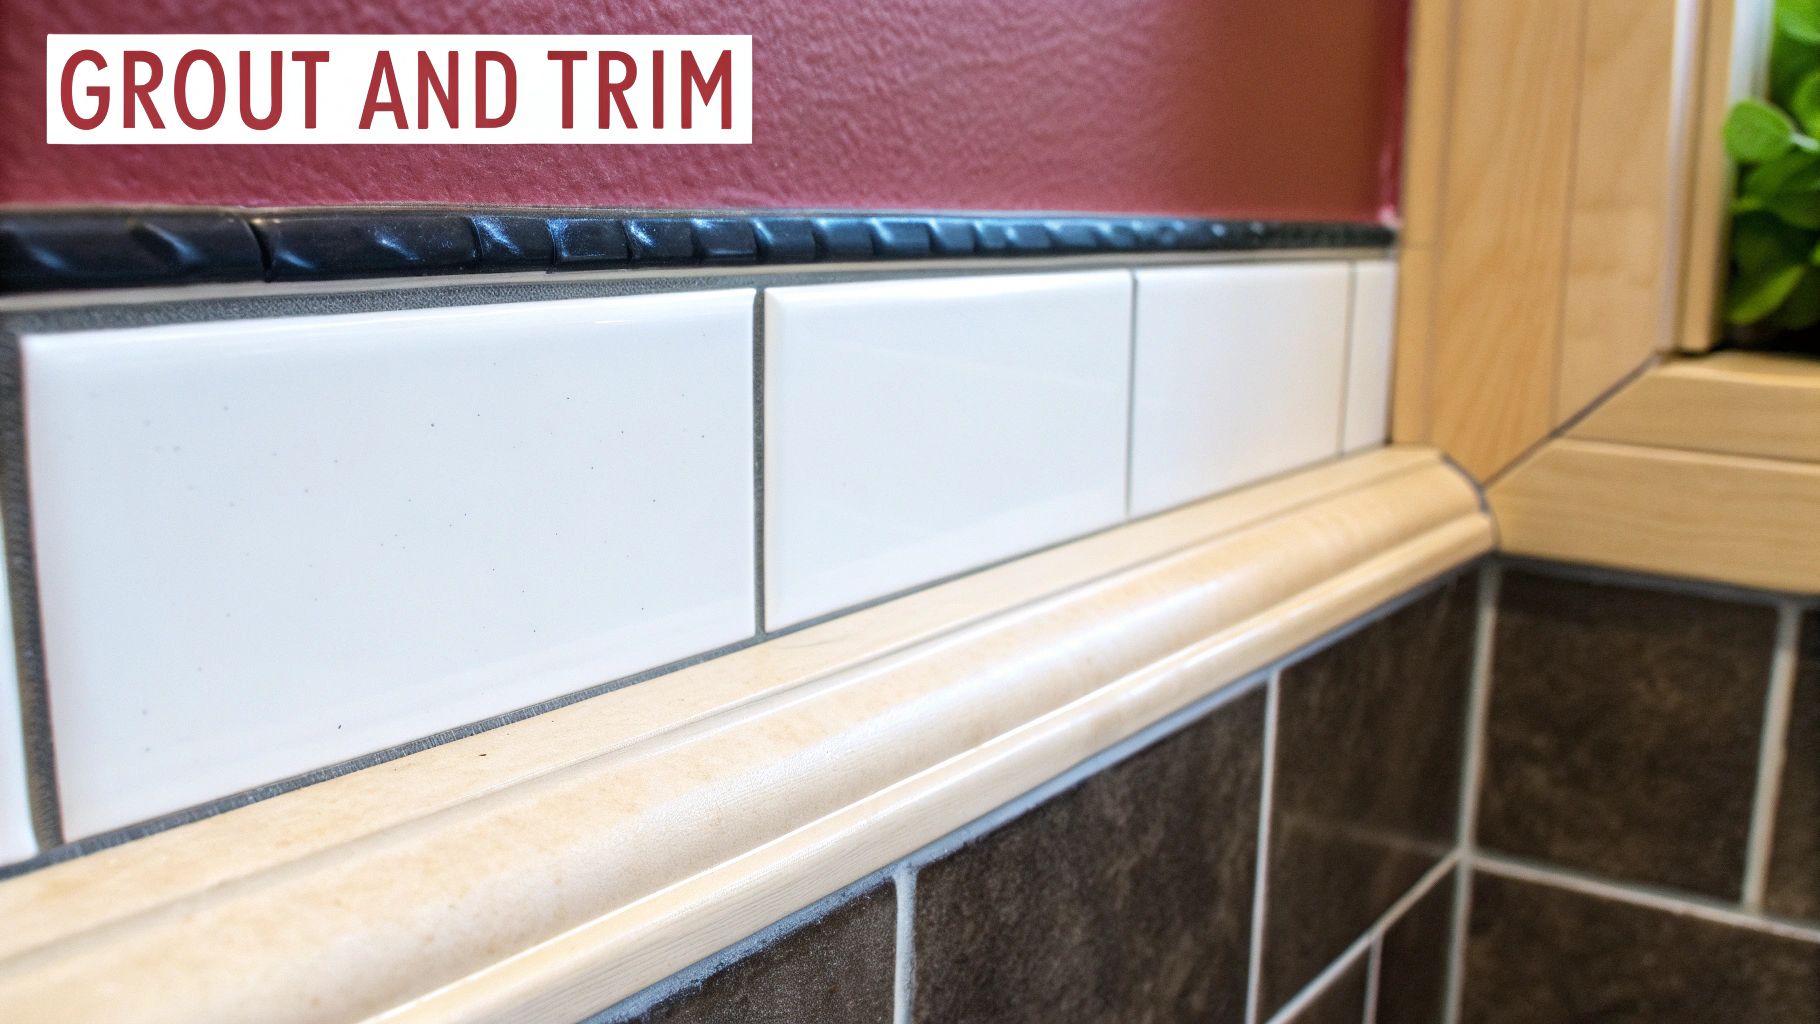
While the tile and pattern you pick are the main event, the grout and trim are the details that take a bathroom subway tile project from good to truly great. Think of them as the supporting cast; they provide essential function, but they also have a massive impact on the final design. Getting these elements right is what creates that polished, professional look we all want.
Grout is so much more than just the stuff that fills the gaps. It’s a powerful design tool. The color you choose can completely transform the feel of the room, making a small choice that delivers a huge visual punch.
The Design Power of Grout Color
Your grout choice has a surprising amount of say in how your tile pattern comes across. You really have two main directions you can go, and each one creates a totally different vibe.
- Matching Grout for a Seamless Look: When you pair a grout color that’s close to your tile color—think classic white-on-white—the individual tiles seem to melt into one another. This creates a subtle, uniform texture that makes a space feel bigger and calmer.
- Contrasting Grout for a Bold Statement: On the flip side, using a dark grout with a light tile (like a charcoal gray with white tile) makes every single tile stand out. This approach puts the spotlight on the shape of the tile and the pattern you chose, turning your wall into a piece of graphic art.
So, what’s the goal? Do you want a subtle, textured surface that feels cohesive, or do you want the tile pattern itself to be the star of the show? Your answer will point you to the right grout color.
The good news is that modern grouts are a world away from what they used to be. You’re no longer stuck with porous, stain-prone material. High-performance epoxy or urethane grouts come with built-in stain and mildew resistance, which is a game-changer for a wet environment like a bathroom. It’s a smart, practical upgrade that keeps your tile looking fantastic for years.
Professional Edges with Tile Trim
Trim is that final, critical element that gives your tile work a clean, deliberate finish. It's often what separates a project that looks DIY from one that looks professionally installed. You’ll need it to neatly cap the edges of your tile around a shower niche, a window, or where the tile simply stops on a wall.
There are a couple of go-to options that always look fantastic:
- Bullnose Trim: This is the traditional choice. A bullnose tile has a finished, rounded edge that creates a soft, clean transition from the tile back to the painted wall. It’s a classic for a reason.
- Metal Edging (Schluter Trim): For a crisper, more modern aesthetic, a thin metal strip does the trick. You can find it in all sorts of finishes—brushed nickel, matte black, chrome, you name it—so it's easy to match it to your faucets and fixtures for a cohesive look.
Both options protect the raw, sharp edges of the cut tile and give your bathroom subway tile a durable, high-end feel. It’s these thoughtful details—the perfect grout line, the clean trim—that really complete the picture and create a bathroom you’ll be proud of.
Understanding the Cost of Your Tile Project
Putting a budget together for a new bathroom can feel a bit daunting, but once you know what goes into the final price, it all starts to click into place. For a bathroom subway tile project, your total investment really boils down to two key things: the materials you choose and the skilled labor needed to install them.
Think of it like commissioning a piece of custom furniture. You have the cost of the wood, the hardware, and the finishes, but you also have the cost of the artisan's time and skill to craft it. Both parts are critical to getting a result that not only looks fantastic but also stands the test of time. Let's pull these two costs apart to see how a project budget really works.
Breaking Down Material Costs
First up, let's talk materials. This is everything from the tiles themselves to the grout, trim, and waterproofing supplies needed to do the job right. The great thing about tile is the sheer variety, which means you can find something beautiful that fits your budget.
Here’s a rough idea of what you can expect to pay per square foot for the tile itself:
- Ceramic Tile: This is often the most budget-friendly choice, usually running from $2 to $8 per square foot. You’ll find a massive range of colors and styles here, making it a go-to for many homeowners.
- Porcelain Tile: A step up in durability, porcelain typically costs between $4 to $12 per square foot. It's a fantastic option for floors or high-moisture areas because it's denser and less porous than ceramic.
- Glass Tile: On the higher end, glass tile can range from $10 to $30+ per square foot. It’s a premium material, but nothing else reflects light quite the same way, which can make a smaller bathroom feel incredibly bright and spacious.
Don't forget the other essentials! You'll need to account for grout, sealant, special trim pieces for edges, and the waterproofing system that goes behind the tile. These are the unsung heroes that ensure your shower is completely sealed and protected from moisture.
Factors That Influence Labor Costs
The other side of the coin is professional installation. Labor costs aren't just a simple flat rate; they're directly tied to the complexity and time your specific project will take. It’s a bit like getting a haircut—a quick, simple trim is going to cost less than a complex style that requires a lot more time and technical skill from the stylist.
The complexity of your chosen tile pattern is one of the biggest factors influencing labor costs. A more detailed design requires more precise cuts and a longer installation time, which is reflected in the final quote.
Here are the main things that will affect the labor portion of your quote:
- Installation Pattern: A classic running bond is the most straightforward pattern, making it the most efficient (and thus, cost-effective) to install. On the other hand, an intricate herringbone pattern requires tons of precise angled cuts and a painstaking layout process, which naturally takes more time and expertise.
- Prep Work: Are we starting with a clean slate in a new home, or do we need to tear out an old, failing shower? The demolition and prep work to get the walls ready for new tile is a significant part of the job that adds to the labor hours.
- Project Details: Little details make a big difference. Custom features like built-in shower niches, benches, or tiling around a tricky window all require extra planning, precision cuts, and careful installation. These touches add incredible function, but they also add to the installation cost.
By seeing how both materials and labor shape the final price, you can make smarter decisions that balance your dream design with your budget. Investing in quality materials and a professional installation for your bathroom subway tile is one of the best ways to add real, lasting value and everyday enjoyment to your Southwest Michigan home.
DIY Installation vs Hiring a Professional
One of the biggest crossroads you'll face with a bathroom subway tile project is whether to tackle it yourself or call in the pros. On the surface, the DIY route seems like a no-brainer—who wouldn't want to save a chunk of change on labor? But here's the thing: tiling a bathroom, especially a shower, is so much more than just sticking rectangles to a wall.
It’s a project where a tiny mistake can snowball into a massive, expensive headache down the road. This decision isn't just about the upfront cost; it's about investing in a final result that looks fantastic, works perfectly, and protects your home for years to come. Let's break down both options so you can figure out what’s right for your project and your sanity.
The Realities of a DIY Tile Installation
For the weekend warrior with a good set of skills, tiling can be an incredibly satisfying job. There's a genuine sense of accomplishment when you step back and admire your own handiwork. That said, you have to go in with your eyes wide open, especially in a bathroom where water is always trying to find a way in.
The real success of any tile job is hidden in the prep work—the stuff you never see.
- Nailing the Layout: That first row of tile has to be perfectly, absolutely, non-negotiably level. Even a slight error will get amplified with every row you add, leaving you with crooked grout lines that will haunt you forever.
- Making Tricky Cuts: Bathrooms are an obstacle course of pipes, outlets, windows, and shower niches. Getting those clean, precise cuts without chipping the tile takes skill, patience, and the right equipment.
- The Waterproofing Mandate: This is it. The single most important step. Proper waterproofing behind shower and tub tiles is the only line of defense protecting your home’s framing from moisture, mold, and rot. One tiny gap in that system can lead to catastrophic damage you won't even see until it's a five-figure problem.
A professional-looking tile job is one thing, but a professionally waterproofed shower is everything. This step is where the real risk lies for an inexperienced installer, turning a potential cost-saving project into a costly future repair.
The Value of Hiring a Professional
When you bring in an experienced tile contractor, you’re buying more than just their time. You're paying for expertise, efficiency, and a guarantee that the job will be done right the first time. It’s an investment that saves you from the stress of potential screw-ups and gives you back your weekends.
A seasoned pro brings a level of precision that’s hard to match. They can lay a complex herringbone pattern without breaking a sweat, make sure every cut around your shower valve is flawless, and deliver perfectly consistent grout lines.
Most importantly, they live and breathe industry-best waterproofing methods. They know the right materials and techniques to use, giving you total peace of mind that your beautiful new bathroom is built to last and won't spring a leak.
At the end of the day, the choice comes down to a gut check: balancing your budget against your skill level, your free time, and your tolerance for risk. A simple kitchen backsplash might be the perfect weekend DIY project. But for a full bathroom subway tile installation, with all its complexities and critical waterproofing needs, hiring a professional is almost always the smartest long-term play.
Your Top Subway Tile Questions, Answered
Even after you think you've figured it all out, a few nagging questions can pop up right before you pull the trigger on a big decision. We get it. Here are some straightforward, honest answers to the questions we hear most often from homeowners right here in Southwest Michigan about bathroom subway tile. We want you to feel completely confident in your choice.
You've got your tile, you know the pattern, and the grout color is calling your name. Let's clear up those last few details.
Can You Use Subway Tile on a Shower Floor?
This is a great question. While you wouldn't use the standard 3×6 inch tiles on a shower floor—they're just too big and slick—the smaller, mosaic versions of subway tile are an excellent, safe choice. These little tiles usually come on a mesh sheet, which makes installation a breeze.
The magic is in the grout lines. Lots of small tiles mean lots of grout lines, and those lines act just like the tread on a tire, giving your feet the grip they need when things get wet and soapy. You can almost always find mosaics that perfectly match the color and material of your larger wall tiles, giving you that seamless, professionally designed look. For a shower floor, we always steer clients toward porcelain mosaics; they’re incredibly tough and don’t absorb much water.
What's the Best Way to Keep Subway Tile and Grout Clean?
One of the biggest perks of choosing glazed ceramic or porcelain subway tile is how easy it is to maintain. For the tile surface itself, a simple pH-neutral cleaner and a soft cloth will do the trick. No harsh chemicals needed.
But the real secret to keeping your new tile looking amazing for years? It's all in the grout care.
- Seal Your Grout: This is non-negotiable. We always recommend sealing the grout lines right after they've cured and then re-sealing them every year or so. Think of grout sealer as an invisible raincoat that keeps moisture, soap scum, and mildew from soaking in.
- Grab a Squeegee: The best habit you can possibly get into is to squeegee your shower walls after you're done. This simple 30-second step is a game-changer for preventing hard water spots and soap scum from ever getting a foothold.
Honestly, taking a few minutes once a year to reseal your grout is the single most effective thing you can do to prevent stains and keep your tile looking brand new. It’s a small bit of effort for a huge payoff.
Are Subway Tiles Just a Fad That's Going Out of Style?
Not a chance. Think of subway tile like you'd think of classic hardwood floors or a simple white t-shirt—it's timeless. It doesn't really go "out of style," but it definitely evolves. What we're seeing today isn't subway tile fading away, but rather a creative explosion of how it's being used.
People are moving beyond the classic look and trying out larger formats, stacking them vertically for a modern feel, and using a whole new range of colors, from beautiful earthy greens to bold navy blues. Its lasting power comes from its incredible versatility. It can look traditional, modern, industrial, or even rustic, all depending on the size, color, pattern, and grout you pair it with. That’s why it will always feel fresh.
Can I Just Install New Tile Over My Old Tile?
Technically, you can in some situations, but for a bathroom, it's a shortcut we would never, ever recommend. Tiling over old tile is like building a gorgeous new house on a shaky, unknown foundation.
You have no idea what's going on underneath that old tile. There could be hidden water damage, a wall that isn't stable, or other problems just waiting to surface. To build a durable, properly waterproofed bathroom that’s meant to last a lifetime, the only right way to do it is to take everything down to the studs and start with a fresh, properly prepared surface. That’s the only way to guarantee your beautiful new bathroom subway tile has the solid, secure base it deserves.
Ready to turn your bathroom vision into a stunning reality? The team at Trademaster Construction is here to guide you every step of the way, from design to flawless installation. Explore our work and start your journey at https://www.trademasterkz.com.

