
You're probably looking at a bathroom that feels tighter than it should. The floor is crowded, the vanity looks bulky, and every inspiration photo that catches your eye seems to have one thing in common: a clean-lined cabinet floating off the wall.
That look can work beautifully in a Southwest Michigan home. It can make a small bath feel more open, simplify cleaning, and pair well with modern tile and curbless shower designs. But a floating vanity installation isn't just about hanging a cabinet where the old one used to sit. It's a wall support project, a layout project, and sometimes a plumbing project all at once.
A lot of homeowners assume the hard part is picking the vanity. It usually isn't. The hard part is making sure the wall behind it can carry the load safely for years, especially in older homes, remodeled basements, and bathrooms being updated for age-in-place use.
Why a Floating Vanity Is More Than Just a Cabinet
A floating vanity looks light. The installation is not.
The part you see is a cabinet, countertop, sink, and faucet. The part that decides whether the project succeeds is hidden inside the wall. If that support is weak, the vanity can shift, pull forward, crack tile, stress plumbing connections, and turn a clean remodel into a repair job.
According to Houzz's 2025 U.S. Bathroom Trends Study, floating vanities made up 11% of bathroom remodeling installations in 2024 to 2025, while built-in vanities accounted for 58% and freestanding units 30%, as summarized in this industry breakdown of floating vanity adoption and installation complexity. That gap makes sense on the jobsite. Homeowners love the style, but many don't see the structural work until the wall is opened.
What the photos don't show
On a showroom floor, every floating vanity looks simple. On a real remodel, the wall might have off-center studs, tile already installed, drain lines in the wrong place, or framing that doesn't match what a standard instruction sheet assumes.
Older homes around Kalamazoo and Portage can be especially unpredictable. One wall opens up and you find standard wood studs. The next one has odd spacing, previous patchwork, or framing changes from an earlier remodel. In finished basements, masonry or metal framing changes the plan again.
Practical rule: The visible cabinet is the finish product. The real installation starts with the wall structure behind it.
Why beginners get into trouble
The most common mistake is treating a floating vanity like a heavy shelf. It isn't. People see factory brackets and assume those brackets can solve a weak wall on their own. They can't.
A safe install depends on a direct structural connection. As wall load guidance for floating vanities explains, drywall alone is not a structural load-bearing material. The cabinet has to be fixed to wall studs, concrete, brick, or another reinforced wall structure.
That's why this project rewards careful planning and punishes shortcuts. When it's done right, a floating vanity feels solid, level, and intentional. When it's rushed, the problems start where you can't see them.
Planning Your Installation and Measuring Everything
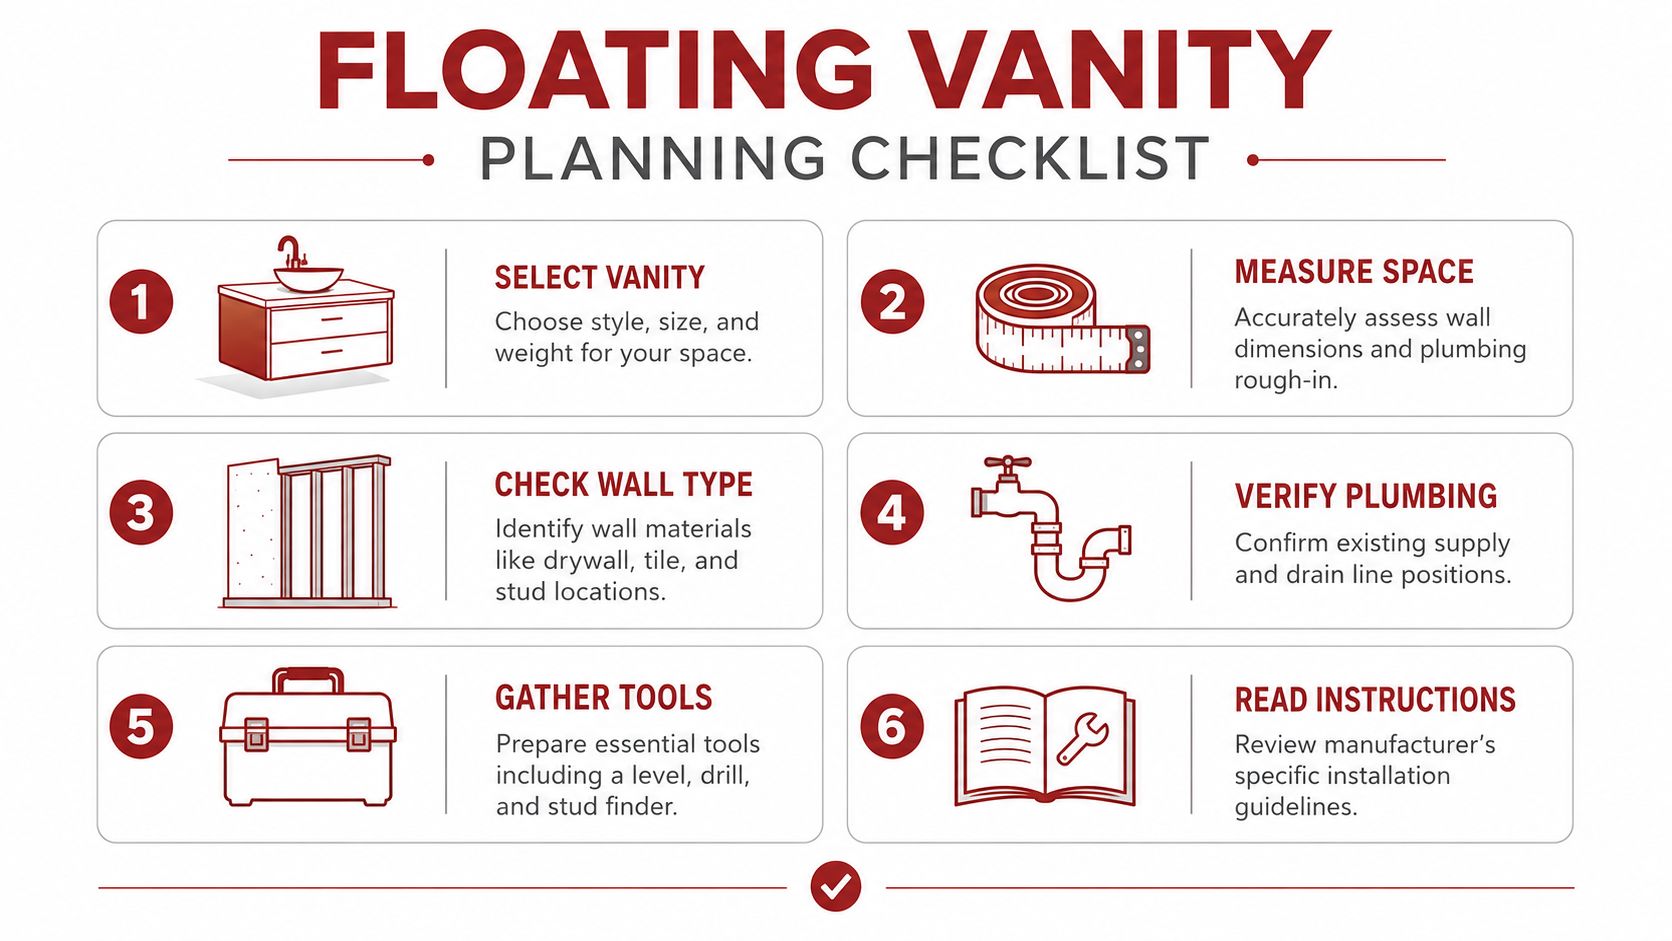
The planning stage decides whether the install feels straightforward or turns into a chain of mid-project fixes. Before any bracket goes on the wall, get clear on three things: where the vanity will sit, how high it should be, and what's happening behind and inside that wall.
This checklist graphic sums up the blueprint phase well:
Start with the finished height
Don't measure to the cabinet box first. Measure to the finished countertop height, then work backward from there.
Most floating vanities are installed with the countertop top surface between 30 and 36 inches above the floor, while ADA guidance requires the countertop to be no higher than 34 inches with at least 27 inches of vertical clearance beneath the sink for legroom, as outlined in this height guide for floating vanities and ADA clearance.
That matters more than people think. Countertop thickness changes the final result. So does sink style. If you're using a thicker top or a sink with deeper internal components, the cabinet mounting line has to shift accordingly.
A simple way to avoid mistakes is to write down:
- Finished countertop height: The number you want to live with every day
- Counter thickness: Subtract this from the target finished height
- Cabinet height: Confirm the box won't interfere with drain or supply locations
- Open space below: Important for cleaning, visual balance, and accessible use
Plan for age-in-place use early
A common oversight in many DIY guides involves accessibility. If the bathroom may need to support wheelchair access, walker clearance, or easier approach from a seated position, height and plumbing decisions change.
A standard vanity layout may place the cabinet too low, too deep, or too closed off underneath. In an age-in-place design, you may need open knee space, a shallower cabinet, relocated shutoffs, and a drain arrangement that won't interfere with legroom.
A few planning checks help:
- Approach space: Can someone comfortably roll or step up to the sink without hitting cabinet corners?
- Under-vanity clearance: Is there enough open room below for seated use if needed?
- Faucet reach: A faucet that looks great from across the room may be awkward to reach from a chair
- Future flexibility: Even if you don't need full accessibility today, roughing the wall with that possibility in mind can save a major redo later
A floating vanity can support a cleaner age-in-place bathroom. It only works if the plumbing and mounting height are planned around the user, not just the cabinet.
Verify the wall and rough-ins
Once the height is set, confirm what the wall is made of and where the framing sits. A stud finder helps, but don't trust a single pass. Scan multiple times, mark both edges of each stud, and verify centerlines.
If you want a better read before opening the wall, a pro-grade stud finder for contractors can help identify framing more accurately than bargain tools that give inconsistent signals through tile or layered drywall.
Use this pre-install checklist before you commit to the vanity location:
- Measure the wall width so the cabinet doesn't crowd doors, trim, or adjacent fixtures.
- Mark drain and supply positions and compare them to the vanity's interior layout.
- Check drawer clearance if the vanity uses full-width drawers or rear cutouts.
- Note electrical conflicts such as outlets, switches, or heated floor controls.
- Confirm floor level because a sloped floor can make your visual layout look wrong even when the vanity itself is level.
Think about what the eye will notice
A floating vanity makes spacing more visible. The open area below the cabinet draws attention to level lines, drain placement, wall tile symmetry, and how centered the sink is within the room.
That means small layout errors stand out more than they do with a floor-mounted cabinet. If the vanity is off-center to the mirror, too close to the toilet, or mounted at a height that looks awkward against tile lines, the room won't feel finished even if the cabinet is secure.
The Unseen Hero Structural Wall Reinforcement
If there's one part of floating vanity installation that decides whether the job lasts, this is it.
Drywall anchors are not the answer. They may be acceptable for lightweight accessories. They are not a substitute for structural backing behind a vanity carrying a cabinet, sink, countertop, stored items, and the daily force of people leaning on it.
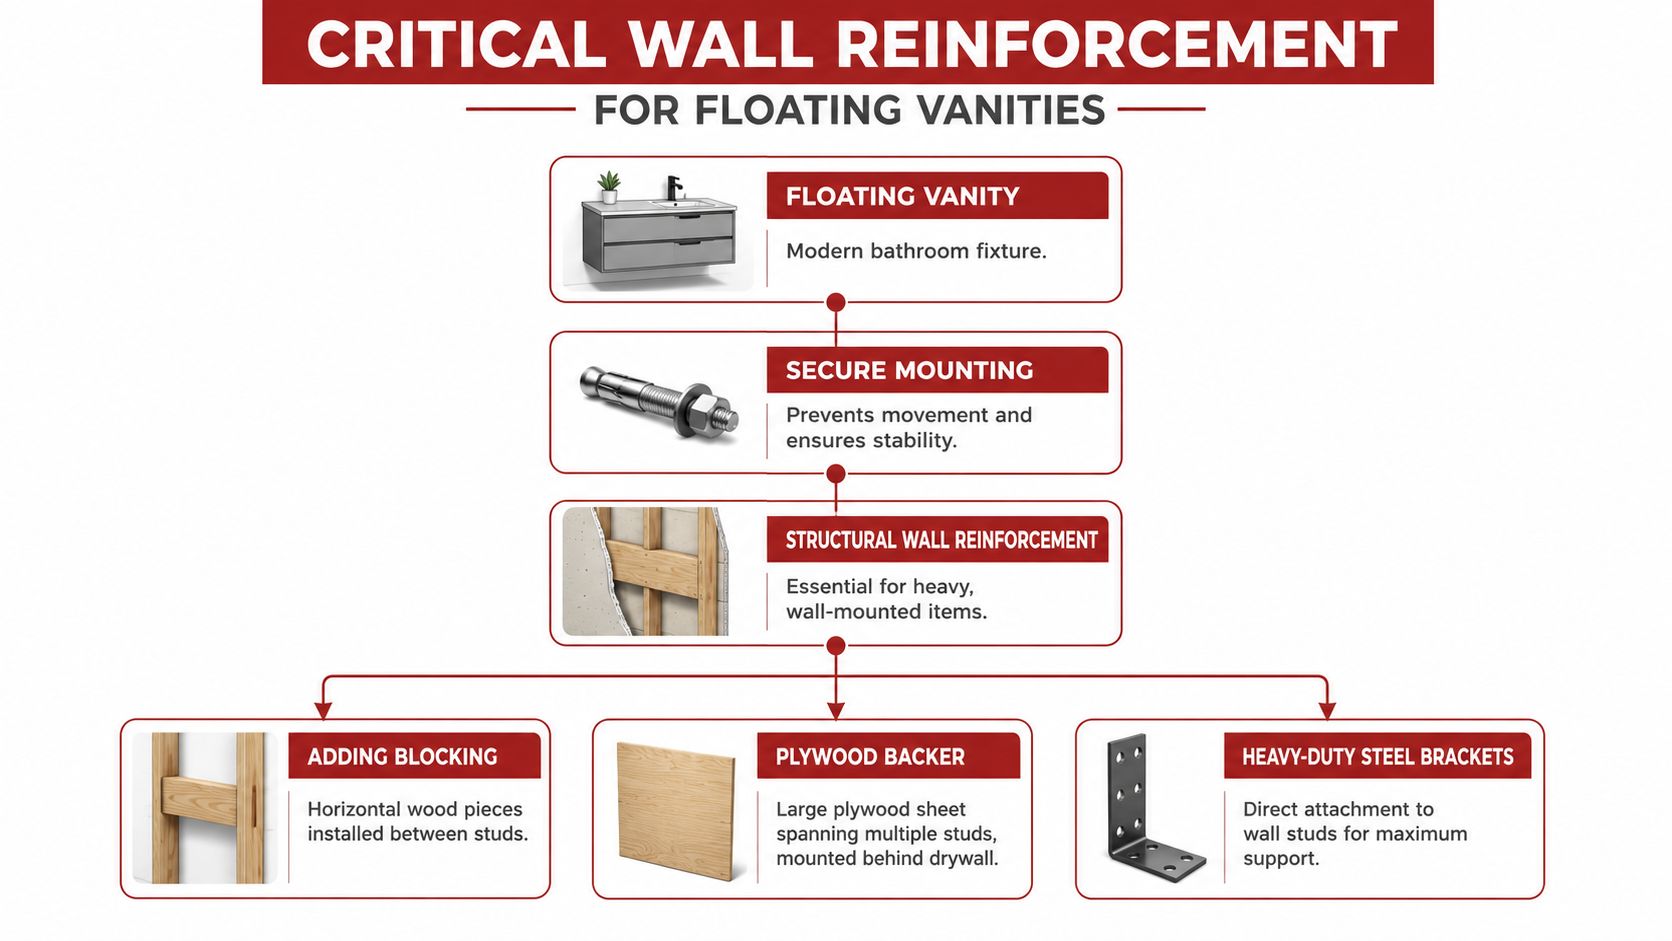
This reinforcement overview shows the hierarchy clearly:
Wood stud walls and the gold standard
In a typical framed bathroom wall, the best support comes from horizontal 2×6 blocking installed between studs at the exact mounting zone for the vanity hardware. According to this floating vanity support guide with blocking details, heavy vanities should be supported by horizontal 2×6 lumber blocking between wall studs, secured with construction adhesive and two 3-inch deck screws at each end where the board meets the studs.
That setup creates a broad, solid fastening area instead of forcing all your mounting points to depend on whether the factory bracket holes happen to line up with existing studs.
Here's what works in practice:
- Open the wall wide enough: Don't cut a tiny inspection hole and try to work blind.
- Set blocking at the true hardware height: Use the vanity specs, not a guess based on cabinet height alone.
- Install blocking flush and tight: If the face sits proud or recessed, the finished wall gets harder to patch cleanly.
- Think about the full bracket span: Reinforcement should support the cabinet where the fasteners land
Plywood backers and steel bracket systems
Some vanities use rail systems or wide mounting brackets. In those cases, a plywood backer spanning multiple studs can be useful in addition to blocking. The backer creates a continuous fastening surface and can help when mounting points don't line up neatly.
Heavy-duty steel brackets also have their place, especially on larger wall-hung units. But the bracket is only as good as what it's fastened into. Strong metal hardware attached to weak substrate still fails.
A good question to ask is simple: if someone leans their forearms on the front edge every day, where is that force going? If the answer is “into framing,” you're on the right track. If the answer is “mostly into drywall and hope,” stop and reinforce the wall properly.
Open-wall reinforcement doesn't add glamour to the remodel. It adds the part that keeps the vanity on the wall.
Metal studs, masonry, and other non-standard walls
This is the part many guides skip, and it matters in Southwest Michigan homes.
A basement bathroom may back up to masonry. A remodeled partition may use metal studs. An older home may have framing that doesn't match standard assumptions. Those conditions change the fastening strategy.
For non-wood-framed walls in older Michigan housing stock, one cited analysis notes 34% of older Michigan homes have non-standard wall framing, often requiring French cleats or metal toggle systems rather than simple wood screw fastening, as discussed in this wall-framing adaptation reference for floating vanity installs. That's exactly why “just hit the studs” can be incomplete advice.
What works depends on the wall type:
| Wall type | Best approach | Common mistake |
|---|---|---|
| Wood studs | 2×6 blocking or direct stud mounting where alignment works | Trusting drywall anchors |
| Metal studs | Reinforced backing, appropriate bracket system, and hardware chosen for metal framing | Driving wood screws into thin-gauge metal and calling it good |
| Masonry or concrete | Direct masonry anchoring with hardware suited to the wall condition | Assuming drywall-layer techniques apply over a solid wall |
| Tile over mixed substrate | Verify what's behind the tile before drilling | Treating the tile surface as if it tells you the structure |
Metal stud walls often need a more engineered approach because the stud itself may not resist pull-out the same way solid wood does. Masonry walls can be excellent for support, but only if you anchor into sound material and account for finish layers.
Reinforcement mistakes that cause callbacks
A few failures show up again and again:
- Blocking set too low or too high: The cabinet ends up hanging from less support than planned
- Fasteners driven without pre-drilling where needed: Wood splits, hardware wanders, or the mounting line shifts
- Drywall patched before a dry fit: You close the wall and then learn the bracket pattern doesn't land where expected
- Ignoring plumbing depth: Reinforcement gets installed right where the drain or supplies need to run
The wall has to support the vanity and leave room for the mechanicals. Both matter. Strong backing with no room for clean plumbing isn't a finished solution.
Mounting the Vanity Securely and Perfectly Level
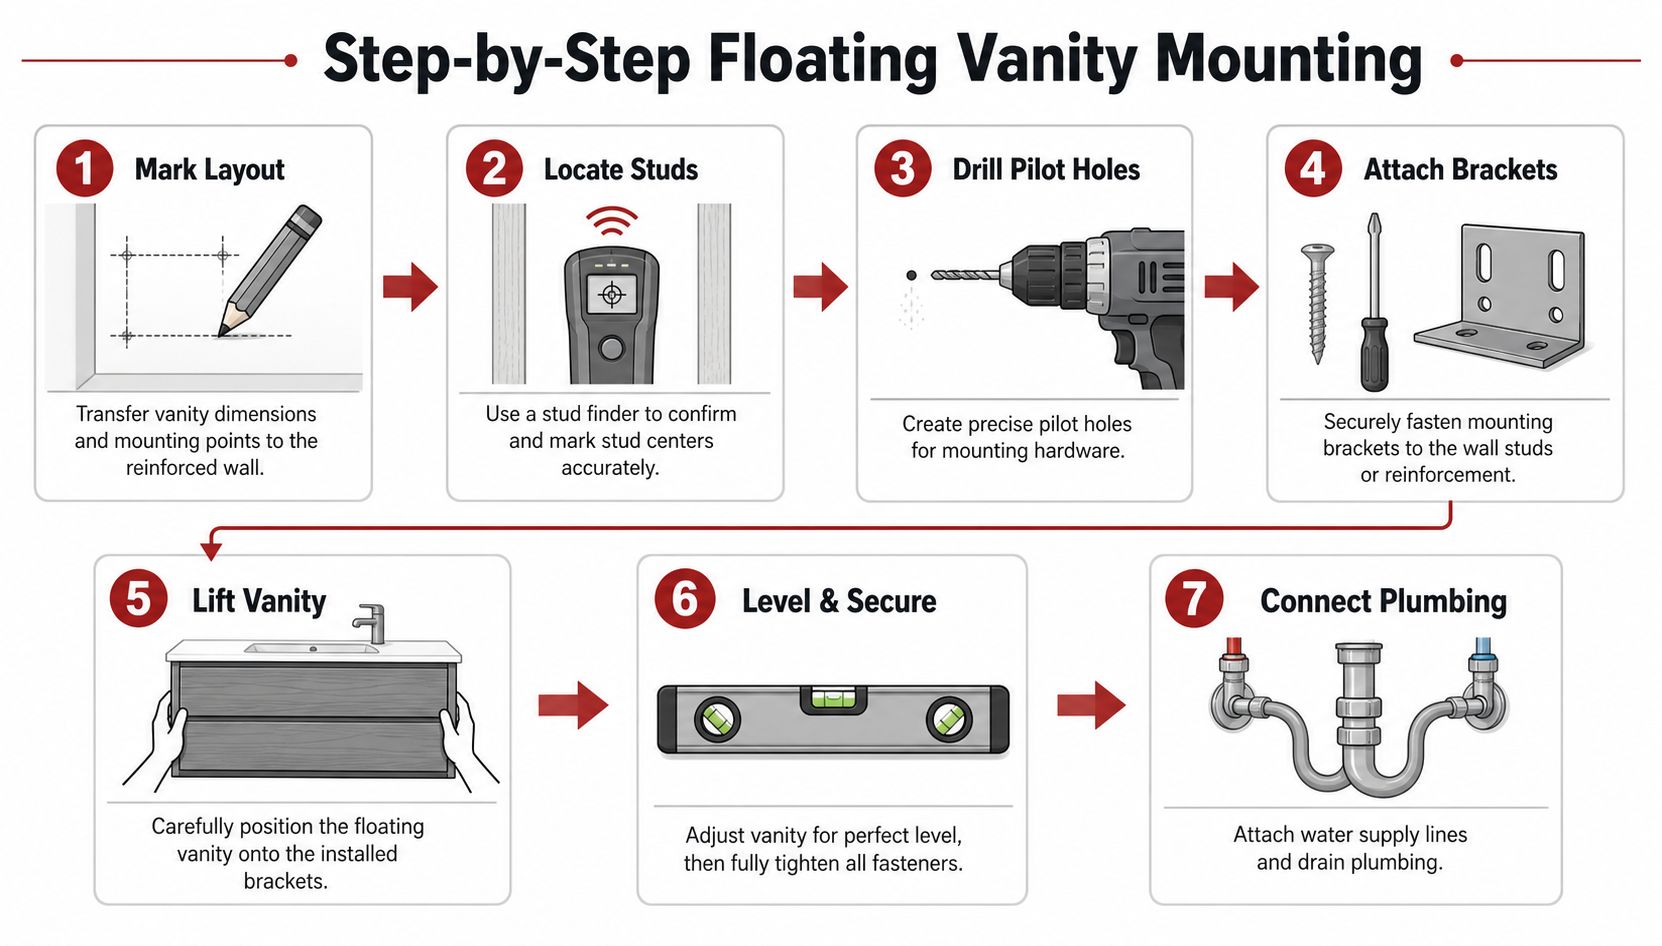
Once the wall is reinforced and patched, the job becomes a precision exercise. A careful floating vanity installation then starts to feel real. The cabinet goes up, but the goal isn't just to hang it. The goal is to hang it level, tight, and stable with no twist in the box.
This mounting sequence is the part most homeowners picture first:
Mark the wall from a true reference line
Start with a level line at the correct mounting height. If you've already calculated the finished top height, transfer that down to the bracket or cabinet support line based on the vanity manufacturer's specs.
Use a long level, not a short torpedo level, for the main line. Mark centerline, side edges, and hardware locations clearly. If the vanity has a sink centered on a mirror or light fixture, verify that alignment before drilling.
One thing that helps is to mark both the ideal layout and the confirmed structural layout. That way you can see whether your vanity position and your reinforcement points are working together.
Pre-drill and fasten with control
Pilot holes matter. They help prevent splitting in wood backing and keep fasteners from wandering off the mark. They also make it easier to seat heavy hardware cleanly and without crushing the wall surface.
According to Signature Hardware's installation guidance for floating vanities, expert methodology calls for anchoring directly into wall studs using deck screws or mounting brackets, and anchoring only to drywall leads to immediate structural failure in 90% of DIY attempts. That same guidance says that when studs aren't available, heavy-duty metal wall anchors such as toggle bolts rated for 100+ lbs should be used, with pilot holes pre-drilled to avoid wall crushing.
That doesn't mean every non-stud condition is a green light for toggles. It means hardware choice has to match the wall condition and load path. If you've already reinforced correctly, your main fasteners should land where they're supposed to.
Keep checking level as you tighten
Don't crank one side fully tight and then move to the other. That's how boxes twist.
A better sequence looks like this:
- Set the bracket or rail loosely first so you still have room for small corrections.
- Check level left to right before final tightening.
- Check front to back if the vanity design allows for adjustment.
- Tighten gradually and alternate sides to keep the load even.
- Dry-fit drawers or doors before calling the mounting finished.
If you're fastening into wood framing or blocking, this guide to building and mounting a floating vanity frame recommends drilling pilot holes first and ensuring the bracket or frame is perfectly level at the back, front, and side-to-side before final tightening. That advice holds up in real installs. A cabinet can look level from one angle and still be subtly twisted.
If the vanity isn't level when empty, it won't improve once the top, sink, and plumbing are added.
Use enough hands for the lift
Even a modest vanity gets awkward once you're trying to align it with brackets and keep finished faces from getting damaged. Remove drawers if possible. Protect tile and flooring. Lift the box with control, not speed.
After the vanity is on the wall, check for movement before adding the top. Push down lightly at the front edge and watch for deflection. A properly mounted cabinet should feel planted, not springy.
Connecting Plumbing and Final Finishing Touches
A floating vanity can be structurally perfect and still look unfinished if the plumbing is sloppy. This stage is where the project starts looking custom instead of pieced together.
The cleanest result usually comes from plumbing routed into the wall so the trap, supplies, and shutoffs stay concealed inside the cabinet area. If the old setup comes through the floor or lands in the wrong place for the new drawer layout, expect some rework.
Make the plumbing fit the vanity, not the other way around
Before reconnecting anything, check the interior of the vanity box. Some models leave generous open space below the sink. Others use shallow drawers, cutouts, or narrow plumbing channels that limit where the drain and supplies can go.
Focus on three things first:
- Drain alignment: The trap should connect without forcing the pipe sideways
- Supply placement: Shutoffs need to stay accessible after drawers and shelves are back in
- Drawer travel: A vanity that looks perfect from the front can still fail if the back of a drawer hits the plumbing
If the pipes need to move, that's often the right time to call a plumber. Clean routing matters more on a floating vanity because the open lower space draws your eye straight to any exposed or awkward mechanical work.
For homeowners trying to understand the broader sequence of bathroom fixture rough-in and final connection, this overview of bathroom installation in Eastbourne is a useful outside reference because it shows how fixture placement and plumbing coordination affect the finished result.
Set the top, sink, and seal joints cleanly
Once the cabinet is secure and the plumbing positions are confirmed, install the countertop and sink according to the manufacturer's method. A dry fit first is worth the time, especially if the wall tile has slight variation.
A neat finish depends on restraint. Too much silicone makes a mess. Too little leaves gaps where water can work behind the top or backsplash.
Use this order:
- Dry-fit the top and confirm wall contact and overhang.
- Apply silicone where the top is meant to seat.
- Set the top carefully without sliding it around more than needed.
- Seal wall joints and sink edges with a smooth, consistent bead.
- Wipe excess immediately so cured silicone doesn't become the visible finish.
Reinstall fronts and tune the details
This is the point where the vanity either feels crisp or slightly off.
Adjust doors so reveals are even. Tune drawer glides so they close smoothly. Confirm the faucet is square to the sink and the drain trim is seated properly. Run water and inspect every connection with the cabinet empty so any leak is easy to spot.
A short finishing checklist helps:
- Check for leaks: Supply lines, trap joints, and faucet connections
- Inspect movement: Push gently on the vanity front and confirm it stays rigid
- Test drawers fully loaded with normal use items: Not heavy bulk storage, just everyday bath items
- Look from multiple angles: Tile lines, mirror center, faucet alignment, and underside appearance
A floating vanity succeeds when it feels deliberate from every viewpoint. The hardware may be hidden, but the quality of the installation never is.
Budgeting Troubleshooting and When to Hire a Pro
A floating vanity budget gets off track when the cabinet price becomes the whole story. In real remodels, the bigger cost drivers are often behind the wall. Extra blocking, metal stud reinforcement, plumbing relocation, tile patching, outlet moves, and finish repair can change the price faster than the vanity selection itself.
According to Heat & Plumb's breakdown of floating vanity costs and labor, professional labor typically runs $200 to $1,000, with total project costs ranging from $400 to $2,200. That same analysis notes floor-standing equivalents often install for $100 to $200, and floating vanity labor reflects a 200% increase because of the wall mounting and reinforcement involved.
In Southwest Michigan, I also budget differently when the home has older framing, plaster, patched tile walls, or a bathroom being updated for long-term accessibility. A vanity set for ADA-style knee clearance or easier transfer access often affects rough plumbing height, drain placement, wall backing, and finished height. Those are good changes, but they need to be planned early.
This screenshot gives you a quick way to start budgeting for a remodel with those variables in mind:

If you are comparing layouts, plumbing changes, or accessibility upgrades, price the room as a system. Vanity height, wall support, clear floor space, and drain location all affect one another.
Common issues after installation
The trouble calls are usually predictable.
A vanity that looks level but feels slightly soft under load often points to missed reinforcement, fasteners that only caught finish material, or a wall surface that was never corrected before mounting. That is not just an annoyance. Movement stresses caulk joints, loosens plumbing connections, and can crack tile over time.
Other common problems include:
- Slightly out of level: Often caused by uneven wall surfaces, twisted framing, or over-tightening one side before the cabinet is fully supported
- Drawer interference: Common when the trap arm, shutoff valves, or supply lines were not planned around the drawer box
- Slow drain: Usually a trap or branch alignment issue, especially after shifting the sink location for a centered vanity or age-in-place clearance
- Visible gap at the wall: Bowed walls, proud tile, or an out-of-square corner can leave a gap that caulk alone should not be asked to hide
Small errors show up every day in use.
When hiring a pro makes sense
A skilled DIYer can handle some installations, especially on a standard wood stud wall with easy plumbing access. The risk goes up fast when the wall type is uncertain or the vanity will carry more weight than a basic single-sink unit.
Bring in a pro if any of these apply:
- The wall could be metal stud, masonry, or a mixed assembly
- You need to add blocking or reinforcement and are not sure what the framing will support
- Supply lines, drain height, or vent connections need to move
- The bathroom has finished tile, stone, or wall finishes that are expensive to repair
- The project includes ADA-compliant goals or age-in-place planning
- The vanity is wide, heavy, or topped with stone
- You want the wall opened, reinforced, patched, and repainted without handling multiple trades yourself
A good floating vanity should feel solid when someone leans on it, opens loaded drawers, or uses it daily for years. That result comes from planning and structure, not just careful mounting.
If you're planning a floating vanity installation in Portage, Kalamazoo, or nearby Southwest Michigan communities, Trademaster Construction can help you think through the structural, plumbing, and accessibility details before the wall gets opened. If you want to start with budget numbers first, try the instant pricing tool and get a clearer sense of what your bathroom remodel may involve.

