
Finding the Right Fit for Your Project
Picking a construction company for your house really comes down to deciding between a large production builder and a local custom remodeler. It depends entirely on your project goals and what's typical in your neighborhood. Here in Southwest Michigan, plenty of homeowners discover that local remodelers deliver better craftsmanship and far more consistent communication than the big national brands.
Local markets tend to lean toward small, specialized remodelers rather than volume builders. Why? Because reputation and finish quality are what drive referrals in a community.
Large Production Builders
- Usually manage entire subdivisions and stick to predictable timelines.
- Often require a minimum project size exceeding $100,000, which limits your design flexibility.
- Communication typically runs through sales teams, slowing down any custom decisions.
Local Custom Remodelers
- Focus on specific upgrades like kitchens, bathrooms, and basements.
- Comfortably handle projects ranging from $10,000 to $200,000 and adapt designs quickly.
- Owner-led crews mean you get direct communication and visible accountability.
Choosing the right contractor has less to do with the brand name and more to do with matching their specific strengths to your project.
Production Builders vs Custom Remodelers
Here is a side-by-side look at how they stack up:
| Feature | Large Production Builder | Local Custom Remodeler |
|---|---|---|
| Minimum Project Size | $100,000+ | $10,000+ |
| Design Flexibility | Low | High |
| Timeline Predictability | High for standard plans | Variable for custom work |
| Communication Style | Sales-driven | Owner/foreman-driven |
| Best For | New subdivisions, spec homes | Kitchen, bath, basement remodels |
As you can see, the scale of your project usually points you in the right direction.
A Real-World Scenario
Imagine you want a spa-like bathroom with an accessible curbless shower. A production builder might offer a handful of preset finishes and long lead times. On the other hand, a local remodeler could map out a 6–8 week window, source the right accessible fixtures, and bring in a licensed plumber who already knows the local codes. Because the remodeler operates on a smaller scale, making choices and adjustments during the build is much faster.
Practical Tips for Vetting
- Ask to see recent projects right in your town so you can evaluate the exterior and finish quality firsthand.
- Request contactable references from jobs finished within the last 12 months.
- Always verify local insurance and registration before you even sit down for a meeting.
To better understand the range of professionals involved in home projects, check out this guide to best interior companies in SE Michigan.

If you want a quick cost reality check before reaching out to contractors, try the instant pricing tool to get ballpark estimates: Get instant pricing.
Defining Your Project Scope and Budget Realities
Walking into a contractor meeting with vague goals is a fast way to waste everyone's time — including your own. Before you start reaching out, get clear on what you actually want done.
Start by drawing a hard line between cosmetic work and anything structural. Repainting cabinets? That's cosmetic. Moving a load-bearing wall? That's structural, and it changes everything — timelines, inspections, permits, and cost. A simple weekend refresh can suddenly become a multi-week remodel once you start touching the bones of the house.
If age-in-place features matter to your household, flag them early. Curbless showers, wider doorways, and lower countertops don't add much to the design bill, but they pay off enormously down the road. The key is getting accessible plumbing rough-ins sorted before finishes go in — once tile is on the wall, changes get expensive fast.
Sorting Must-Haves From Nice-to-Haves
Sit down and build a short, honest list you can hand to contractors. A one-page table works wonders: core functions, desired finishes, and how flexible you are on each item. This keeps conversations grounded and dramatically cuts down on those costly mid-project pivots that blow budgets.
Here's what that planning phase should cover:
- Define each room and major work item with a one-sentence description
- Label every item as Must or Nice-to-Have, and note why it matters to daily life
- Flag any code-sensitive changes like stair adjustments or structural moves
Why Early Numbers Matter
Getting a rough estimate early saves you from falling in love with a design you can't afford. It's a reality check before emotions take over. For a quick benchmark, our instant pricing tool can give you a realistic number for your project type before you even start calling contractors.
Early cost clarity prevents scope creep and keeps contractor conversations productive.
To set expectations: a mid-range kitchen remodel typically runs between $35,000 and $75,000, while a full bathroom upgrade usually lands somewhere between $12,000 and $30,000 depending on fixtures and layout. Regional differences and finish levels shift these numbers, so treat them as ballpark figures rather than firm quotes.
When you show up to a consultation with a realistic budget in hand, contractors can actually help you make smart trade-offs. Swapping quartz for a durable laminate on non-visible counters, for example, might free up cash for better tile or upgraded plumbing where it counts.
Before detailed drawings begin, document your agreed priorities and rough budget in writing. That alignment turns early meetings into a real plan — and keeps surprises to a minimum once construction starts.
Vetting Licenses, Insurance, and Local References
Doing your homework upfront is the difference between a smooth remodel and an absolute nightmare, especially when you're hiring a construction company for house projects in Portage and Kalamazoo.
First things first, ask for a copy of their contractor's license and actually verify it with the state licensing board. Don't just take their word for it. You'll also want current insurance certificates. Jot down the carrier, policy number, and expiration dates so you can call and confirm the coverage yourself.
General liability takes care of property damage, while workers' comp handles injuries on site. But here is a pro tip: get listed as an additional insured. This shifts some liability protection your way during the build. Make sure you get that status in writing on the certificate—it is a lifesaver if a subcontractor messes something up.
Take a close look at the class codes on the workers' comp policy, too. If you see unrelated business activities or outdated codes, that is a red flag. It usually means there are gaps in their coverage.
Cross-reference their online reviews with their portfolio photos. You are looking for inconsistencies. If their gallery shows pristine siding but the reviews complain about sloppy exterior work, you need to dig deeper.
Ask past clients how often the contractor communicated, how change orders were handled, and whether punch-list items were completed on time.
When you call references, come prepared with specific prompts. Ask about the frequency of updates, how clear the invoices were, and if the subcontractors actually showed up on time. Do not forget to ask if warranties were honored and how those requests were processed.
A little legwork goes a long way. Ask for addresses of recent projects and drive by to check out the exterior workmanship yourself. Consistent detail across multiple jobs is a solid indicator of real craftsmanship.
Evaluating a contractor's credentials thoroughly is non-negotiable. If you want more vetting ideas that apply to general remodelers, check out these questions to ask a roofing contractor.
Quick Verification Checklist
- Confirm the license with the state board and keep a record of the license number.
- Verify general liability and workers' comp directly with the carrier, and request that additional insured endorsement.
- Call three recent clients and ask targeted questions about their communication and how change orders were handled.
A Real-World Scenario
A homeowner I know found a local remodeler with great photos but mixed reviews. Instead of guessing, they confirmed the insurance and drove by two of the addresses listed. The exterior finishes looked consistent, so they moved on to reference calls. Those calls confirmed the contractor communicated timely—giving them the green light to proceed.
Before you dive too deep into vetting, get a reality check on your budget. Grab a ballpark estimate using the Trademaster instant pricing tool to shape your discussions and set realistic expectations: Get instant pricing.
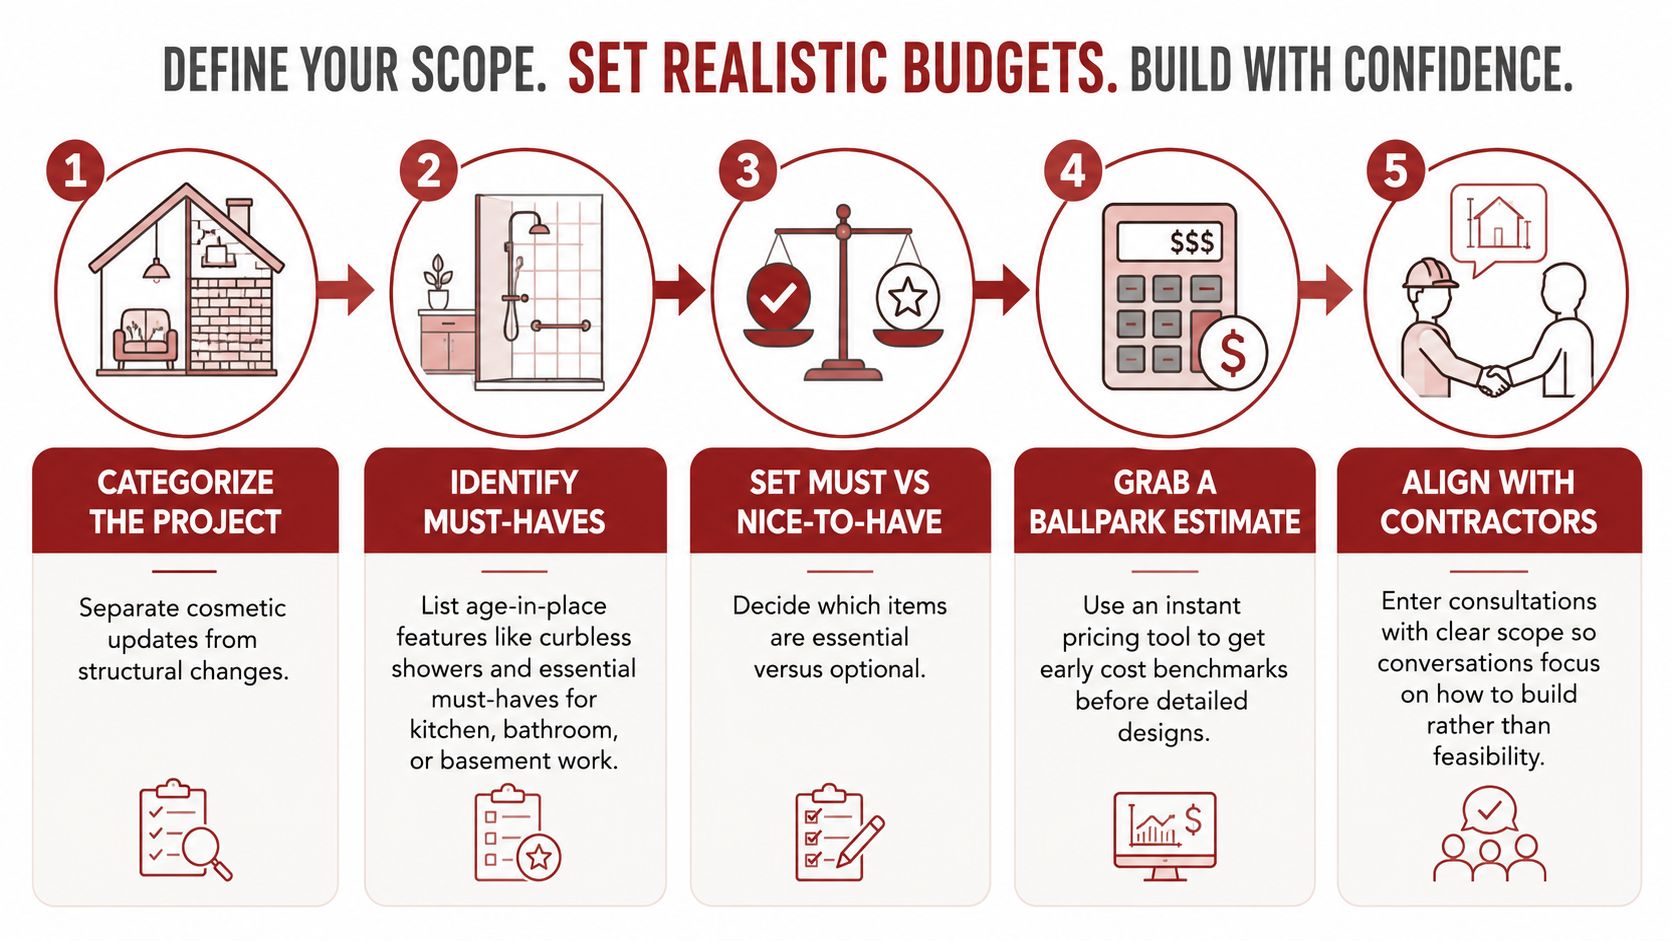
This infographic breaks down a five-step process for defining your scope and budget realities. Walking through it before your contractor meetings means you will start with clear priorities and realistic costs. Basically, sorting out your must-haves and getting a rough estimate early on cuts down on scope creep and gets everyone on the same page.
Evaluating Portfolios and Specialized Craftsmanship

Don't just flip through the highlight reel. Ask for full project sets — the ones that walk you through demolition, rough framing, mechanical work, and the final finishes. That progression tells you whether the crew actually manages the whole job or just shows up for the pretty parts.
You want to see quality at every stage, not just the glossy end result.
Pay attention to the details that affect daily life. Tile alignment, grout width consistency, cabinet reveal gaps, and toe-kick fit — these small cues separate careful work from sloppy shortcuts. Mismatched grout lines in a backsplash, for instance, often point to rushed tile layout, which can lead to leaks or uneven surfaces down the road.
Ask for projects finished in the last twelve months that match your scope. Specifically request:
- Project address or client contact for a drive-by
- Final cost range and any change order examples
- Subcontractors used and whether the same teams return
"Seeing three similar kitchens finished by the same crew is worth more than a dozen staged photos."
Material Sourcing and Subcontractor Consistency
Find out where materials come from and whether the company has preferred suppliers. Reliable sourcing means fewer lead-time surprises and consistent finish quality from batch to batch.
Subcontractor consistency matters more than most people realize. The same trusted tile setter or plumber across multiple jobs reduces variability and speeds up problem-solving when something goes sideways.
| What to Check | Why It Matters | Red Flag |
|---|---|---|
| Consecutive project photos | Shows end-to-end capability | Only staged final shots |
| Recent similar projects | Reflects current skillset | No recent examples |
| Supplier relationships | Predictable timelines | Frequent last-minute substitutions |
Bring targeted questions to your meeting. Ask which projects in the past year had similar tile complexity, and who installs the cabinets and how long they've worked together. The answers will tell you whether you're dealing with genuine specialization or just marketing polish.
When you're trying to gauge the budget impact of higher-skill finishes, grab a quick benchmark with the Trademaster instant pricing tool to see realistic numbers before locking in design choices: Get instant pricing.
Navigating Contracts, Payment Schedules, and Permits
A solid contract is your best defense against miscommunication on a home project. It spells out exactly who is responsible for what, keeping both you and the builder on the same page. Before signing anything, make sure the document clearly outlines the scope of work, materials, start and end dates, and a straightforward change order process. Getting these details in writing upfront eliminates ambiguity and prevents surprise costs down the road.
Fixed Price Versus Cost Plus
With a fixed-price agreement, you get a single total for clearly defined work. This is a lifesaver if you are working within a strict budget. On the other hand, a cost-plus contract covers the actual costs of labor and materials plus a builder's fee. This approach makes more sense when the project scope is still taking shape. For instance, structural remodels often start as cost-plus agreements until the framing is open and inspections reveal the true extent of the work.
Key takeaway: A fixed-price contract locks in your budget, while cost-plus gives you flexibility when unknowns are lurking.
Payment schedules should tie to verifiable milestones, not calendar dates. A standard deposit for an established remodeler usually falls between 10–20%; if a builder asks for more than 30% upfront, consider that a red flag. Your subsequent payments should reflect the value of the completed work. Never pay for finish work before the rough carpentry has passed inspection.
- Request a detailed milestone schedule that includes specific deliverables and acceptance criteria.
- Demand lien releases from all subcontractors and suppliers after every payment.
- Hold back a retainage (typically 5–10%) until the final punch list is completely resolved.
Handling Change Orders
Every change order needs to detail the exact scope of the change, the cost impact, and any adjustments to the schedule. Always insist on a signed approval before the extra work begins. This simple step saves countless disputes. Take moving a load-bearing wall, for example. The change order should explicitly list the engineering fees, permit costs, and the additional labor days required.
Permits And Inspections
Any reputable contractor will pull the necessary permits and coordinate inspections to guarantee code compliance. Verify who handles this in the contract. Never assume the city will waive requirements just because a project is small. Pulling permits protects your property value and shifts liability to the licensed contractor once the work passes inspection.
| Item | What To Require |
|---|---|
| Deposit | 10–20% with insurance proof |
| Milestones | Linked to inspections and photos |
| Final Payment | After punch list and lien releases |
Before you finalize contract terms, it helps to have a realistic ballpark figure in mind. You can use the Trademaster instant pricing tool to get a quick cost sanity check and shape your payment planning.
Recognizing Red Flags and Communication Best Practices

A proposal that's short on detail or an estimate that shifts every time you ask a question should make you pause. If a contractor won't put numbers on paper or dives around specifics about what's included, trust your gut — that evasiveness tends to show up again later, right when costs start climbing.
High-pressure moves like "sign today or the price doubles" are almost always a sign of scheduling gaps or shaky finances. Same goes for contractors who are impossible to reach during bidding but suddenly appear with a "great deal." That pattern doesn't improve once they've got your deposit.
If reviews mention abandoned work or unresolved warranty claims, walk away — those issues rarely fix themselves.
The good ones stand out fast. They send updates before you have to chase them, document everything clearly, and openly explain trade-offs when options come up. A team that flags problems early and brings solutions instead of excuses is one worth keeping.
Communication Practices Worth Setting Up Early
Pick a single point of contact for approvals and change orders. That one decision alone prevents the messy "I thought someone else approved it" conversations that derail timelines and trust.
Agree on how and how often you'll communicate. Quick texts for daily updates, a weekly email summary with photos — something consistent that works for both sides. Unless you're in a quiet permitting phase, expect that weekly cadence to stick.
Set response time expectations upfront. Aim for 24 hours on weekdays for non-emergency items, and make sure you have direct numbers for anything urgent on site. Having those boundaries in writing keeps things from spiraling.
Document decisions and store them in one place so you can reference approvals later.
Practical tools and habits that actually help:
- Keep a running project log with dated notes and photos at each milestone
- Get signed change orders that spell out cost, schedule impact, and who authorized the change
- Tie payments to completed milestones and request lien releases to keep finances aligned with actual progress
Here's a quick comparison of what to watch for and what to look for instead:
| Warning Sign | What To Do | Positive Signal |
|---|---|---|
| No written estimate | Walk away or insist on one | Detailed itemized proposal |
| High deposit >30% | Negotiate or decline | 10–20% deposit standard |
| Different subcontractors every job | Ask about crew consistency | Same trusted crews across projects |
Before you lock anything in, run your numbers through a sanity check. The instant pricing tool gives you a ballpark estimate so you can walk into negotiations with a realistic budget — and confidence.
The bottom line: stay vigilant, keep records simple and clear, and don't let communication gaps slide. That's how a construction company for house projects stays on track from demo all the way through the final walkthrough.
Frequently Asked Questions About Hiring a Construction Company For House Projects
How Long Does a Typical Kitchen Remodel Take From First Consult to Final Walkthrough?
A modest kitchen refresh often finishes in 6–10 weeks once construction starts. But that's just the build phase. When you factor in design, ordering materials, and permitting, plan on 8–14 weeks total. This means you should build buffer time around long-lead items like cabinets.
What About a Bathroom Remodel Timeline?
A standard bathroom usually takes 4–8 weeks of onsite work. Complex accessible showers or structural changes can push that to 10–12 weeks. If permits are required, expect inspections to add a few days between phases.
What Warranty Should I Expect From a Remodeler?
Reasonable coverage includes 1–2 year workmanship guarantees and manufacturer warranties for fixtures. Ask for written warranty terms and warranty claim contact procedures. This prevents confusion if issues appear after the final walkthrough.
How Do I Handle a Mid-Project Change Order Without Derailing Plans?
Require a signed change order that lists cost, who approved it, and schedule impact. Small swaps can be bundled to limit admin delays; big scope shifts should be re-priced separately. Insist work not proceed until approvals are documented.
What If I Spot a Red Flag After Work Starts?
Document the issue with dated photos and notify the point of contact in writing. If response is slow, refer to the contract dispute clause and request a corrective timeline. For safety or code failures, pause work and contact the local building department.
Quick Practical Tips
- Compare three bids with the same scope before choosing a construction company for house work.
- Use the instant pricing tool to validate your budget early: Get instant pricing.
- Keep all approvals and change orders written and dated.
Final takeaway: A clear paper trail and early cost checks keep projects on schedule and protect your budget.
For a fast and accurate way to estimate your project costs before speaking with contractors, try our instant pricing tool. It gives you a realistic budget baseline in just a few clicks. Check it out here: https://www.trademasterkz.com/instant-pricing/

