
You're looking at a bathroom remodel in Portage, Kalamazoo, or a nearby Southwest Michigan community, and the product search has probably already started. A wall-mounted sink looks promising, a low-curb shower seems practical, and a toilet with grab bars appears to solve the safety problem. Then someone places those fixtures on the existing floor plan, and the wheelchair can't approach the sink, the door swing blocks the toilet, or the shower transfer area disappears.
That's the central reality of wheelchair accessible bathroom fixtures. A fixture can meet a specification and still fail the person using it if the surrounding floor space, reach distance, transfer zone, and plumbing layout don't work together. Accessible remodeling is less about buying special products and more about reserving usable space before the finishes and fixtures are chosen.
Why Accessible Bathroom Design Starts with Layout, Not Fixtures
A common Southwest Michigan remodel starts with a well-kept older home and a bathroom that looks large enough on paper. The homeowner chooses an attractive vanity, a standard toilet, and a curbless shower. During installation, the vanity projects farther into the room than expected, the bathroom door swings across the approach path, and the shower entry leaves no comfortable position for a wheelchair or transfer bench.
The problem isn't the appearance of any single fixture. The problem is that the plan treated the bathroom as a collection of objects instead of a movement system. A wheelchair user needs room to approach, turn, position beside the toilet, roll beneath the sink, and enter or transfer into the shower. Those spaces compete with walls, doors, cabinets, radiators, and existing plumbing.
Practical rule: Draw the wheelchair path and transfer zones before selecting tile, cabinets, or fixtures.
The U.S. baseline became more specific with the 2010 ADA Standards for Accessible Design, which became enforceable for newly constructed or altered state and local government facilities on March 15, 2012. Projects starting on or after September 15, 2010 could use either the 1991 Standards or the 2010 Standards during the transition period. The standards formalized fixture-specific requirements for toilets, lavatories, faucets, grab bars, mirrors, and clear floor space, creating a benchmark that influences accessible design well beyond government buildings (2010 ADA Standards for Accessible Design).
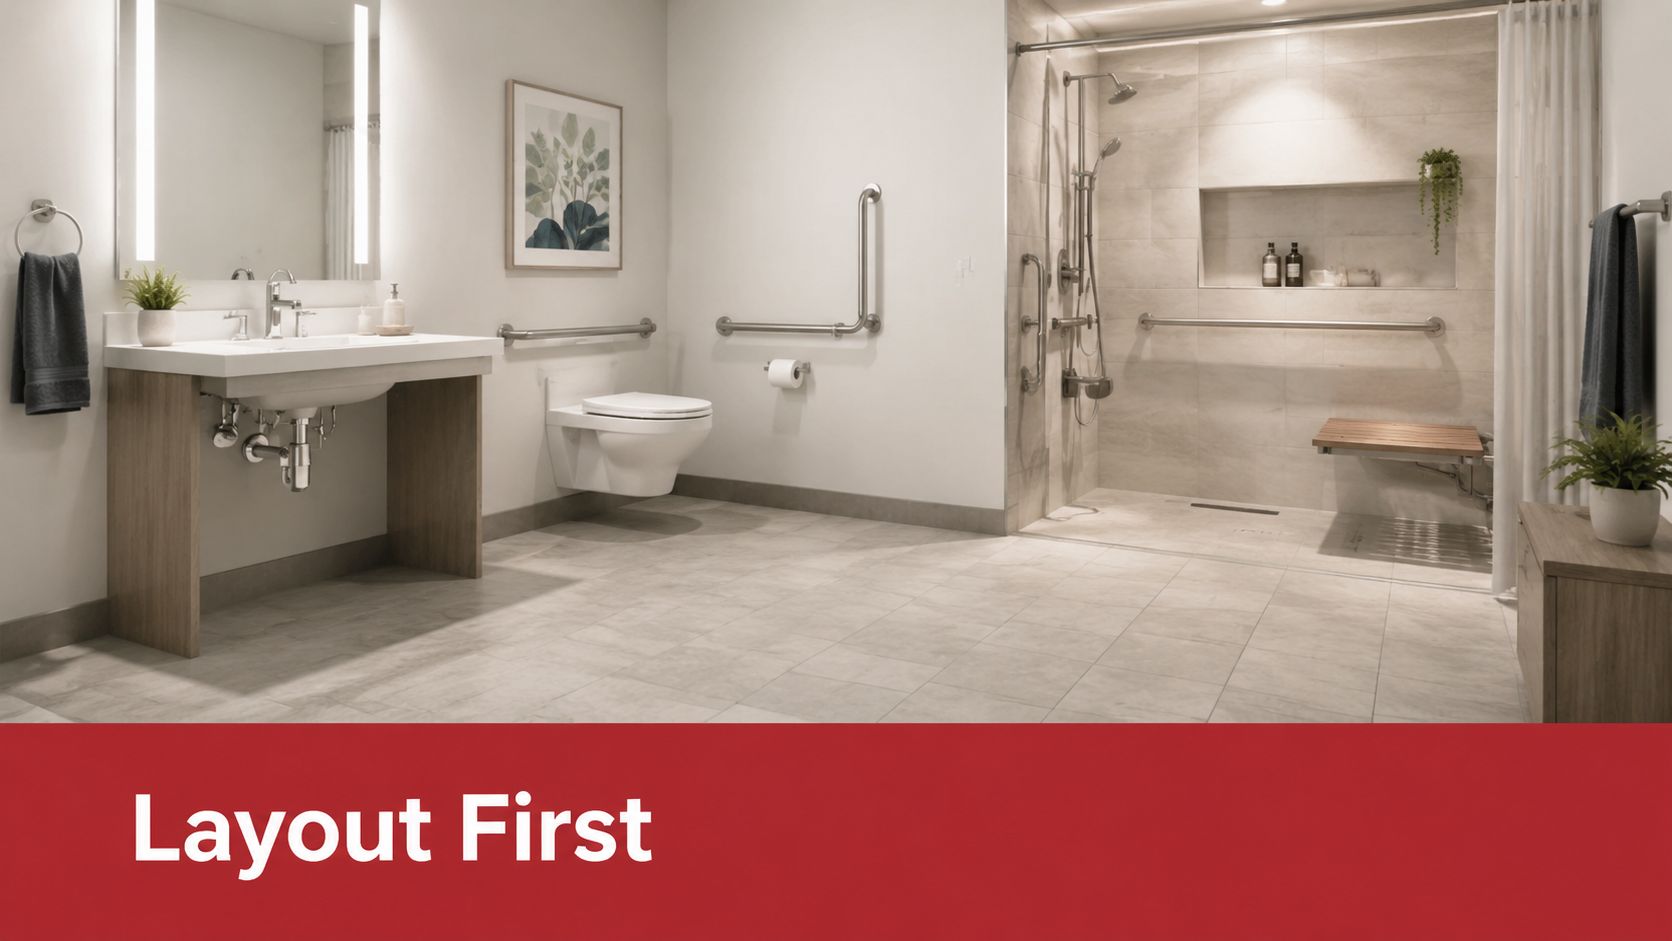
In an existing local home, that can mean moving a partition, changing a door location, rebuilding a shower floor, or replacing a full vanity with a shallower or wall-mounted design. It's also why fall prevention belongs in the same conversation as wheelchair access. A useful homeowner resource is this fall prevention guide from MedAmerica Rehab Center, especially when a bathroom must support both wheelchair movement and someone who still walks with a cane or walker.
Start with a scaled plan, not a showroom visit. Mark the door swing, toilet centerline, sink projection, shower entry, and the clear areas needed to approach each fixture. Once those spaces are protected, fixture selection becomes far more straightforward.
Understanding ADA Clearances and Turning Requirements
A bathroom can pass a fixture checklist and still fail the person using it. In Southwest Michigan remodels, a toilet may meet the required location while the wheelchair cannot pull alongside it, or a sink may be low enough but blocked by a door swing. Layout determines whether the dimensions work together.
A wheelchair-accessible toilet compartment must be at least 60 inches wide. Minimum depth is 56 inches for a wall-hung water closet and 59 inches for a floor-mounted water closet, according to the ADA Access Board requirements for toilet rooms. That extra depth can decide whether an existing room works without moving a wall. A wall-hung toilet saves floor projection but may require reinforcement and relocated plumbing, while a floor-mounted model often fits local homes with less structural work.
The sink needs space below and in front
A compliant sink requires usable knee clearance, not just a lower countertop. The open area beneath the basin needs 27 inches minimum knee height, 30 inches minimum width, and 19 inches minimum depth, with the sink rim no higher than 34 inches above the finished floor (accessible sink and lavatory guidance). Protect the drain and supply lines as carefully as the cabinet opening. Exposed or poorly positioned plumbing can interfere with a user's knees.
The sink also needs 30 by 48 inches of clear floor space for a forward approach. That rectangle can disappear behind a projecting vanity, an open door, or the edge of a toilet. On an actual remodel drawing, show the wheelchair position, not just the sink outline.
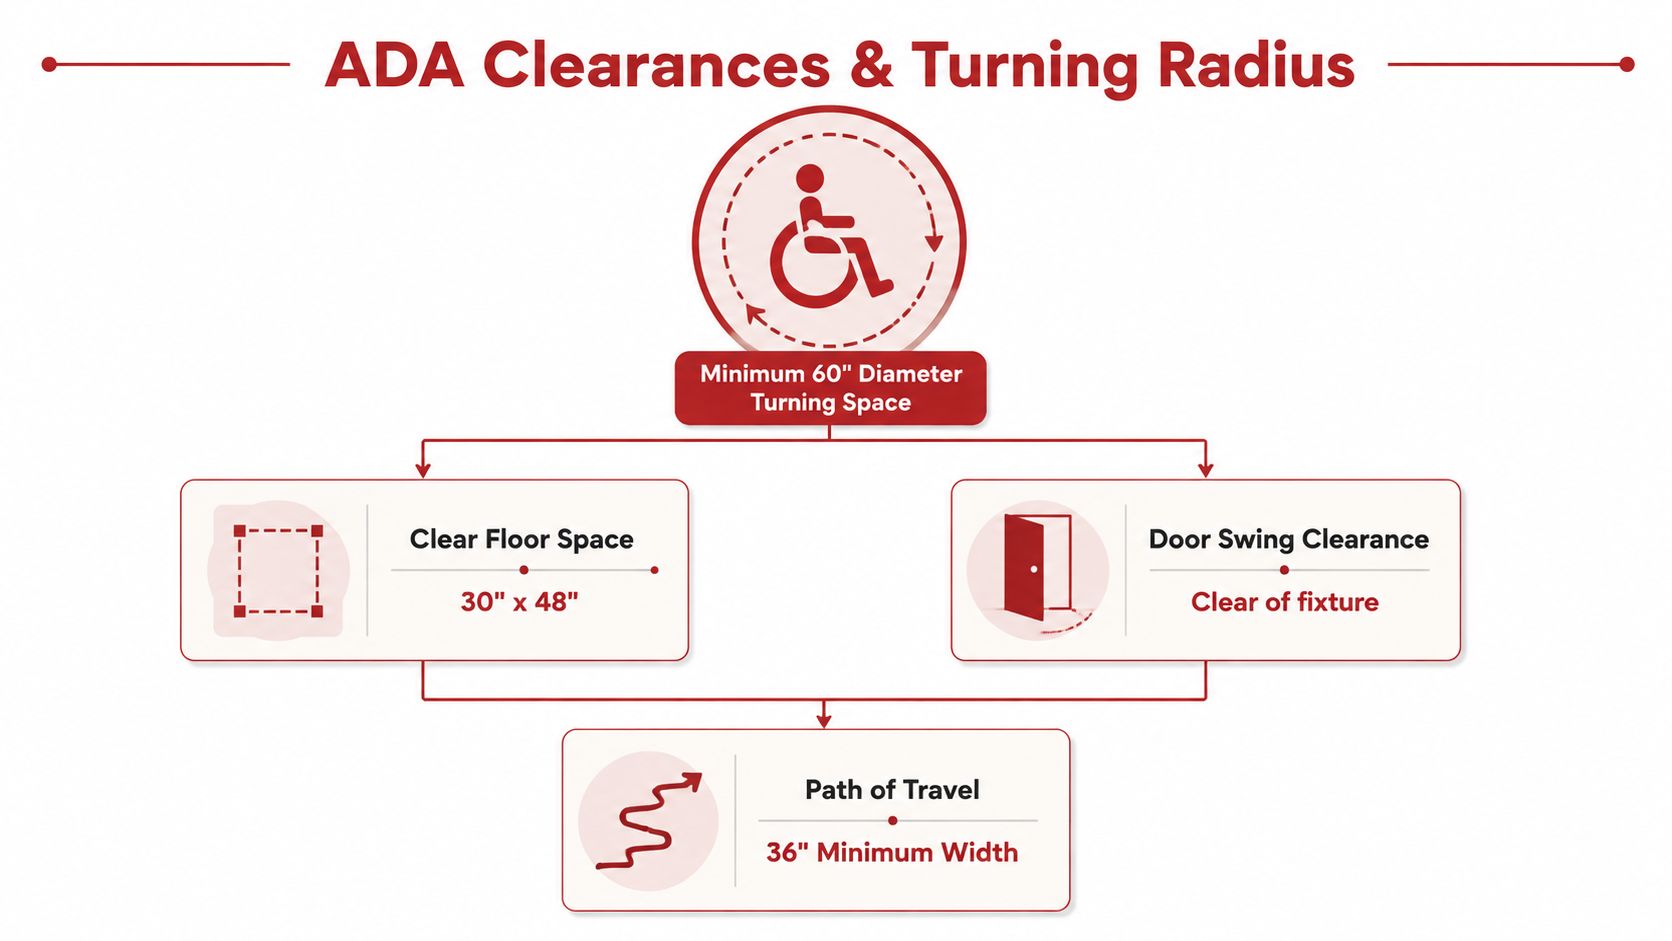
The room also needs usable turning space. Current guidance commonly uses a 60-inch turning circle, while each fixture requires its own approach clearance. Some clear areas may overlap, but only after checking the actual chair path, door position, wall locations, and fixture projections.
Why exact measurements beat visual spaciousness
A standing person may see an open bathroom where a wheelchair user encounters a dead end. A wide aisle does not help if the toilet approach stops at a wall. A large shower still creates difficulty when the threshold, drain slope, or transfer position forces a tight turn.
The ADA Access Board bathing-room guidance bases accessibility on defined dimensions rather than a room's visual openness. Put those dimensions on the scaled plan before demolition. In older Southwest Michigan homes, that early check often determines whether the project needs a door relocation, partition change, or different fixture configuration.
Comparing Essential Accessible Bathroom Fixtures
Fixture selection should follow the user's transfer method and the room's existing geometry. A roll-in shower offers the easiest wheelchair entry, but it demands careful floor slope, drainage, and waterproofing. A low-curb shower reduces the step while taking less floor area. A transfer shower can work better when the bathroom cannot fit a full wheelchair approach.
Toilets and transfer support
A 17 to 19-inch toilet seat can reduce the lift required during transfers. Height alone does not make a toilet usable. The user still needs side-transfer space, a reachable grab bar, and room for feet and wheelchair positioning. Use the earlier accessibility guidance as a code reference, then test the planned approach against the actual walls and door swing.
Toilet construction affects both installation and daily cleaning. A conventional floor-mounted model often fits an existing Southwest Michigan bathroom with fewer plumbing changes, but its deeper compartment can consume valuable clearance. A wall-hung toilet leaves more open floor beneath the bowl and can simplify cleaning. It usually requires reinforced framing and relocated plumbing, which can increase the remodel scope. Homeowners comparing bowl shapes and configurations can review choosing a toilet for accessibility before selecting a model.
Sinks and lavatories
A standard vanity commonly blocks the knee space needed for a seated approach. A wall-mounted lavatory or open-base cabinet preserves that space, provided exposed plumbing is protected and the faucet remains reachable. Keep the counter or rim at or below 34 inches, and coordinate basin depth with mirror height, faucet reach, and wall protection.
In older homes, an open sink may require more than removing the cabinet. Supply lines, drains, shutoffs, and baseboard details can project into the user's leg space. Resolve those conditions on the drawing before ordering the fixture.
Grab bars and showers
Grab bars support transfers and should not be treated as towel rails. Circular bars must measure 1 1/4 to 2 inches in outside diameter, sit 33 to 36 inches above the finished floor, and maintain 1 1/2 inches of clearance from the wall. Follow the detailed grab bar specifications, and install blocking in the framing before wall finishes close.
The shower needs a defined entry and transfer method. Curbless construction lowers the trip barrier, but it requires controlled slope, reliable waterproofing, and coordination with the finished floor. A low curb may handle drainage more easily in some local remodels. A transfer bench with correctly placed bars can provide better daily function than a larger shower without a stable transfer position.
Planning Accessible Bathroom Layouts and Transfer Zones
Layout planning works best when it follows the user's route through the room. Don't begin with the vanity wall. Begin at the doorway and trace the wheelchair, walker, or caregiver path to every fixture.
Start at entry and circulation
Check the door swing first. A door that opens across the sink approach or toilet transfer zone can erase otherwise usable space. Then mark the main clear floor area and identify where the user turns, pauses, and changes direction.
Fixture approach spaces commonly use 30 by 48 inches for a forward or parallel approach. The Home Depot guide to ADA bathroom requirements is useful for seeing why these clear areas must be treated as part of the floor plan, not as leftover space after cabinets and fixtures are drawn.
Protect transfer zones
At the toilet, plan the side transfer position before choosing the bowl, tank, or wall finish. At the shower, decide whether the user will roll in, transfer from a chair, or use a permanent bench. Put future grab-bar blocking in the wall framing even if the household won't install every bar immediately.
For an aging-in-place bathroom, flexibility often matters more than a single current-use setup. A person may use a walker now and need a wheelchair later. An open sink, reinforced walls, a shower entry without a high barrier, and a layout that preserves approach space can support that change without requiring another full demolition.
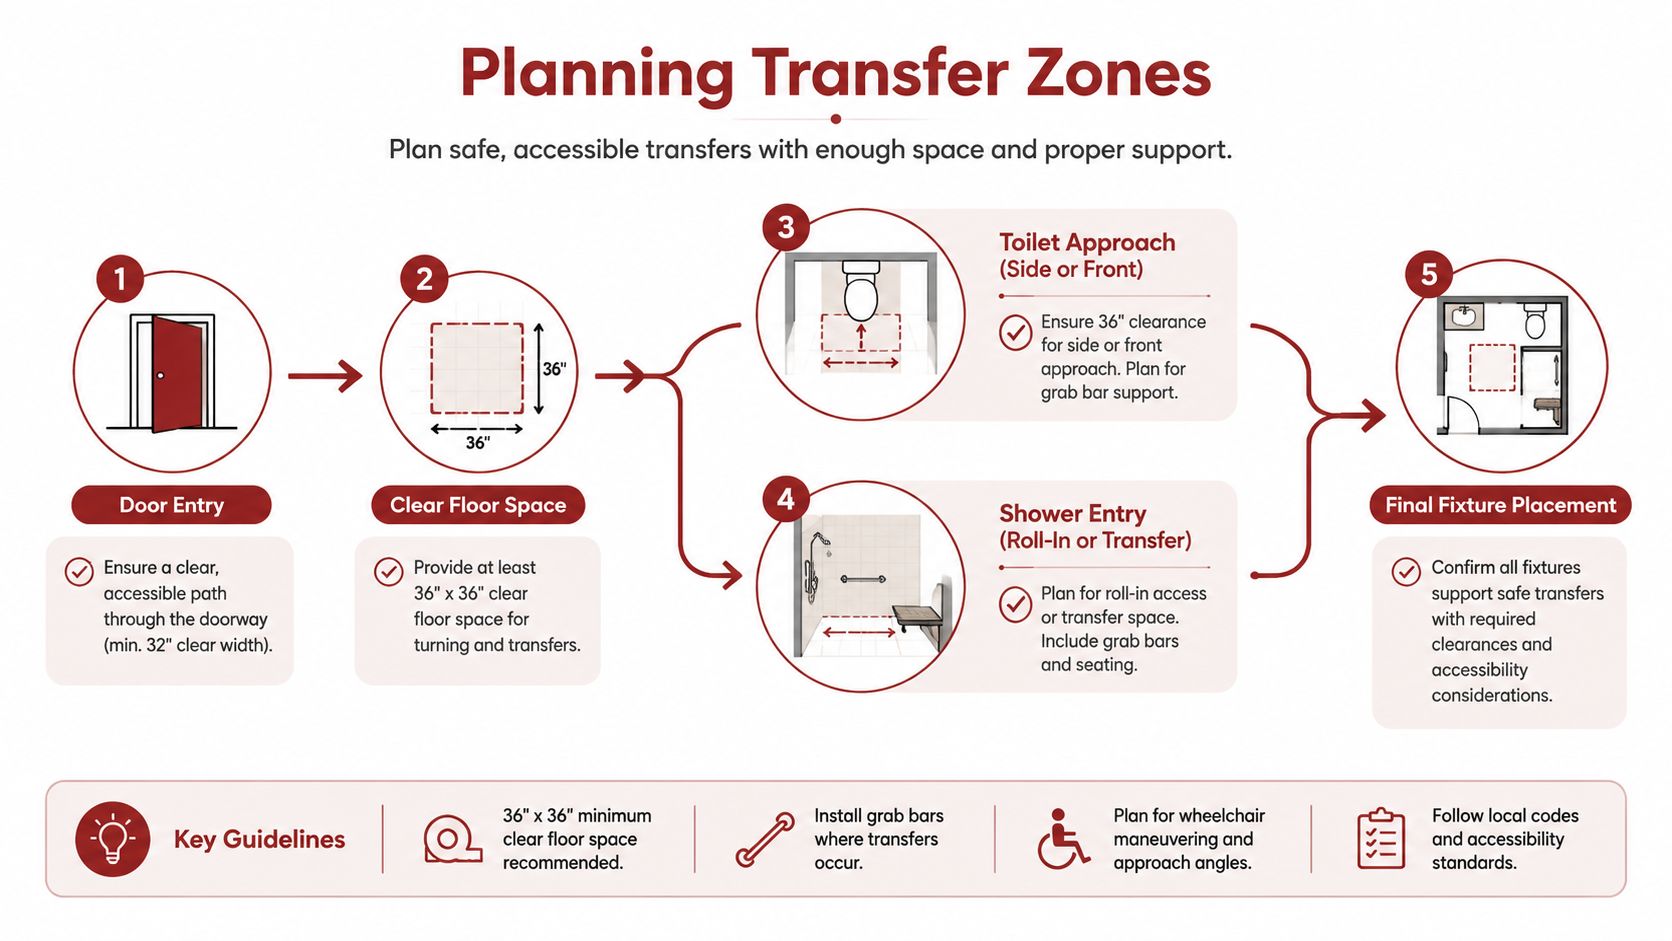
Review the plan in sequence
Use this order during a contractor review:
- Door entry: Confirm the opening and swing don't block the room's usable path.
- Turning space: Mark the wheelchair turning area and check its relationship to walls and fixtures.
- Toilet approach: Identify the side or front transfer position and the support-bar locations.
- Shower entry: Choose roll-in or transfer access based on the user, floor structure, and waterproofing plan.
- Final fixture placement: Recheck the sink, toilet, shower, cabinetry, and plumbing as one connected system.
A short visual demonstration can help families discuss movement patterns before construction begins.
Installation Realities and Remodel Costs in Southwest Michigan
A bathroom that meets accessibility goals often requires more than replacing fixtures. In Portage, Kalamazoo, and surrounding communities, existing homes may have plumbing clustered in one wall, narrow door openings, wood-framed floors, masonry partitions, or showers built around a raised threshold. Each condition changes the work sequence and the budget.
Framing usually comes first when the plan needs a wider opening, a relocated partition, or reinforced walls for grab bars. Plumbing rough-ins may need to move so the sink can provide knee clearance and the toilet can maintain its transfer area. Standard vanity cabinets often have to be removed from the plan entirely because lowering the counter without removing the cabinet still leaves the wheelchair user's knees blocked.
Showers create hidden construction demands
A curbless shower isn't just a shower pan with the curb omitted. The installer must manage slope, waterproofing transitions, drain placement, finished-floor elevations, and the relationship between the shower and the rest of the room. In an existing structure, the floor may need reframing or adjustment to create a reliable barrier-free entry without sending water toward the doorway.
Low-curb showers can be a practical compromise where a fully flush transition would require substantial structural work. They still need a stable entry, slip-resistant surfaces, usable support, and enough room for the selected transfer method. A large shower footprint doesn't compensate for poor drainage or an entry that leaves the user fighting the door.
Budget for the whole construction sequence
Cost planning should account for demolition, disposal, framing, plumbing, electrical changes, waterproofing, tile, finish carpentry, fixtures, and inspection-related corrections where applicable. Accessible work is rarely a simple fixture swap because the clearances around the fixture can force changes to several trades at once.
A licensed general contractor should review the room before product orders are placed. That review can identify whether the floor plan requires a structural change, whether the existing drain location is workable, and whether the selected sink or shower system fits the finished dimensions. For early budgeting, use the instant pricing tool to develop a project estimate before committing to a specific fixture package. Treat the result as planning information, then confirm the scope through an on-site review.
Putting It All Together with a Practical Project Plan
A workable project plan starts with the person, not the product catalog. Identify whether the bathroom must support a wheelchair, a walker, a transfer bench, caregiver assistance, or changing needs over time. That decision influences the shower entry, sink style, toilet position, grab-bar reinforcement, and the amount of open floor space worth preserving.
The 2025 Houzz Bathroom Trends Study indicates that accessibility has entered mainstream remodeling decisions. The study reports that 68% of homeowners considered special needs in their bathroom projects, with low-curb showers at 52%, curbless showers at 28%, grab bars at 61%, and nonslip flooring at 55% (coverage of the 2025 Houzz Bathroom Trends Study). Those figures describe project choices, not proof that every resulting bathroom works for every wheelchair user. The practical question remains whether the selected feature fits the user and the room.
Use a measured decision path
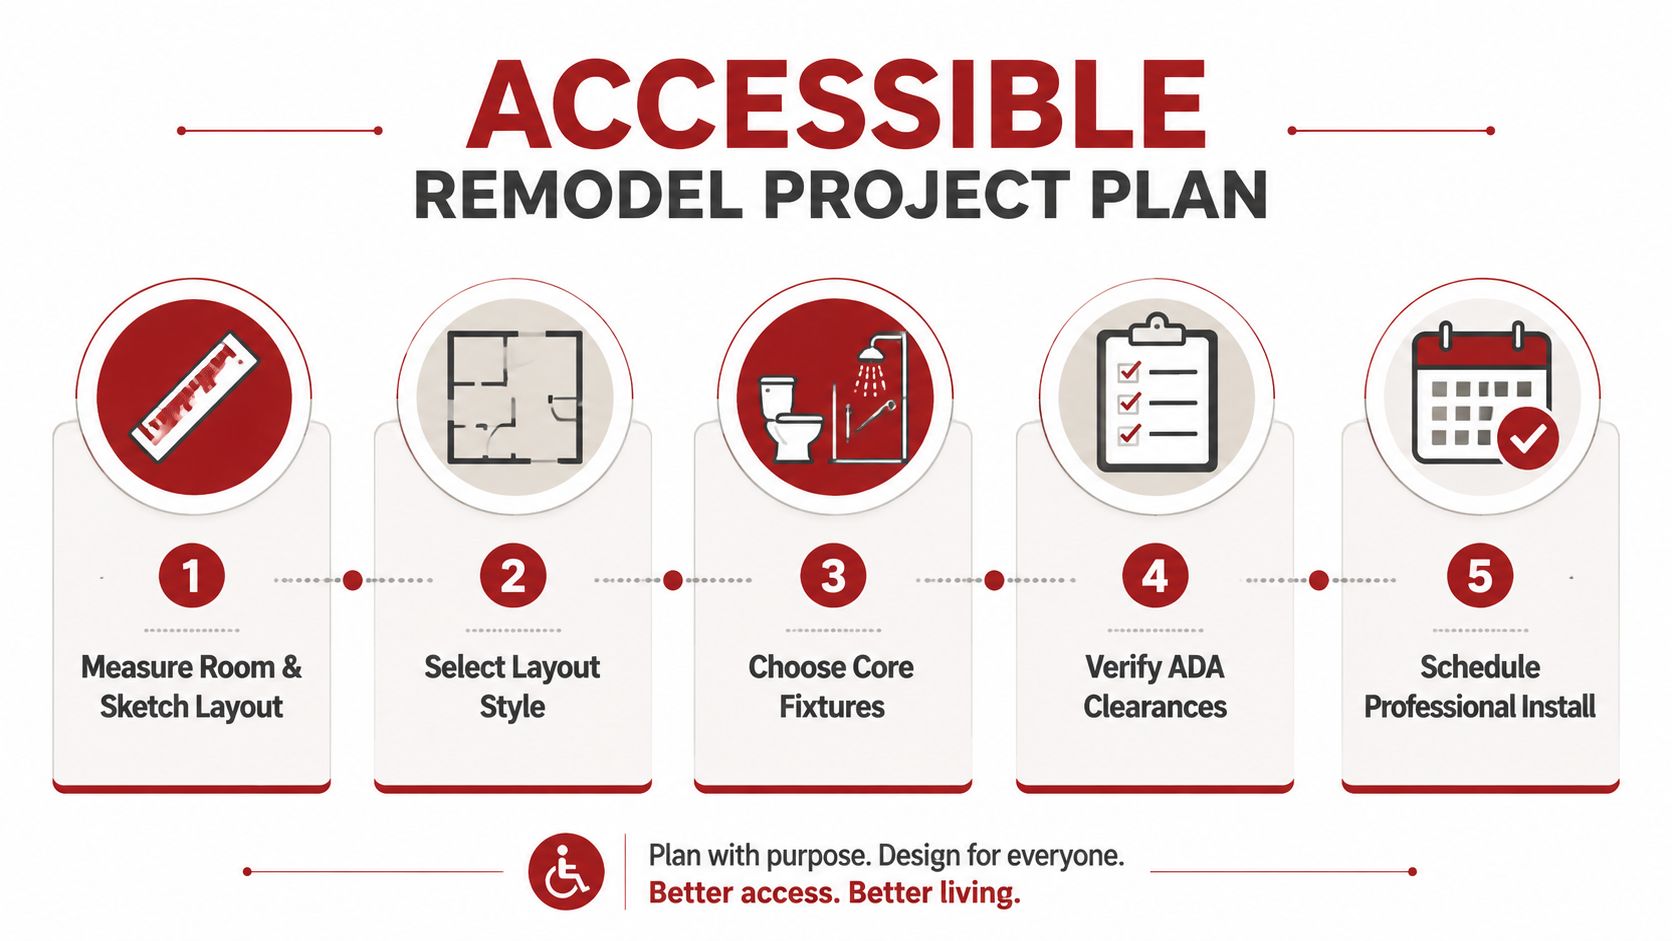
- Measure the room and sketch the layout. Record walls, doors, windows, plumbing locations, and obstructions.
- Select the layout style. Decide whether the plan supports a roll-in shower, transfer shower, open sink, and usable toilet approach.
- Choose core fixtures. Select the toilet, lavatory, shower base, bench, faucets, and bars only after the clear spaces are protected.
- Verify clearances. Check the turning area, approach rectangles, knee space, rim height, toilet geometry, and grab-bar locations.
- Schedule professional installation. Sequence demolition, framing, rough-in, waterproofing, tile, fixture setting, and final review.
When funds are limited, prioritize the layout, shower entry, toilet transfer zone, sink knee clearance, and wall reinforcement before decorative upgrades. A future-proofed rough-in can preserve options even when the household installs only the most urgent supports during the first phase.
Before you schedule a consultation, use the instant pricing tool to estimate the likely project scope and organize your budget. Bring the measurements, user requirements, and preferred fixtures to the contractor so the estimate reflects actual construction decisions rather than a generic bathroom allowance.
Common Accessible Bathroom Mistakes to Avoid
A homeowner may lower a vanity and assume the sink is now accessible. If the cabinet still blocks knee space, the user can't roll forward, and the lower countertop hasn't solved the barrier.
Another frequent mistake is buying a decorative rail that resembles a grab bar. If its diameter, wall clearance, mounting height, or structural support doesn't meet the requirements, it shouldn't serve as a transfer aid.
Showroom appearance can mislead, too. A broad shower may have a difficult threshold, or a stylish toilet may leave inadequate side-transfer room. Review the finished floor plan, not just the product photograph.
Finally, contractors sometimes place the clear floor space wherever it fits after the fixtures are selected. That approach fails because door swings, cabinets, and plumbing projections can block the required approach. Trademaster Construction can help Southwest Michigan homeowners coordinate layout, accessible shower work, custom tile, and fixture installation around real clearance requirements rather than treating accessibility as a last-minute accessory.
Trademaster Construction offers bathroom remodeling, accessible shower conversions, custom tilework, and construction planning for homeowners in Portage, Kalamazoo, and nearby Southwest Michigan communities. Visit Trademaster Construction to discuss a wheelchair-accessible layout that fits your home, your mobility needs, and your budget.

