
You're standing in a dated tub-shower combination in your Southwest Michigan home, looking at the high side of the tub and wondering how much easier the bathroom would be without that step. A barrier-free walk-in sounds simple, but the visible grate on the floor is only the part you notice. Behind it, the installer has to coordinate the drain location, floor slope, subfloor height, waterproofing membrane, tile layout, and the amount of water your fixtures deliver.
That's why choosing a curbless shower drain isn't just a matter of picking a finish. It's a whole-room drainage and waterproofing decision. A well-designed system lets water reach the drain without a curb to contain it. A poorly planned one can leave puddles, wet adjacent flooring, or create a leak that stays hidden beneath the tile.
What a Curbless Shower Drain Really Is
A curbless shower drain is the visible drain assembly plus the sloped, waterproofed floor system built around it. The drain sits at the lowest point of the shower floor, while the surrounding surface guides water toward that point. In a true zero-entry design, the shower floor meets the bathroom floor with a zero or near-zero threshold. Accessible shower guidance limits a wheelchair roll-over threshold to 1/2 inch, or 13 mm, and calls for the floor to slope toward the drain at about 1/4 inch per foot from all directions. Accessible bath guidance explains the threshold and slope relationship.
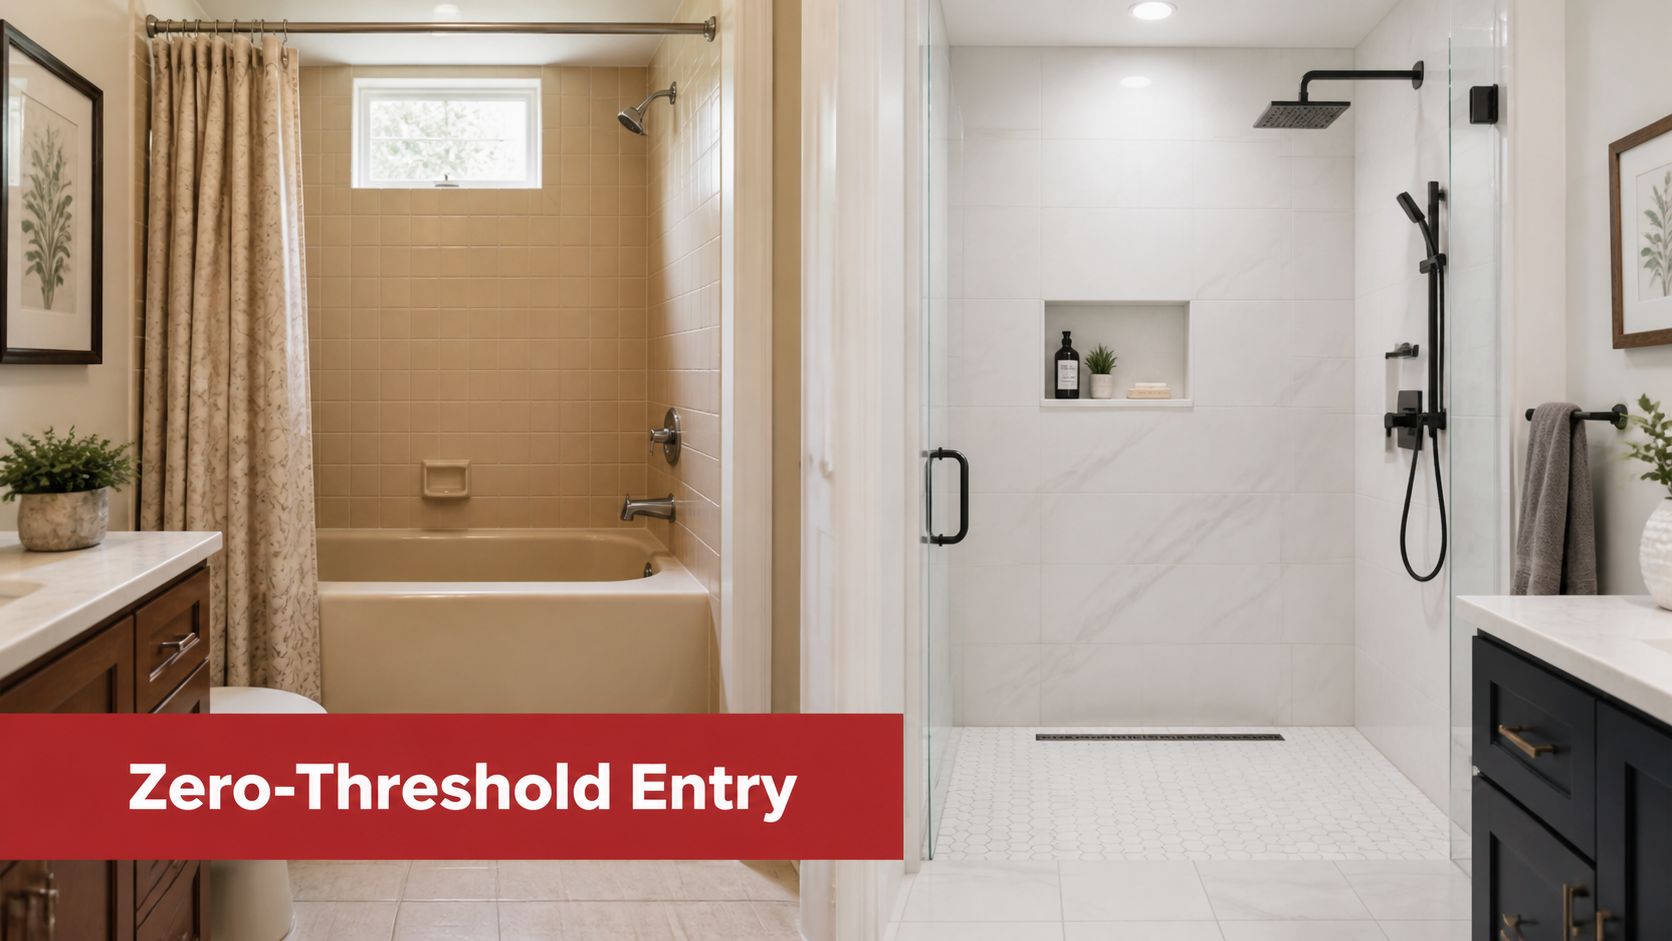
Think of the drain as the lowest point in a shallow, waterproofed basin. The grate may be round, square, or a long linear channel, but it can't do the whole job by itself. The slope moves the water. The membrane keeps it from entering the structure. The drain receives and carries it away.
A point drain often sits near the center or another carefully selected low point. A linear drain may run along a back or side wall, allowing the floor to slope in one primary direction. Either style can work, but the installer has to establish the geometry before setting tile.
The modern accessibility framework grew from the Americans with Disabilities Act of 1990 and the later 2010 ADA Standards for Accessible Design. Those standards formalized requirements for roll-in shower compartments, including the 1/2-inch threshold limit and clear floor spaces such as 60 inches by 36 inches for standard roll-in configurations. TileLetter's standards-based installation discussion covers these accessible shower dimensions.
For a homeowner, the practical takeaway is straightforward. You aren't buying a decorative drain and hoping it works. You're building a controlled path for water across a floor that has no raised edge.
How the Slope and Drain Work Together
Take a flat baking sheet and pour water onto it. The water spreads because nothing tells it where to go. Tilt the sheet, and the water travels toward the lower edge. A curbless shower floor works the same way, except the low point is a drain and the waterproofed surface has to meet tile and building requirements.
The minimum finished-floor slope commonly used for a curbless shower is 1/4 inch per foot, about a 2% grade, toward the drain. In larger layouts, installers may increase the slope to roughly 5/16 to 3/8 inch per foot to improve runoff and reduce residual standing water. Installation guidance for curbless shower membranes and drains explains how slope controls drainage.
The drain sets the floor geometry
An installer generally works through the drainage layout in this order:
- Choose the low point. The drain location determines where water must finish its journey.
- Calculate the fall. Every part of the shower floor needs the required slope toward that low point.
- Coordinate the transition. The shower entrance must meet the surrounding bathroom floor without creating a raised lip or an abrupt dip.
- Set the waterproofing system. The membrane follows the prepared floor and connects securely to the drain assembly.
- Lay tile to the finished plane. Tile follows the slope. It doesn't correct a poorly shaped substrate.
A point drain creates a four-way slope. That arrangement works well in a compact, roughly square shower, but it also creates more tile cuts and more directions for the installer to control. A linear drain gathers water along a channel, so the floor can often use a single-plane slope. That can simplify larger or doorless layouts.
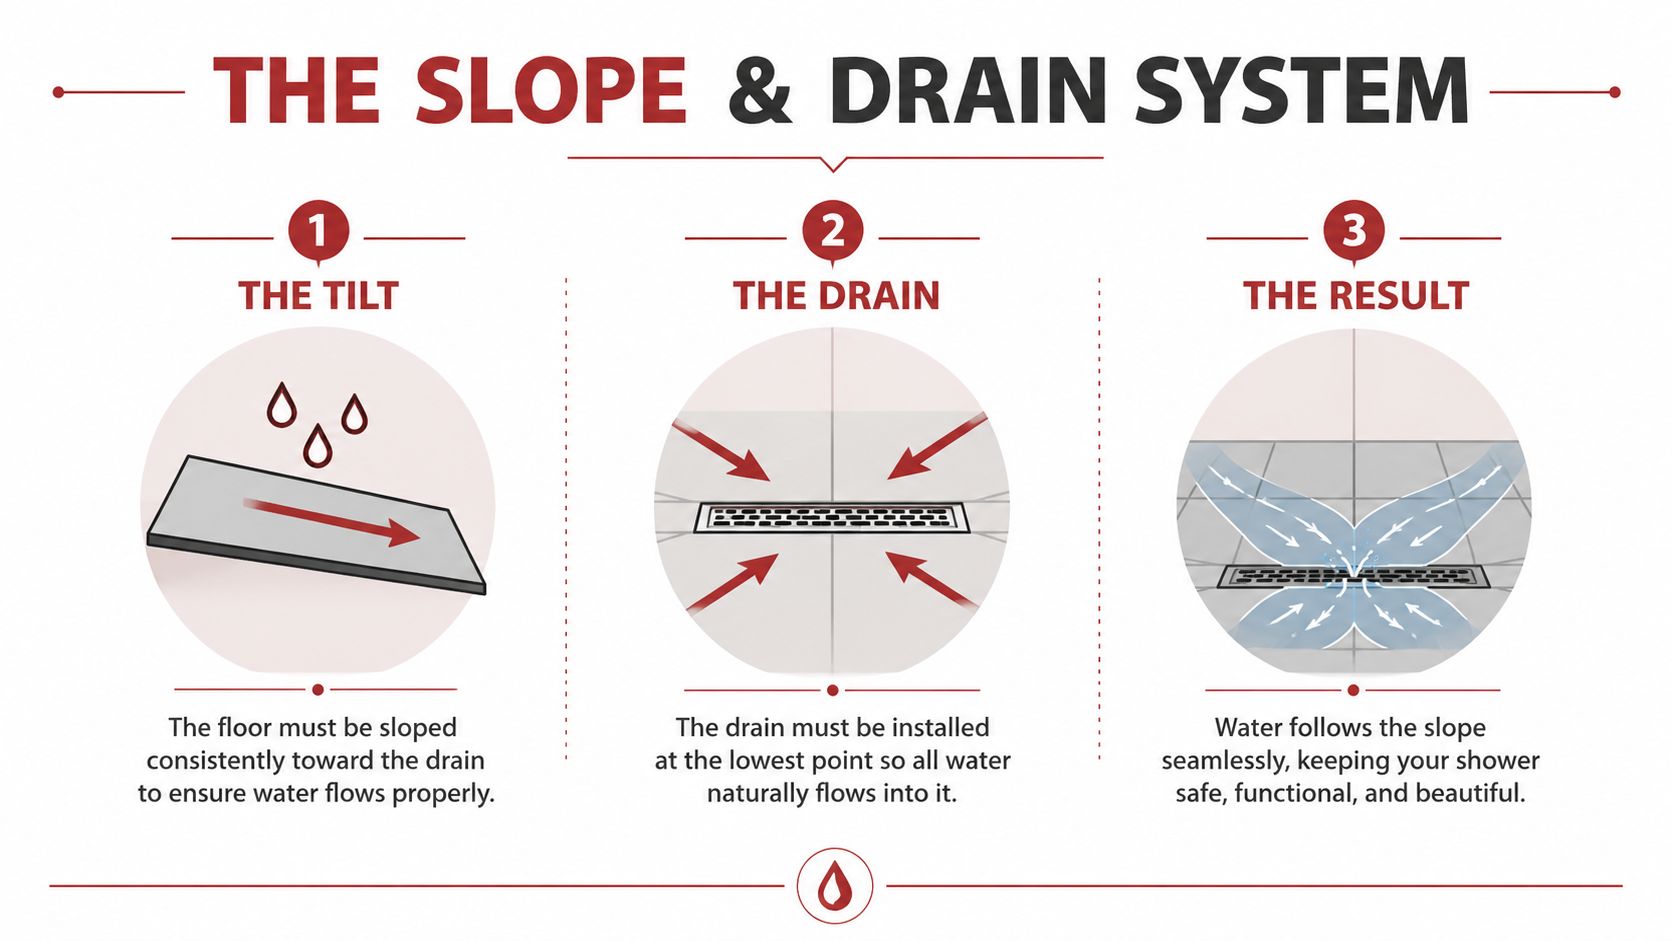
Practical rule: Put the drain location on the floor plan before anyone orders tile. Moving it after the slope is built can change the entire wet-zone layout.
Slope isn't the only capacity question. The drain also has to accept the water coming from the fixture package. One source notes that a 2-inch point drain may handle about 8 to 10 gallons per minute, while a rain head combined with body sprays can exceed 14 gallons per minute. This curbless shower design guide discusses matching drain capacity to fixture flow. A standard showerhead and a high-flow luxury setup shouldn't automatically receive the same drain specification.
Linear vs Point Drains Compared
Linear and point drains can both support a curbless shower, but they shape the floor differently. A point drain concentrates water at one location. A linear drain receives water across a longer channel, usually placed near a wall or at the shower entrance.
| Factor | Linear Drain | Point Drain |
|---|---|---|
| Floor layout | Usually supports a single-plane slope | Requires a four-way slope toward one low point |
| Best footprint | Larger, rectangular, or doorless layouts | Compact or conventional square footprints |
| Tile planning | Can reduce complex directional cuts | Requires more cuts around the central low point |
| Drain location | Often works well at a back or side wall | More flexible when an existing drain location is fixed |
| Appearance | Long, architectural channel or tile-in cover | Small, familiar grate with many finish options |
| Hardware cost | Generally higher for the drain body and channel | Usually simpler and less expensive hardware |
| Retrofit practicality | May require more floor preparation | Often easier where plumbing is already positioned |
A linear drain is attractive when the shower needs a broad, open entry. The single-plane approach can make it easier to keep large-format tile visually organized, although the substrate still has to be shaped accurately. A tile-in linear grate can blend into the floor, while a stainless finish can become a deliberate design detail.
Point drains remain practical for homeowners working with a tighter budget or a fixed rough-in. They can fit a smaller shower without requiring a long channel, and a skilled tile setter can manage the four-way pitch. The trade-off is that the floor and tile pattern become more demanding as the shower grows wider or less square.
A useful selection test: Choose the drain style after reviewing the room footprint, existing plumbing, tile format, fixture flow, and required access route together.
For a Southwest Michigan tub-to-shower conversion, the existing drain position may strongly influence the decision. A point drain can sometimes work with that location more directly. A linear drain may produce a cleaner floor plane, but it can require more extensive framing and plumbing coordination.
The finish also matters, but it should come after function. A beautiful grate that can't accept the fixture flow or fit the floor geometry won't make the shower perform better. Start with the water path, then choose the appearance.
Pros and Cons of Going Curbless
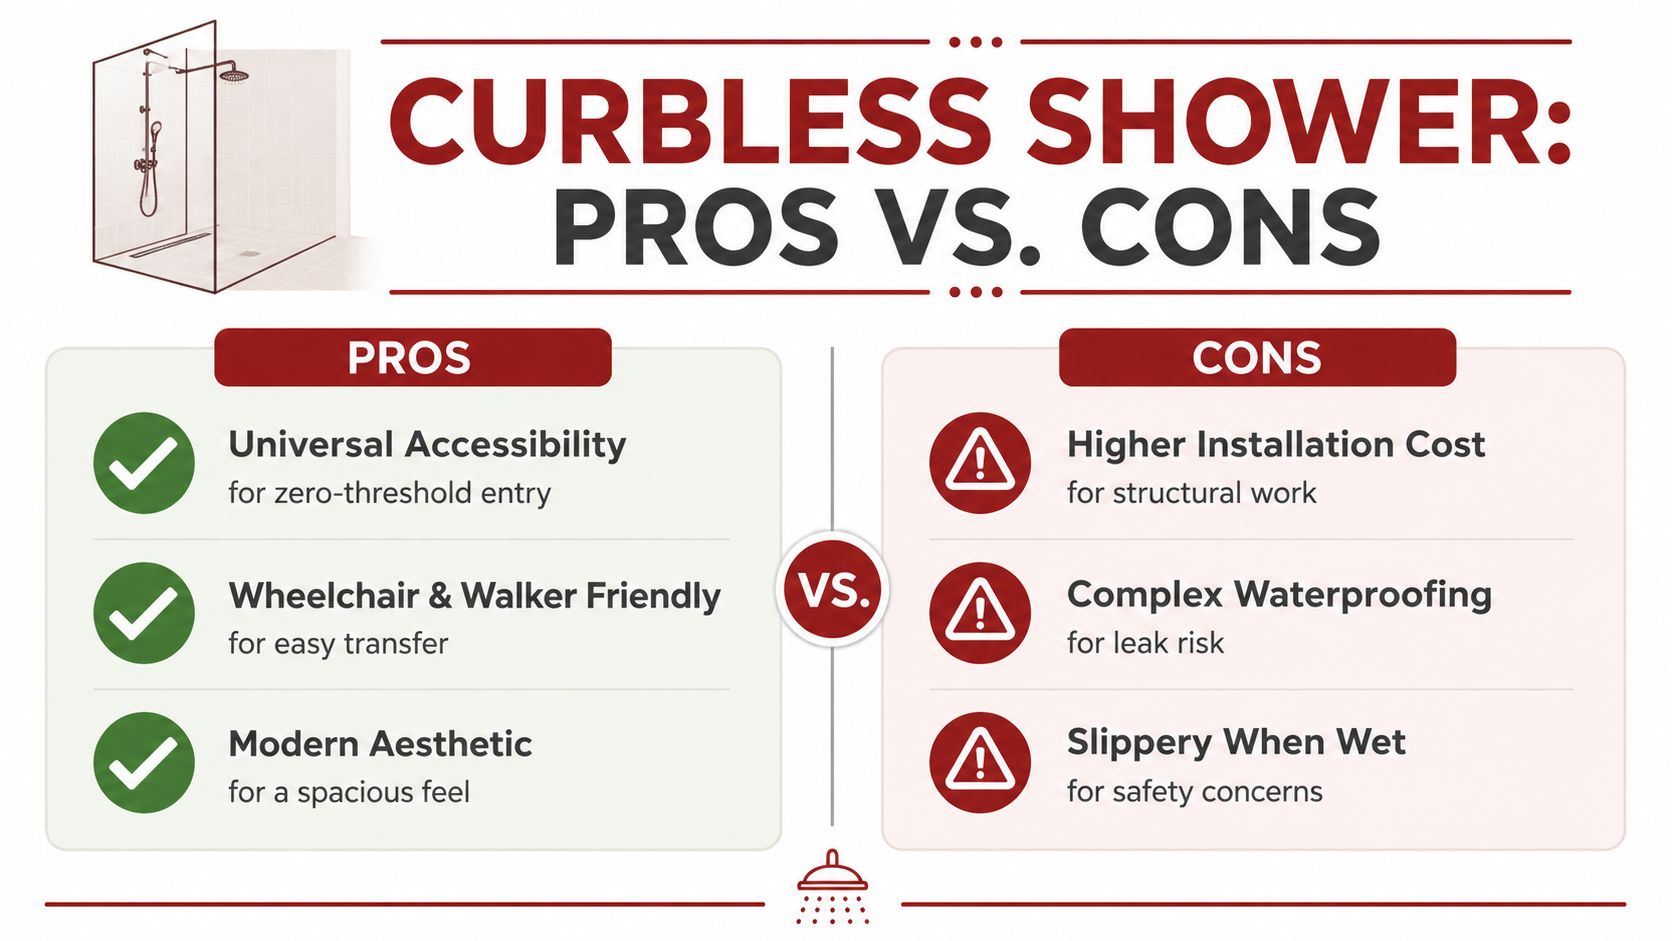
The main benefit is the entry. A zero-threshold shower removes the step that a person using a walker, wheelchair, or transfer seat has to cross. It also supports aging in place because the bathroom can remain usable as mobility needs change.
The design benefits are real, too. A glass panel over continuous tile can make a small bathroom feel less divided. Large-format tile can create a calmer visual field, and the absence of a curb removes one hard boundary between the shower and the rest of the room.
What the structure has to support
A curbless floor needs enough depth for a controlled recess or another method of creating the required slope. The framing, subfloor, plumbing, waterproofing, and adjacent flooring all have to meet at compatible heights.
The waterproofing also has to continue beyond the shower opening. Residential code-based guidance cited for curbless work calls for a uniform slope to the drain and a membrane extending at least 4 feet beyond the front edge of the shower. The Yorba Linda residential guidance explains this broader wet-zone approach.
That requirement illustrates why a curbless shower is not just a fixture swap. The open threshold removes the curb's containment function, so the floor membrane and slope carry more responsibility.
The trade-offs homeowners feel later
A wrong slope can send water toward a doorway, vanity, or nearby hardwood instead of the drain. That can create an ice-dam-style wicking problem at the transition, where water repeatedly rests against an edge and migrates into vulnerable materials.
A linear drain also has a longer channel and more parts to service. If the channel or its waterproofing connection fails, access can be more involved than servicing a compact point drain. These aren't reasons to avoid linear drainage. They're reasons to document the installation and hire someone who understands the entire assembly.
The honest trade-off: Curbless design buys access and visual openness by requiring tighter control beneath the tile.
A conventional low-threshold shower may deliver much of the convenience with less structural modification. A curbless system makes more sense when the household needs the clear entry, when the floor is already open for renovation, or when long-term accessibility carries more weight than the simplest installation.
Installation Considerations and Waterproofing
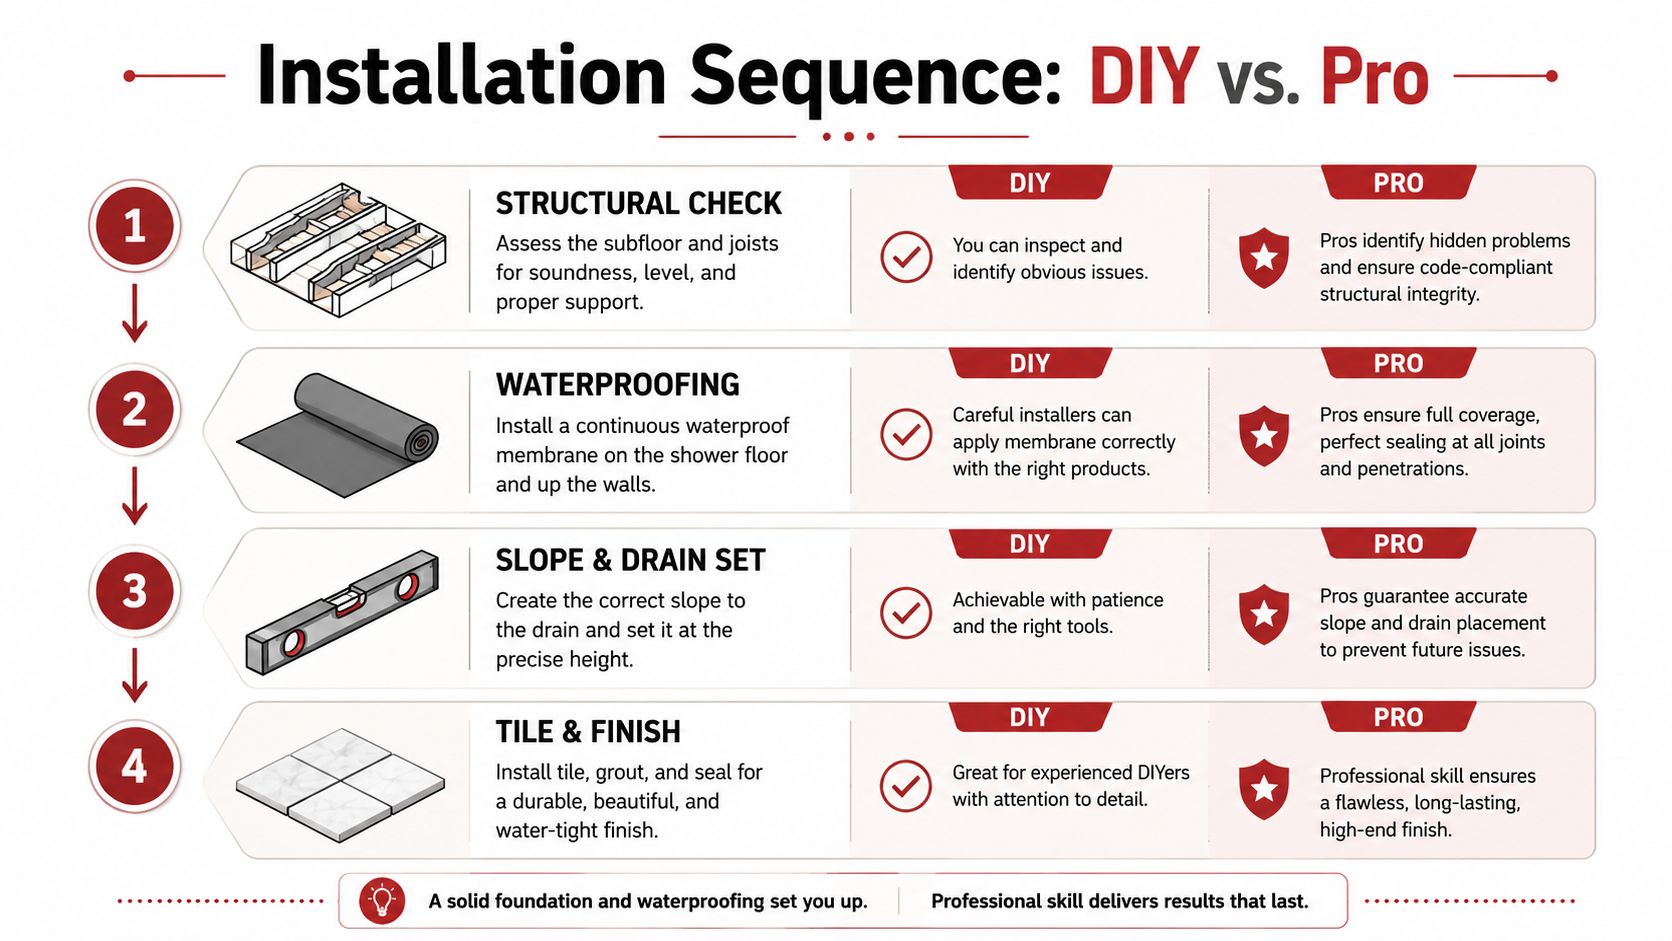
A remodeler starts below the tile, not at the grate. First comes a structural check of the joists, span, and subfloor. The installer needs to know whether the floor can be recessed, whether joists can be modified under local requirements, or whether the framing needs reinforcement instead.
The recess has to create a flush transition while preserving the intended slope. A linear drain often needs a dropped subfloor across the wet zone, while a point drain may need depth concentrated around the drain and tapered toward the perimeter. The exact assembly depends on the drain manufacturer, framing, membrane system, and local inspection requirements.
The sequence beneath the tile
- Verify the framing. The installer confirms the proposed recess won't compromise the floor structure or conflict with plumbing.
- Plan the drain position. A back-wall linear drain supports a single-slope arrangement. A centered point drain supports a four-way pitch. Placement also determines tile cuts.
- Build the sloped base. The finished receptor must slope uniformly toward the drain. The installer can't rely on tile adhesive to create the drainage plane.
- Install continuous waterproofing. The membrane must connect to the drain and extend beyond the opening and onto adjacent wall surfaces. Zero-threshold guidance emphasizes that the membrane should continue onto the bathroom floor because the opening has no curb to stop water. Oakwood Remodel's aging-in-place guidance discusses this continuous membrane strategy.
- Test before tile. A flood test gives the installer a chance to find leakage before the finished surface hides the problem.
PVC or CPE liners, liquid-applied products such as RedGard and Hydro Ban, and sheet systems such as Schluter Kerdi each have specific installation requirements. The drain flange, seams, corners, penetrations, and backer-board joints need compatible treatment. A liner that stops at the shower opening defeats much of the purpose of a continuous wet-zone design.
Common trouble spots include unsealed plumbing penetrations, missing slope beneath a liner, and backer-board seams that haven't been treated as part of the waterproofing system. If the recess affects joists or the waterproofing layout extends across the bathroom, hire a tile setter who has completed multiple curbless installations and can show how the drain, membrane, and transition are being coordinated.
Cost Ranges and Budget Planning
A curbless shower budget covers the room's structure and waterproofing, not only the drain. Plumbing location, floor framing, demolition, membrane system, tile, glass, and the scope of the wider bathroom renovation can all change the final cost. In a Southwest Michigan retrofit, the condition of the existing floor often matters as much as the fixture selection.
| Component | Low Range | High Range | Notes |
|---|---|---|---|
| PVC or stainless point drain | $40 | $120 | Basic point-drain hardware |
| Tile-in or brushed stainless linear drain | $150 | $600 | Longer channel and finish options |
| High-end branded linear channels, including Quick Drain or Schluter | $400 | $900 | Premium drain systems |
| Waterproofing materials | $150 | $350 | Pan liner, membrane, sealant, and drain flange for a standard 3-by-5 footprint |
| Curbless shower floor tile labor | $1,200 | $2,500 | Exact slope and detailed tile work |
| Traditional mud-bed floor labor for comparison | $600 | $1,000 | Less complex than a curbless floor |
| Recess framing, joist modification, and possible subfloor replacement | $300 | $1,200 | Structural and substrate variables |
| Typical curbless retrofit total | $3,000 | $8,000 | Full-gut remodels can scale higher |
The drain is one part of the water-management system. A premium linear channel may suit a single-plane floor and provide a particular finish, yet it does not replace structural preparation or a membrane that connects correctly to the drain. The drain also needs enough capacity for the actual shower fixtures. A body spray or multiple showerheads can send water faster than a basic assembly is designed to handle, so the installer should match the drain, trap, and piping to the fixture flow rather than choosing by appearance alone.
Budget for the work that stays hidden
Waterproofing costs include the membrane or liquid coating, sealant, corners, transitions, drain connections, and compatible fasteners. Floor preparation adds labor because the installer must create a reliable plane for water to reach the drain. That slope is part of the budget, even though tile hides it.
Structural work can increase the total quickly. Recessing the floor may involve joist modification, subfloor replacement, or adjustments where the shower floor meets the rest of the bathroom. A traditional mud-bed comparison may look less expensive because its floor work is less complex, but it does not provide the same flush transition.
A flood test also belongs in the plan. Testing before tile keeps leaks accessible for repair. Skipping it can turn a small correction into removal of finished flooring and other paid work.
For an early planning figure, enter the bathroom footprint and intended scope in the instant pricing tool. Treat that result as a starting point, then confirm the structural, plumbing, waterproofing, slope, and tile requirements with the contractor inspecting the room.
Maintenance and Long-Term Performance
A curbless shower needs ordinary cleaning plus occasional attention to the drainage path. Remove hair and debris from the grate or strainer, clean the drain throat gently, and avoid harsh chemical products that may damage finishes or seals. After seasonal humidity changes, inspect the grout and caulk where the shower floor meets walls, glass, trim, and adjacent flooring.
Slow puddling usually points to a slope or floor-plane problem rather than a simple clog. A blockage can restrict flow, but plunging or chemical cleaners won't correct water that naturally settles away from the drain. If you need basic guidance for removing a blockage, this resource on how to unclog shower drain provides a useful starting point.
A practical inspection routine
Every six months, run the shower and watch how water travels across the floor. Check whether it moves consistently, photograph the drain area for comparison, and press gently around nearby tile for soft spots or movement.
Watch for warning signs that deserve prompt attention:
- Persistent musty odor: Moisture may be remaining beneath or beside the finished surface.
- Darkening at the threshold: Repeated dampness can signal trouble at the most exposed transition.
- A wet ceiling below: If the bathroom sits over finished space, moisture below needs investigation.
- Loose or cracked grout: Movement or substrate moisture can affect joints around the drain and perimeter.
Keep the drain model, membrane system, tile product, and installation date with your home records. That information helps a future service technician identify replacement parts and understand how the waterproofing and drain were assembled.
A well-built system should move water predictably. Maintenance won't fix a failed slope or membrane, but it can help you notice changes before a small service issue becomes a larger repair.
When Curbless Is the Right Choice for Your Remodel
A homeowner using a wheelchair, walker, transfer bench, or other mobility aid may gain practical access from a curbless shower. The same design can support aging in place, particularly when the remodel already involves opening the floor and moving plumbing.
In a small bathroom, removing the curb can also preserve visual space. A glass panel keeps the room visually connected, while a correctly positioned linear drain supports an open shower area. A continuous tile plane between the bathroom and an adjoining space is possible, but only when the waterproofing, slope, and finished floor heights are planned as one system. The shower is part of the room's water-management system, not merely a drain selection.
Fixture flow matters as well. A rain head, handheld shower, or body sprays can deliver more water than a basic showerhead, so drain capacity must match the complete fixture package. Otherwise, even a well-built slope may struggle during use.
Reasons to slow down before choosing
Pause if the slab or joist system cannot accept the needed recess without major structural work. A rough-in located far from the proposed drain may require more invasive plumbing changes. With a tight budget, a carefully designed low-threshold shower may provide much of the access benefit with less floor and waterproofing work.
Before signing a contract, request clear answers:
- Can the floor be recessed without weakening the structure?
- Where will the drain sit, and how does that location control the slope?
- How much water will every planned fixture deliver?
- How far will the waterproofing extend beyond the shower opening?
- What areas will be flood-tested before tile is installed?
The Mesa bathroom renovation guide provides further context for coordinating layout, materials, and contractor decisions. Confirm floor depth, fixture flow, drain capacity, waterproofing limits, and tile transitions before approving the scope.
Trademaster Construction helps Southwest Michigan homeowners coordinate floor preparation, curbless shower drains, waterproofing, and custom tilework. Visit Trademaster Construction to review remodeling options for your home, access needs, and budget.

