
Most shower tile installation videos give the wrong part of the job the most attention. They show straight grout lines, clean corners, and attractive tile layouts, then rush through the waterproofing that determines whether the shower survives years of daily use. Tile and grout create the visible finish, but the waterproofing assembly protects the structure.
That distinction matters for Southwest Michigan homeowners planning a bathroom remodel in Portage, Kalamazoo, or nearby communities. A 2024 Australian survey found that 32% of respondents would watch YouTube for home renovation help, including 18% who said yes and 14% who would use it only for minor projects, while 68% said they would not. Among people ages 18 to 24, 75% said they wouldn't use YouTube for renovations. The figures show that video guidance reaches a substantial group of homeowners, but watching a tutorial doesn't guarantee that the tutorial emphasizes the details most likely to prevent failure. The survey data is available through Built With Tools.
YouTube already has a large audience for shower and tile instruction. One tile-focused channel listed in 2026 reported 250,000 subscribers, 345.3 million total views, and 903 uploaded videos. Its shower-tile installation content included one video with 8.7 million views and a shower-pan installation video with 1.9 million views, evidence that this is a mature instructional category rather than a niche topic. The referenced shower installation video is a useful reminder that homeowners want to see the work, but they also need to know what to inspect beneath the finished surface.
Why Pretty Tile Work Fails Without Proper Waterproofing
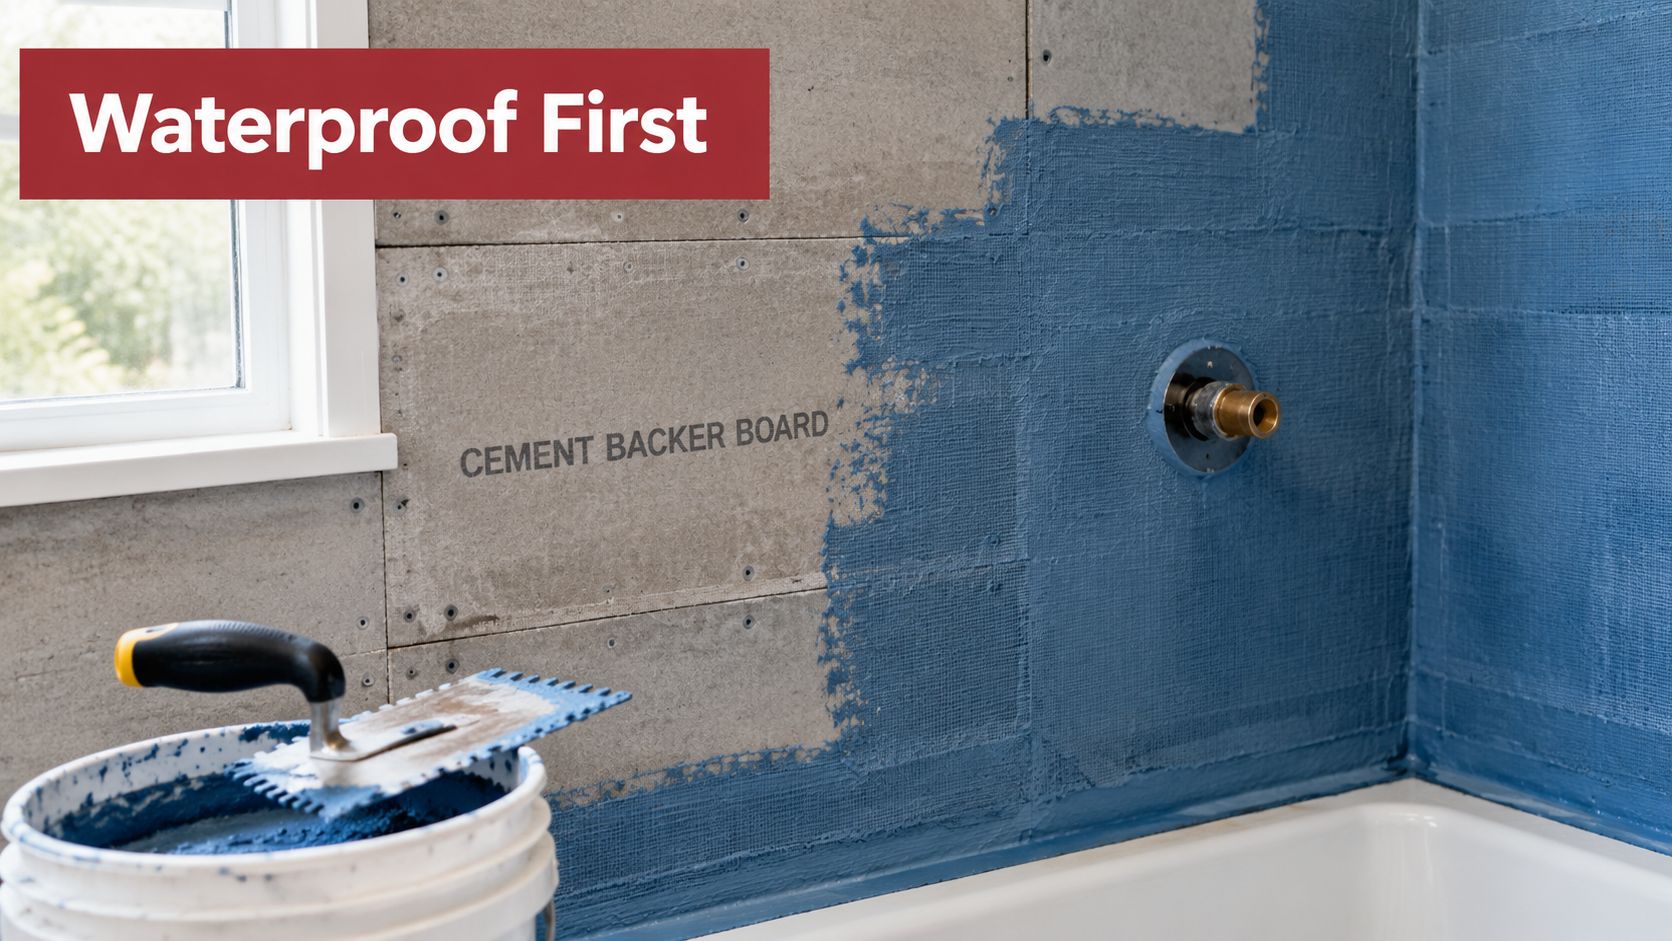
A shower can have beautiful tile and still be badly built. The common assumption that ceramic or porcelain tile, grout, and caulk form a waterproof box is the first idea a good tutorial should challenge. Tile sheds water, but the joints, penetrations, corners, and transitions still need a properly designed water-management system behind the finish.
The difference between a shower that remains sound and one that develops hidden damage usually appears before the first tile is installed. Water can move through grout joints, cracks, movement joints, fastener penetrations, and poorly sealed transitions. Once moisture reaches framing or a vulnerable wall assembly, the finished tile can continue to look acceptable while the substrate deteriorates behind it.
Practical rule: Judge a shower installation video by how carefully it explains waterproofing, not by how satisfying the final tile reveal looks.
Industry material notes cite estimates that roughly half of U.S. showers are leaking, while New Zealand tile-industry research has reported an overall tile and waterproofing failure rate of about 11% to 13%, with approximately 89% of failures attributed to the installer. These figures are presented in Schluter's discussion of common waterproofing mistakes. They point to a practical conclusion, workmanship behind the tile deserves as much scrutiny as the visible layout.
The details that separate a system from a surface
A professional installer pays close attention to the places where separate materials meet. That includes:
- Seams and corners: The membrane must remain continuous through changes in plane, with compatible reinforcement where the waterproofing system requires it.
- Screw penetrations: Fastener heads and penetrations need the treatment specified by the membrane or backer-board manufacturer.
- Tub flanges: The wall assembly has to connect to the tub flange without creating a path for water behind the surround.
- Drain integration: The waterproofing system must connect to the drain assembly, not merely stop near it.
- Cure and transition details: Liquid membranes, sealants, and mortars need the preparation and curing time specified for the system.
A video that spends several minutes on tile spacing but shows waterproofing as a quick coat has its priorities backward. The hidden work isn't glamorous, but it controls whether the finish has a stable, dry assembly beneath it.
Accessibility hardware also belongs in the waterproofing conversation. If a remodel includes grab bars, their locations and backing should be planned before the wall is closed, and homeowners comparing finish options can review resources such as oil rubbed bronze grab bars for showers while the structure is still accessible. Installing reinforcement and sealing penetrations in the right sequence is far safer than drilling through a finished waterproofed wall and hoping caulk solves the problem.
Preparing the Substrate and Waterproof Membrane
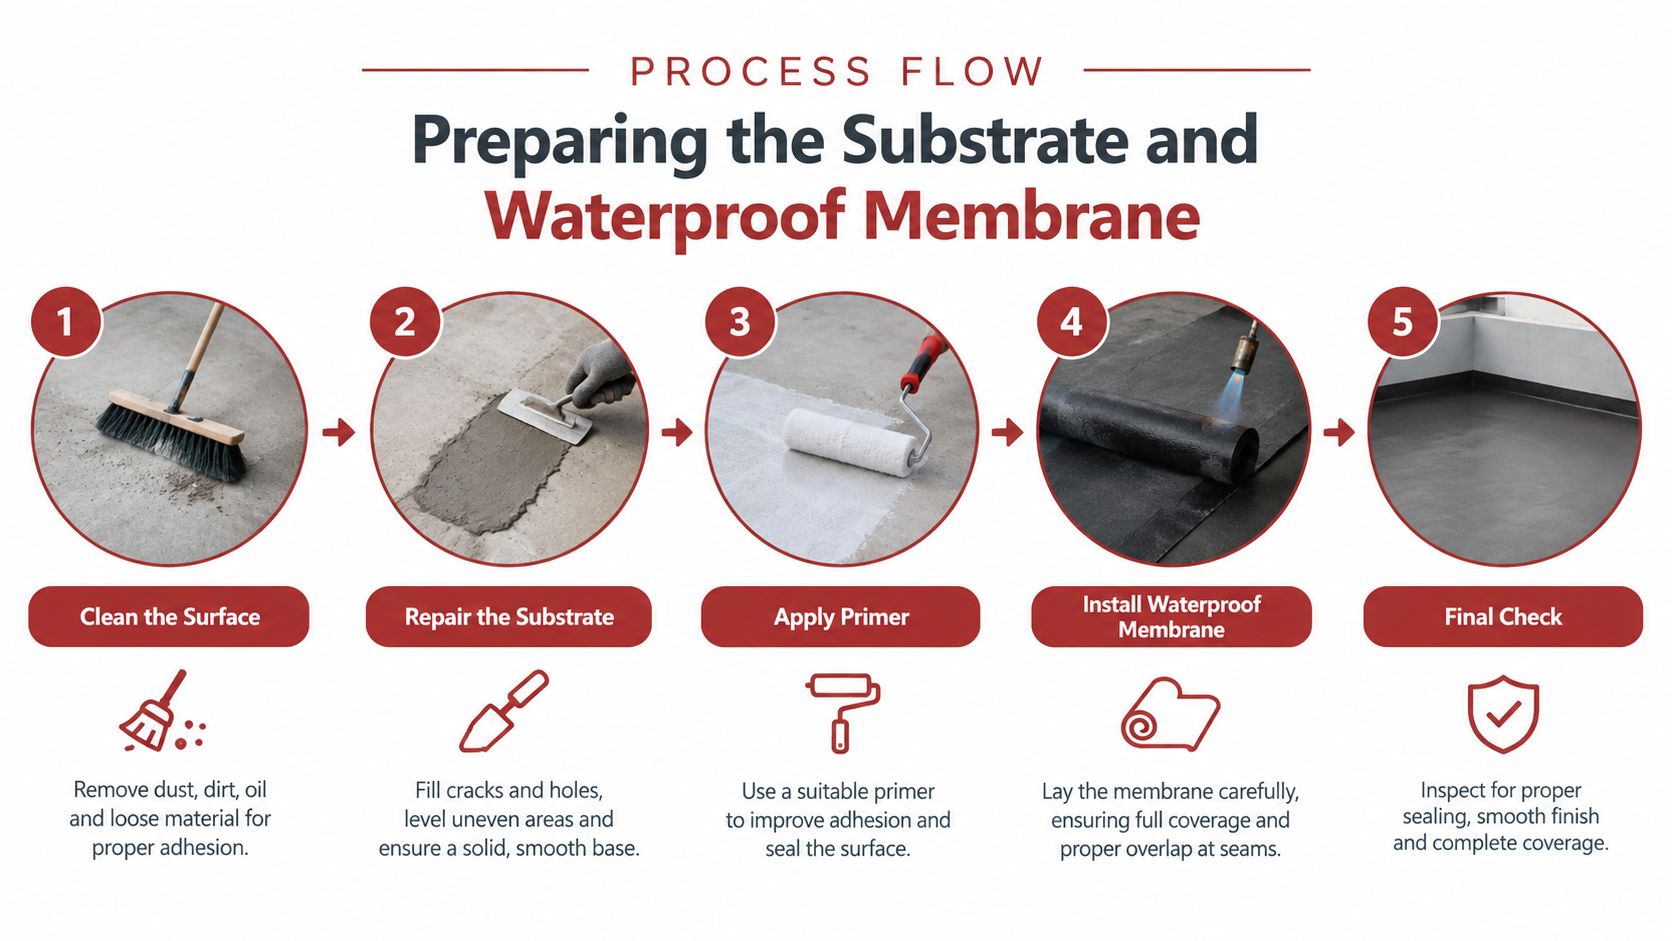
Tile needs a foundation that won't flex, shift, or telegraph irregularities into the finished surface. Start by checking the framing and the wall plane, then install a substrate that is flat, rigid, and suitable for the selected waterproofing method. A membrane can't compensate for a wall that moves, and tile won't hide a severe change in plane for long.
The installation sequence should follow the requirements of the complete system rather than a collection of disconnected tips. TCNA and ANSI-based practice calls for a prepared substrate, a continuous waterproof membrane meeting ANSI A118.10, a correctly sloped shower floor, and mortar coverage suited to wet areas. The BSD tiling guide summarizes these requirements.
Build the base before addressing the finish
A reliable preparation process looks like this:
- Verify the structure. Check that framing is secure and that the substrate has no loose areas, damaged edges, or movement. Correct the wall plane before waterproofing.
- Install the approved substrate. Use the backer board or panel system specified for the waterproofing method. Follow its fastening pattern and joint treatment requirements.
- Create a continuous membrane. Liquid and sheet membranes can both work when installed as complete systems. The selected product must meet the required performance standard, and seams, corners, penetrations, and transitions must receive the specified treatment.
- Connect the drain. The membrane should integrate with the drain assembly so water has a controlled path toward the drain rather than a vulnerable gap around it.
- Verify before covering. Inspect the work for pinholes, open seams, untreated fasteners, weak corners, and incomplete flange transitions before setting tile.
The shower floor must slope at least 1/4 inch per foot toward the drain, a requirement identified in the BSD guide. That slope isn't a cosmetic preference. It directs water away from the perimeter and reduces the chance of persistent standing water.
Mark the actual wet-area boundaries
Waterproofing limits should be laid out visibly rather than guessed. New Zealand wet-area guidance requires waterproofing behind tiles in all showers. In an open shower, it extends to wall tiles within 1500 mm of a fixed showerhead, or 1500 mm plus the hose length for a removable showerhead. BRANZ wet-area guidance provides these boundaries.
BRANZ also states that, in enclosed showers, impervious linings and finishes should be continuous to at least 1800 mm above the floor or top of an upstand, and at least 300 mm above the showerhead. For unenclosed showers, the waterproof or impervious finish extends in a horizontal radius of 1500 mm from the showerhead. The Build magazine guidance illustrates these dimensions.
Local requirements still control the project. The U.S. Department of Energy tub-and-shower water-management guide notes that the cited assembly guide had no applicable building codes or standards governing the waterproofing details it described. That distinction matters, because recommended industry practice and enforceable local code aren't always identical. Homeowners should verify local requirements with the authority having jurisdiction before treating a generic shower tile installation video as a complete construction specification. The Level guidance discusses this code and best-practice distinction.
Setting Tile and Grouting for Long-Term Durability
Once the membrane and substrate have passed inspection, tile setting becomes the visible portion of a much larger system. The installer still has to control layout, mortar contact, tile alignment, movement joints, and transitions. A straight wall doesn't compensate for poor bond coverage or a floor that drains badly.
Dry-fit the layout before mixing mortar. Account for cuts at corners, niches, valves, benches, and the drain. A balanced layout usually looks more deliberate than a narrow sliver at one edge, but the layout must never force the installer to compromise waterproofing or movement accommodation.
Mortar coverage is the hidden quality check
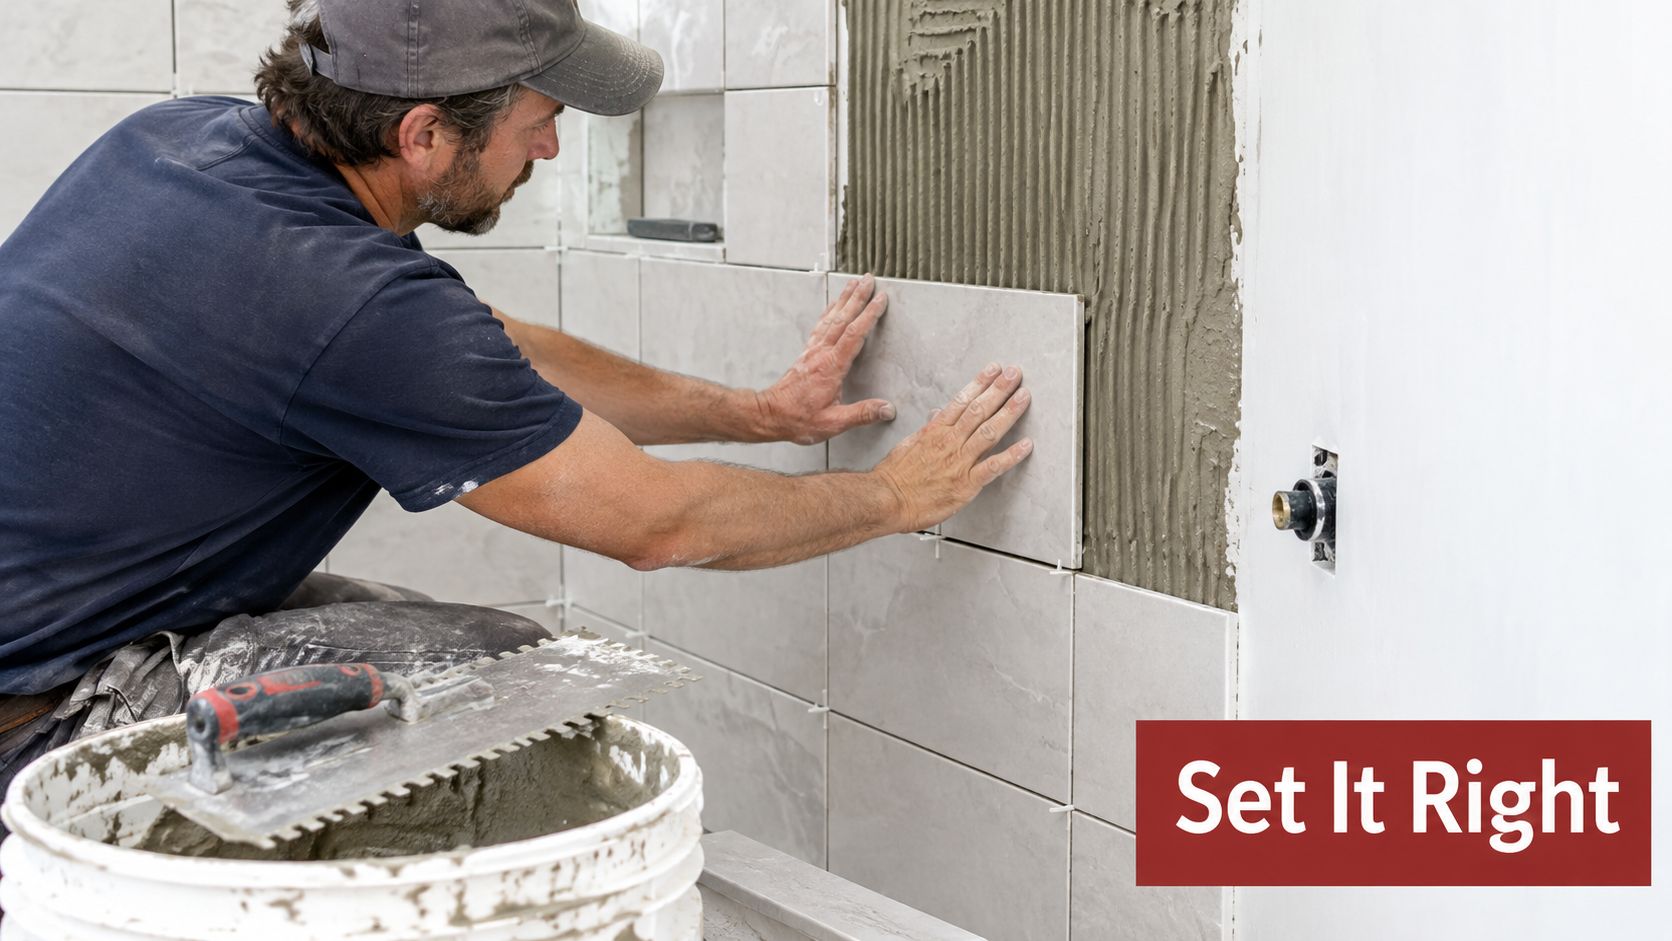
Comb the mortar with the correct notched trowel, maintain consistent ridges, and press or beat the tile into place so the ridges collapse. Pulling a tile occasionally during installation is a useful verification step, because the finished face doesn't reveal whether mortar reached the edges and corners.
Wet areas require at least 95% mortar coverage, according to the BSD tiling guidance. The reason is straightforward. Voids beneath tile create weak spots, especially at edges and corners, where impact, movement, or concentrated loads can cause cracking or debonding. Coverage also becomes more difficult with large-format tile, uneven substrates, and rushed mortar placement.
Coverage matters more than speed. A tile that looks aligned but has poor support is not a successful installation.
Use spacers or an appropriate leveling method to maintain the planned joint width, but don't allow clips or spacers to substitute for a flat substrate. Clean mortar from joints before it hardens, because hardened thin-set reduces grout depth and makes the finished joint difficult to tool consistently.
Protect the slope and finish the joints correctly
On a shower floor, preserve the established 1/4-inch-per-foot minimum slope while setting tile. Smaller floor tile often follows changes in plane more easily, while large tile can create lippage or awkward cuts on a sloped pan. The right choice depends on drain location, pan geometry, desired appearance, and slip considerations, not just the look of a showroom display.
Grout selection should match the tile, joint conditions, cleaning expectations, and manufacturer instructions. Cementitious grout, high-performance cement grout, and epoxy grout each have different handling and maintenance characteristics. Sealant belongs at changes of plane and movement joints, not as a substitute for grout packed into every joint.
Allow mortar, grout, and sealants to cure according to their product instructions before exposing the shower to regular water use. The following video can help viewers study trowel handling and tile placement, but it should be evaluated alongside the membrane manufacturer's instructions and local requirements.
Designing Curbless and Accessible Shower Layouts
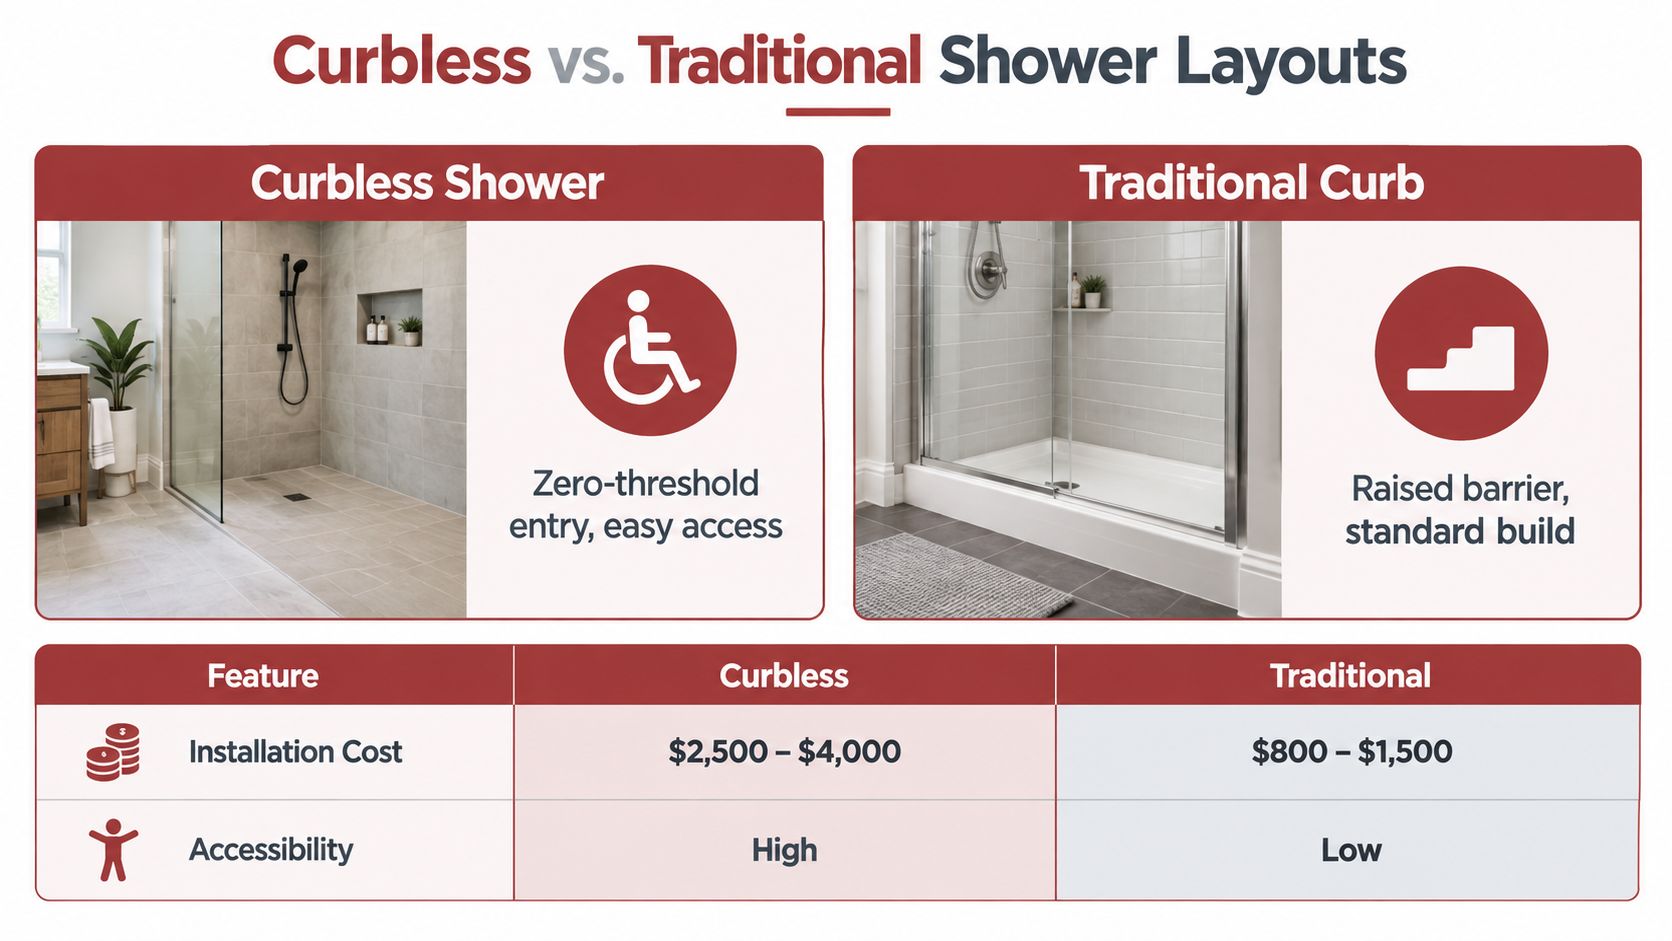
A curbless shower isn't just a standard shower with the curb removed. The curb normally helps contain water and provides a transition between the shower floor and the bathroom floor. Removing it makes drainage, elevation, membrane continuity, and floor structure central design decisions from the beginning.
For aging-in-place or wheelchair access, the entry should be evaluated as part of the whole bathroom. The finished bathroom floor, shower pan, drain body, framing depth, and waterproofing layers all affect the available slope. If the structure can't accommodate the required fall without creating an abrupt transition, a nominally curbless design may be difficult to execute safely.
Drain location changes the tile strategy
A center drain sends the floor slope from multiple directions, which can produce compound planes and more demanding tile cuts. A linear drain can allow a single-direction fall in some layouts, making larger floor tile more practical, but it still requires careful waterproofing and accurate elevation control. Neither drain type automatically creates an accessible shower.
Consider these questions before choosing the layout:
- Where does water go if the shower spray is directed toward the entry?
- Can the floor maintain the required slope without a sharp transition?
- Does the selected tile suit the floor geometry and provide appropriate slip resistance?
- Can the drain and membrane system be installed without uncertain overlaps or improvised transitions?
- Would a modest curb improve containment and reduce construction risk?
A small curb isn't always a design failure. In some bathrooms, it provides a durable water barrier and makes the slope easier to form. A zero-threshold entry may be the better accessibility choice when the structure and drainage design support it, but the decision should come from the user's mobility needs and the water-management plan, not from a trend image.
Plan for real use, not only visual access
A curbless shower may improve entry for a wheelchair, walker, or person with limited balance, but usable access also depends on clear floor space, control placement, seating, grab-bar backing, handheld shower positioning, and water containment. The floor tile must remain manageable underfoot, and the transition must avoid a lip that catches wheels or toes.
Waterproofing should be designed continuously across the shower floor and into the surrounding transition. Treating the shower as a decorative tile zone and the bathroom floor as a separate finish invites a weak connection at the entry. A professional layout makes the slope and membrane strategy visible before tile is ordered.
Common Installation Mistakes and How to Avoid Them
The most expensive shower mistakes are usually hidden, repetitive, and easy to make when an installer follows a shortcut. A tutorial may show a membrane being applied, but the important question is whether the entire system is continuous at seams, corners, penetrations, flanges, and drains.
| Shortcut | Professional correction |
|---|---|
| Stopping membrane near a transition | Carry the approved waterproofing into the transition and treat the joint according to the system instructions. |
| Leaving screw heads untreated | Seal fasteners and penetrations with the specified compatible material. |
| Relying on surface grout | Use the membrane as the primary water-management layer, with grout serving as the finished joint material. |
| Ignoring corner reinforcement | Reinforce inside and outside corners where the system requires it. |
| Guessing at floor slope | Verify the pan and tile-setting surface with a level and measurement rather than judging by eye. |
A frequent failure pattern involves tub flanges and wall-board transitions. The board may look neatly installed while water can still reach the flange or framing because the connection wasn't sealed correctly. Recent instructional content has focused on sealing the board to the flange, covering screw holes, and sealing seams and corners before tile, which reflects the questions homeowners ask after seeing how often leak prevention depends on these less visible steps. This shower waterproofing example demonstrates those details.
Separate code compliance from good practice
A method can be common without being reliable, and a recommended detail can exceed the local minimum. The installer should identify the membrane system, explain how the drain is integrated, and state which requirements come from product instructions, industry standards, or local code.
Red flag: If the explanation begins and ends with “the tile and grout will keep the water out,” the waterproofing plan isn't sufficiently defined.
Before tile covers the work, photograph seams, corners, fasteners, niches, benches, and drain connections. Ask what testing or inspection is appropriate for the selected system. Don't accept a vague promise that the membrane is “waterproof enough.” A durable shower depends on compatible materials installed in the correct sequence.
Estimating Time and Budget for Your Tile Project
A shower remodel budget isn't just the price of tile. Demolition, framing corrections, substrate preparation, waterproofing, drain work, mortar, grout, sealants, trim, fixtures, cleanup, and labor all influence the final scope. A simple-looking wall can become a more involved project if the existing framing is out of plane or the drain and floor elevations don't support the intended layout.
The project also moves through distinct phases. Demolition exposes the existing conditions, framing establishes the plane, substrate preparation creates the tile base, waterproofing protects the assembly, tile setting builds the finish, and grouting and sealant work complete the surface. Each phase depends on the previous one, so rushing a membrane cure or covering questionable work can create delays and repairs later.
Budget for the decisions that affect risk
Material choices affect labor as well as appearance. Intricate mosaics require more layout and cutting than straightforward field tile. Large-format tile can reduce joint count but demands a flatter substrate and careful handling. Linear drains, benches, niches, curbless transitions, decorative borders, and accessibility hardware each add coordination requirements.
A realistic planning conversation should answer:
- What is being removed, and what stays?
- Will the existing framing and floor support the chosen design?
- Which waterproofing system will be installed?
- Where will the drain sit, and how will the slope be formed?
- Which details need backing before the walls close?
- What cure times and inspections must occur before the next phase?
For homeowners in Portage, Kalamazoo, and surrounding communities, the Trademaster Construction instant pricing tool can provide a quick ballpark estimate before a design consultation. It won't replace a site assessment, but it can help organize the early budgeting conversation around the actual scope instead of the tile price alone.
A good shower tile installation video should help you identify quality, not encourage you to skip the difficult parts. Look for clear explanations of substrate rigidity, ANSI A118.10 membrane performance, seam and penetration treatment, drain integration, floor slope, mortar coverage, curing, and local code verification. Those details are what turn a tile finish into a shower assembly built for dependable daily use.
Trademaster Construction helps homeowners plan bathroom remodels and custom tilework with practical attention to waterproofing, layout, accessibility, and long-term durability. Visit Trademaster Construction to discuss your shower project, review the available planning resources, and take the next step toward a properly built renovation.

