
You're probably at the point where a curbless shower looks simple on the surface. One flat floor. Clean tile lines. No step to climb over. Then the questions start. How does the water stay in? Can large tile work? Does the floor need to be lowered? Why does one quote look close to a normal shower and another jumps once framing gets involved?
That confusion is normal. Curbless shower tile isn't just a tile choice. It's a floor system. The part you see is the finish layer. The parts that decide whether the shower performs are buried below it.
Why Curbless Shower Tile Is More Than a Pretty Surface
A homeowner picks a large-format porcelain tile, approves the color, and expects the rest to work itself out. Then framing starts, the plumber asks where the drain should land, and the quote changes. That shift surprises people because the expensive part of a curbless shower is often not the tile you see. It is the floor system you do not see.
A curbless shower has no raised curb to act like a small dam at the entry. Water control has to happen through shape, drainage, and waterproofing built into the assembly below the tile. If those parts are coordinated well, the shower feels simple. If they are not, the bathroom floor becomes part of the test.
The finished tile is only the top skin. Under it, the installer is working with structure, drain height, waterproof layers, thin-set compatibility, and the amount of drop available between the bathroom floor and the shower drain. It works a lot like a roof built upside down. The surface has to look finished, but the part that keeps water where it belongs is the layered system beneath it.
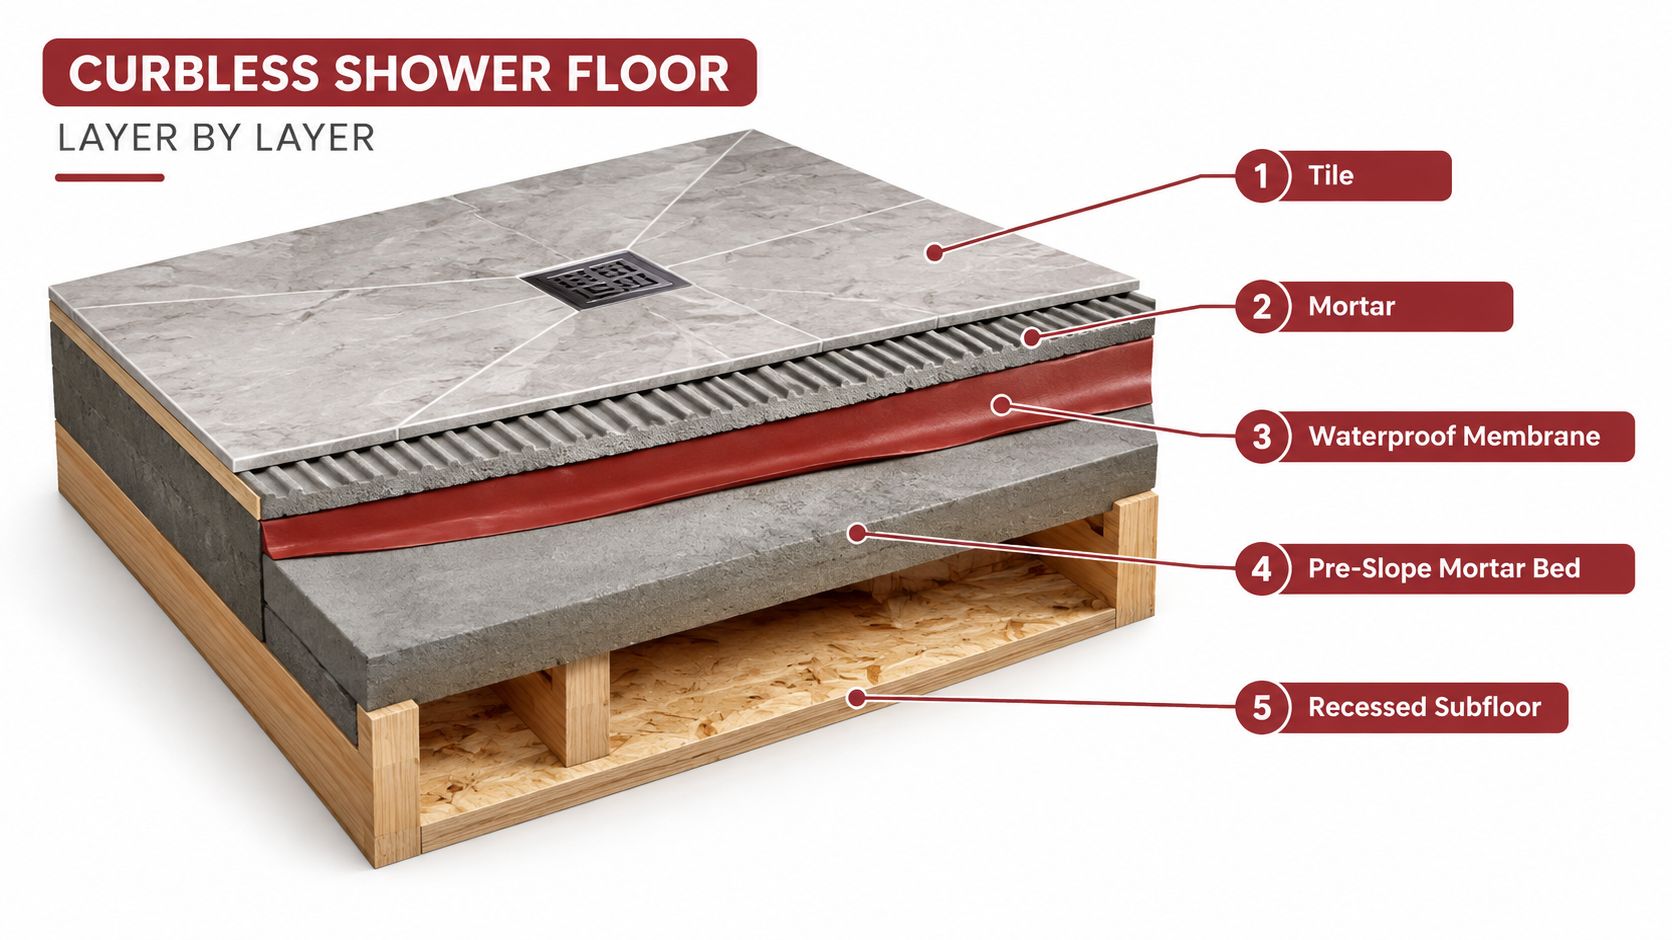
What sits behind the tile
Homeowners usually start with style. Installers start with geometry.
- Framing depth: The floor needs enough room to create pitch toward the drain without leaving the shower entrance higher or lower than the rest of the bathroom in an awkward way.
- Drain location: A centered drain, offset drain, or linear drain changes the shape of the slope, the tile layout, and the plumbing work below.
- Waterproofing method: The membrane, drain body, and setting materials have to be part of the same approved system or a clearly compatible assembly.
- Flood testing: Before tile goes in, the shower base should be tested so leaks are found while they are still easy to fix.
One practical checkpoint helps here. If the conversation is focused on grout color before anyone has confirmed recess depth, drain placement, and waterproofing details, the project is being discussed from the top down instead of from the structure up.
Curbless entries also matter for access, not just appearance. Universal design guidance treats a flush or near-flush shower entry as an important feature for people using mobility aids, for older adults, and for anyone who wants fewer tripping points in the bathroom, as outlined in this Universal Design Ireland reference.
Style still matters. It just comes after the assembly makes sense. If you want visual inspiration once the underlying system is planned, these 2026 shower tile ideas show how different tile looks can work in a curbless layout.
Substrate and Slope Requirements
A curbless shower floor has to do two jobs at once. It has to feel almost level when you walk in, and it has to move water downhill fast enough that the bathroom floor stays dry. The tile on top cannot solve that by itself. The result depends on the layers underneath and on whether the framing leaves enough room for the slope, waterproofing, drain body, and tile assembly.
The rule installers work from is straightforward. The shower floor is typically pitched 1/4 inch per foot toward the drain, which means a 4 foot run needs about 1 inch of fall, as outlined in the SCI BC curbless shower installation guide. That number sounds small until you try to fit it into a bathroom floor that was framed flat from wall to wall.
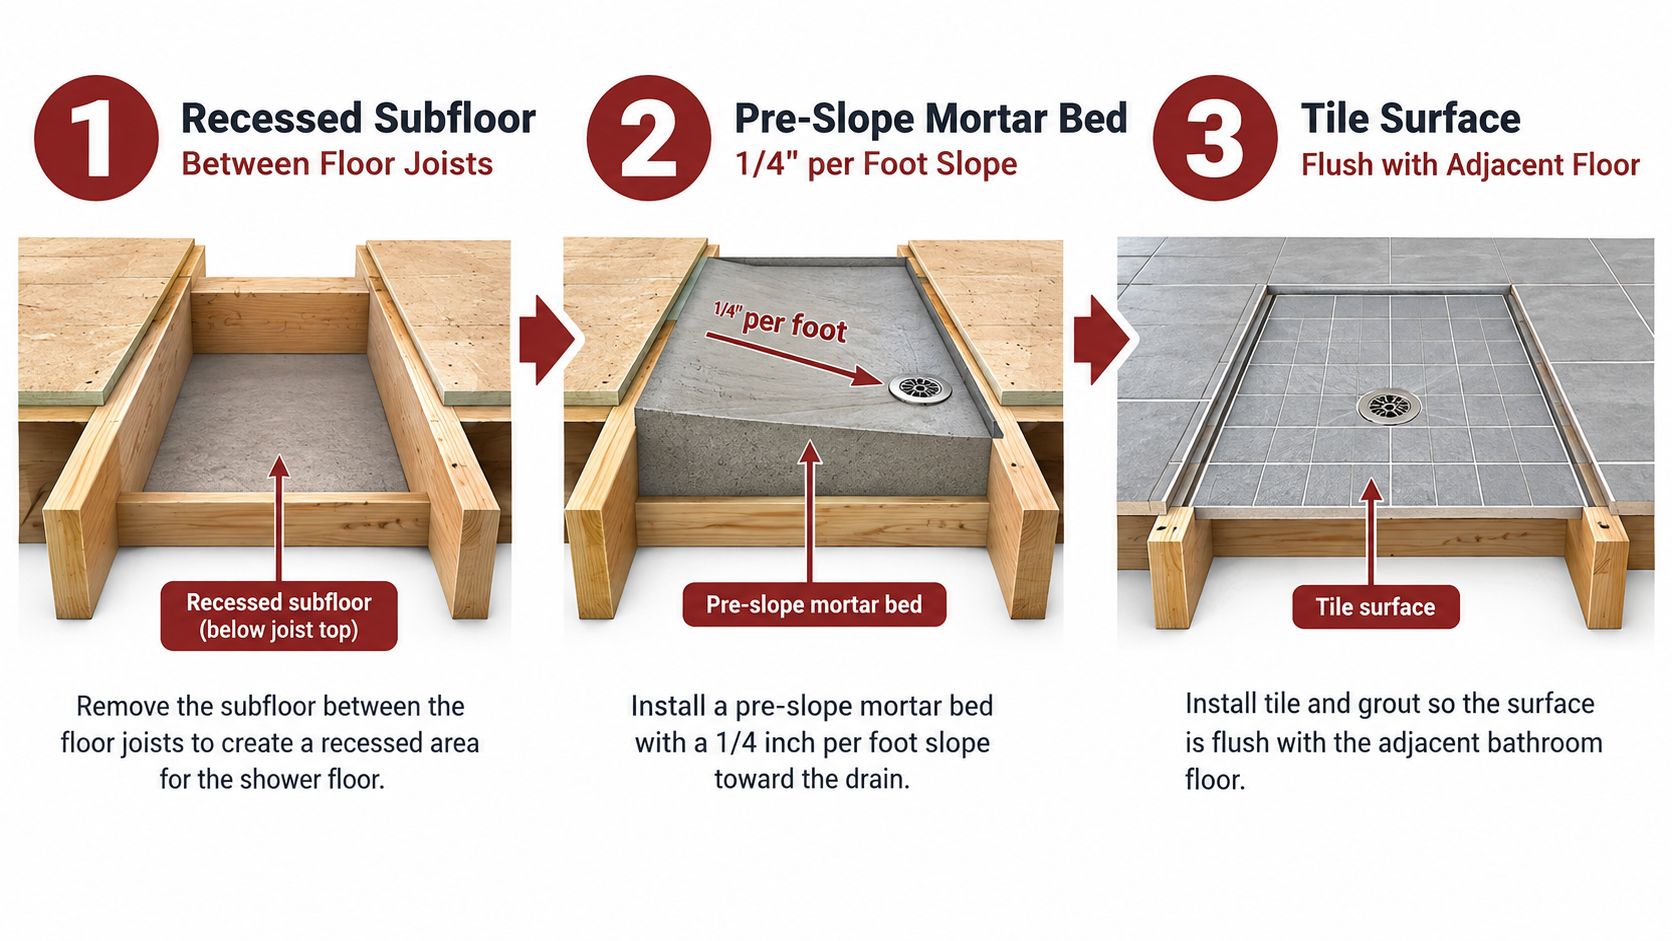
The three layers that get confused
Homeowners often hear one floor term used for another. On site, those layers do very different work.
Structural subfloor
This is the plywood or framed base that carries weight. If it flexes, the tile assembly above it starts with a handicap.Sloped shower base
This layer creates the fall toward the drain. It might be formed with mortar or built from a manufactured tray that matches the drain and waterproofing system.Tile-setting surface
This is the surface that receives tile and ties into the waterproofing. It has to be flat within each sloped plane, even though the whole shower floor is pitched.
A good comparison is roof framing. Shingles are visible, but the rafters and underlayment decide whether water sheds properly. Curbless shower tile works the same way. If the framing is too high, the installer runs out of depth. If the slope is inconsistent, water slows down or spreads toward the entry. If someone tries to correct those problems with extra thinset during tile installation, the floor shape usually ends up uneven.
Why the floor often has to be recessed
In many remodels, the shower area needs to be lowered between the joists or depressed in the slab so the finished tile can end up close to flush with the rest of the bathroom. The same SCI BC guide notes that a recess of roughly 1.5 to 2 inches or more may be needed depending on shower size and assembly thickness, while still aiming to keep any transition low if a perfectly flush entry is not possible.
That hidden framing work is a big reason curbless showers cost more than they look like they should. The visible tile may cover only a few square feet, but the carpenter, plumber, and tile setter are all working within the same shallow space.
Here is where projects usually get into trouble:
- Too much stack height: Subfloor patching, backer layers, heating mats, mortar, uncoupling membranes, and tile can add up fast.
- Drain set too high: A rough-in that is off by even a small amount can steal the depth needed for a proper pitch.
- Joists not adjusted correctly: Cutting or notching framing without an approved plan can create structural problems.
- Floor movement: Deflection in the wood framing can show up later as cracked grout, loose tile, or stressed waterproofing seams.
One honest jobsite truth matters here. If the floor is not lowered enough, the installer has only a few choices, and none of them are magic. The entry gets raised, the slope gets flatter than it should be, or the drain assembly has to be reworked.
That is why experienced tile installers spend so much time measuring before any tile goes down. The pretty part is the finish. The dry part comes from the slope math, the layer thickness, and the framing decisions underneath.
Drain Types and Placement
Drain choice changes almost everything. It changes how the floor slopes, what tile size works, how many awkward cuts show up, and how much structural depth the shower needs.
A curbless shower can use a center drain, an offset drain, or a linear drain, and the slope toward that drain is what keeps water in the shower zone rather than letting it wander into the room, as summarized in this curbless shower drain guide.
What each drain type asks the floor to do
A center drain usually creates a four-way compound slope. That's workable, but it asks more from the tile installer because every section of floor pitches toward a central point. Small mosaic tile handles that shape best because it bends with the geometry.
An offset square drain is similar, but it can help when plumbing or layout pushes the drain away from dead center. It still creates multiple planes, so tile size matters.
A linear drain changes the geometry. Instead of pitching the floor from all sides into a point, you can slope the whole floor in one direction toward a trench-style drain. That makes larger tile more practical.
Curbless Shower Drain Comparison
| Drain Type | Typical Slope Pattern | Best Tile Size | Key Trade-Off |
|---|---|---|---|
| Center drain | Four-way slope to a central point | Small mosaics | More forgiving for water collection, less forgiving for large tile |
| Offset square drain | Multi-plane slope to one side of center | Small mosaics or small modular tile | Helps with plumbing constraints, still creates complex tile cuts |
| Linear drain | Single-plane slope | Medium to large format tile | Cleaner tile layout, but drain placement and framing become more strategic |
Placement changes the build
A linear drain at the back wall gives you a broad, open look because the whole floor falls away from the room into the shower. It's popular for large tile layouts and cleaner sightlines.
A linear drain near the entry can shorten the slope run, which can reduce how much recess depth the floor needs. But it changes how the shower feels underfoot and puts the drain where the bathroom and shower visually meet.
One practical planning number shows why location matters. Independent design guidance notes that in a 5-foot-deep curbless shower with a linear drain along the back wall, a slope of 1/4 inch per foot creates a total fall of 1.25 inches from the entry edge to the drain, as shown in this curbless shower design guide.
Drain layout also has to respect joist direction, plumbing path, and the waterproofing system. That's why a drain isn't just a trim piece. It's one of the first decisions that should be locked in.
Waterproofing Strategies That Replace the Curb
A curbless shower has no raised lip to forgive a small mistake. If water gets past the tile at the entry, around the drain, or through a wall penetration, there is nothing there to stop it. The protection has to come from the layers you do not see.
Tile and grout are the finish surface. The water control happens below them, where the slope, membrane, seams, drain connection, and wall transitions all have to work as one system.
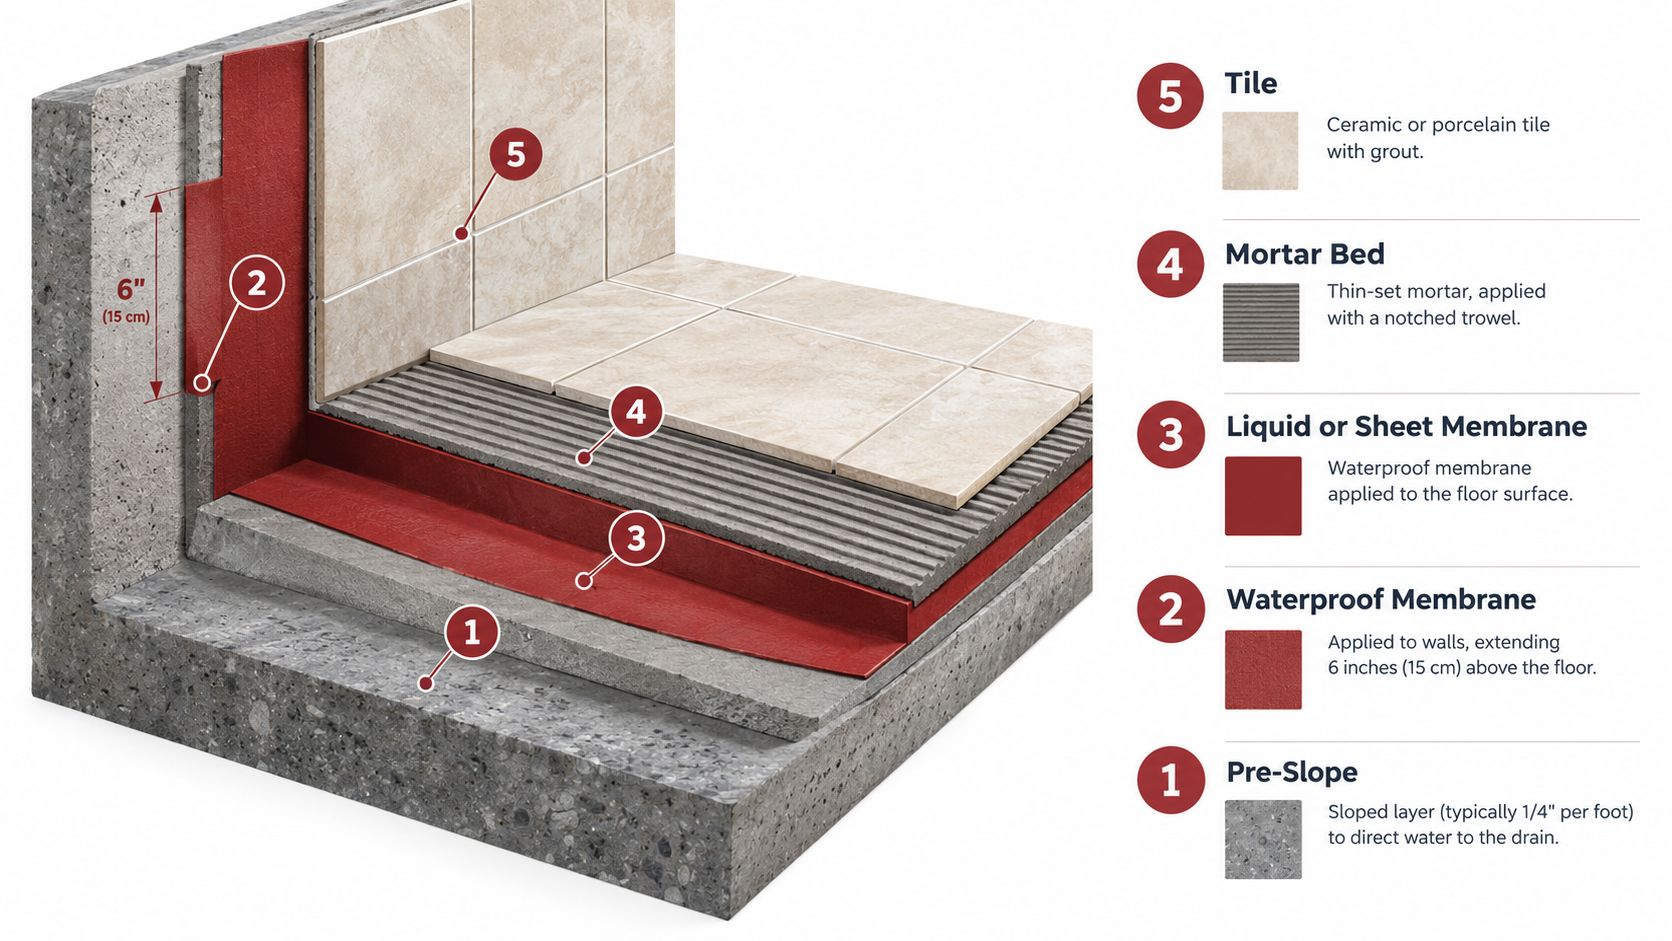
What the waterproofing has to accomplish
The easiest way to understand a curbless shower is to picture a shallow pan built into the floor framing. The tile is the visible skin. Under that skin, the waterproof layer has to send any water that gets through the tile assembly back to the drain instead of letting it spread into the bathroom floor or wall cavity.
That means three jobs have to happen at the same time. The substrate has to stay sloped toward the drain. The membrane has to remain continuous at corners, seams, and changes in plane. The waterproofing also needs to continue beyond the wet area because the shower opening has no curb to contain splash and overspray.
Industry guidance from the Tile Council of North America says curbless shower receptors need waterproofing that extends beyond the shower opening and a successful water test before tile is installed, as outlined in the TCNA curbless shower receptor discussion and testing article.
A detail many homeowners miss is the bathroom side of the entry. That area is part of the water-management plan too. If the floor just outside the shower is flat, or worse, pitched the wrong way, water can travel out of the wet zone even when the shower itself was tiled neatly.
Why failures usually happen at transitions
Leaks rarely start in the middle of a field tile. They usually start where one material hands off to another.
That includes inside corners, the drain flange, the wall-to-floor joint, bench framing, niches, pipe penetrations, and fasteners placed where they should not be. I tell clients to think of waterproofing like a rain jacket. The fabric matters, but the stitched areas and zipper are where water usually finds its way in first. A curbless shower works the same way.
The order of work matters because each layer depends on the one below it.
- Slope first: Water under the tile still needs a downhill path to the drain.
- Membrane next: Sheets or liquid-applied products only work if coverage is continuous and the manufacturer's thickness or overlap rules are met.
- Drain tie-in: The membrane has to lock into the drain assembly made for that system.
- Wall carry-up: Waterproofing needs to run up the walls and around every penetration, not stop at the floor line.
If an installer gets one of those steps wrong, the shower can look finished and still be one busy week away from a call-back.
Flood testing is the honest checkpoint
A flood test is the builder's chance to prove the pan holds water before expensive finish work hides everything. The drain is plugged, the receptor is filled, and the water level is checked after the test period. If the level drops, the shower is telling you there is a problem while it is still fixable.
That is a far better moment to find a leak than after the bathroom is painted, trimmed, and in daily use.
Some homeowners worry most about mold, which makes sense. Mold is usually the result, not the first mistake. The first mistake is letting moisture stay where it cannot dry. For practical cleanup and prevention habits after installation, this Florida shower mold guide from AMPM Restoration is a useful homeowner read.
Questions worth asking your installer
Ask these in plain language.
- How far does the waterproofing run past the shower opening? It should extend beyond the visible wet area.
- Which drain system is being used, and how does the membrane connect to it? Surface caulk is not the waterproof connection.
- Will you flood-test the shower before tile is installed? Ask when that happens and who verifies it.
- How are niches, valves, benches, and spray-body penetrations waterproofed? Those details are common leak points.
- What protects the bathroom floor right outside the entry? In a curbless shower, that edge detail matters almost as much as the drain.
The curb used to be the obvious water barrier. In a curbless shower, the barrier becomes a hidden system of slope, membrane, and tested connections. That hidden work is what decides whether the tile stays beautiful or becomes the cover over a slow leak.
Tile Sizes and Slip-Resistant Finishes
Showroom boards can make any tile look like it belongs on a shower floor. Real slope changes that answer fast. Curbless shower tile has to match the drain layout, the pitch, and the need for stable footing.
Small tile is more forgiving on sloped floors. Large tile can look excellent too, but only when the drain geometry supports it.
Tile Format vs Curbless Floor Performance
| Tile Format | Slope Compatibility | Drain Layout Needed | Slip Resistance Notes |
|---|---|---|---|
| Small mosaics | Excellent on compound slopes | Center or offset drains | More grout joints usually improve traction |
| Medium porcelain | Good on simpler slopes | Often paired with linear drains | Matte or textured finishes are safer than glossy surfaces |
| Large format tile or slab | Best on single-plane layouts | Usually needs a linear drain | Surface finish matters heavily because there are fewer grout joints |
Why size changes with drain style
A center drain forces the floor into several angled planes. That's why small mosaics are common there. They can follow the surface without leaving high corners and lippage all over the place.
A linear drain lets the floor tilt in one direction. That opens the door to larger planks or rectangles because the tile doesn't need to fold across multiple planes.
Slip resistance matters more than people think. In wet areas, textured matte finishes are usually a smarter call than glossy floor tile. More grout joints can help with grip, but too much texture can also make cleaning harder. That balance is part of the selection process.
Finish and grout choices that hold up better
A few practical guidelines help:
- Use floor-rated finishes: Wall tile and floor tile don't always belong in the same place.
- Watch grout joint width: Too tight can make layout corrections harder on a sloped floor.
- Choose grout by maintenance goals: Some homeowners prefer epoxy grout in wet areas because it resists absorption better than traditional cement grout.
- Coordinate cuts with the drain: A linear drain cover can often hide a full tile cut for a cleaner visual line.
The best curbless shower tile floor isn't always the tile that gets the biggest reaction in the showroom. It's the one that still looks and feels right after years of wet feet.
Accessibility, Aging in Place, and Who Really Benefits
A homeowner in their 40s may choose a curbless shower because it looks clean and modern. Ten years later, that same detail may be the reason a parent can visit safely, or why a sore knee does not turn shower entry into a balancing act. The benefit is not only what you see at the floor line. It is how the whole shower is built to remove a tripping point while still controlling water.
That second part matters. A curbless shower only helps if it stays usable when the floor is wet, when someone needs a little more room to turn, or when a caregiver has to step in beside the person showering. The tile is just the wear surface. Accessibility comes from the wider system underneath it, including the floor height, the slope, the drain layout, and how far waterproofing extends into the bathroom.
Major accessibility guidance stays fairly consistent on the big ideas. The shower entry should be flush or close to flush, and the space around it needs to support real movement, not just look open in a photo. The Canadian CMHC guide identifies the custom-built curbless, wheel-in shower as the best design to accommodate as many people as possible, and related universal design guidance commonly points to open floor areas around 36 x 60 inches, entrances of at least 36 inches, and wheel-in layouts around 1,500 x 1,500 mm, as summarized in this universal design bathroom specifications reference.
Practical advantages
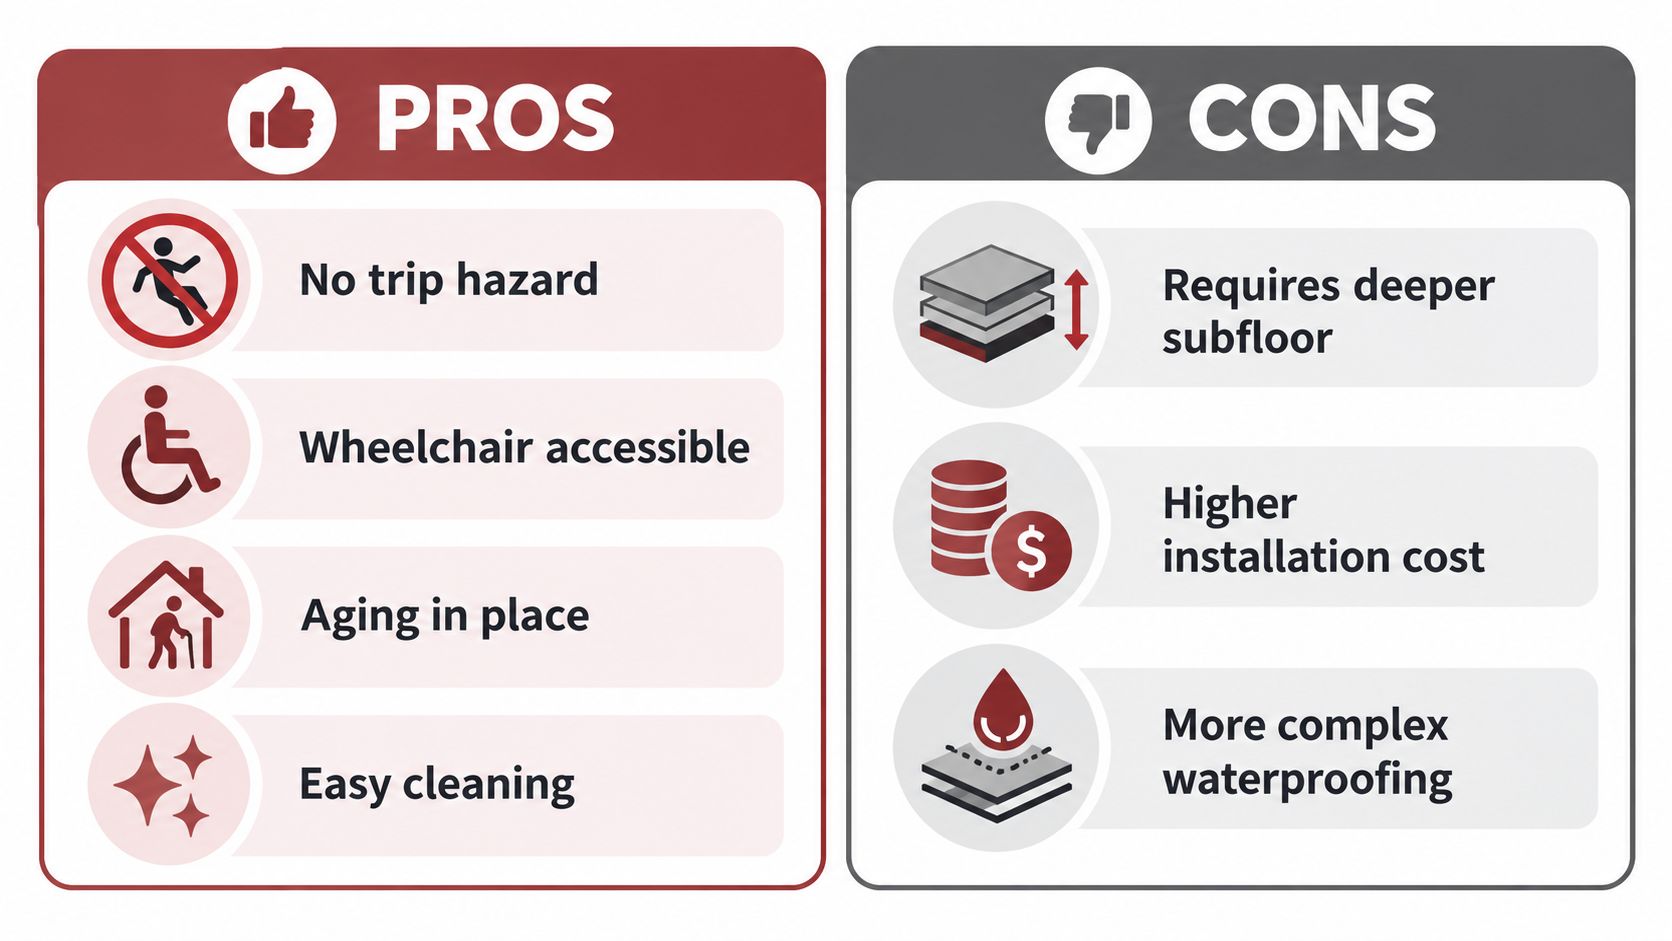
- Easier entry: No curb means no step up and over, which helps with walkers, wheelchairs, canes, and tired legs.
- Safer transfers: A helper has more room to stand beside the user instead of reaching over a raised edge.
- Better long-term use: A bathroom that works for a healthy adult today is more likely to keep working after surgery, injury, or reduced balance.
- More useful floor area: The bathroom often feels larger because the floor continues into the shower without a hard stop.
The U.S. Access Board also allows shower floors to slope to drains with a maximum 1:48 slope in bathing rooms, which reflects the balance between drainage control and accessibility in this Access Board bathing room guidance.
Here's a visual explanation of how the layout and entry can work in practice:
Who benefits most
Wheelchair users are the clearest fit, but they are not the only ones. Older adults with reduced balance, people recovering from hip or knee surgery, and households planning to stay in the home for many years often get the most practical value from a curbless layout.
Caregivers do too.
A standard curb works like a small barrier in the exact spot where someone may need steady footing and extra space. Remove that barrier, and the shower becomes easier to enter, easier to assist in, and easier to adapt later with grab bars, a folding seat, or mobility equipment.
Trade-offs to understand before you build one
A curbless shower asks more from the room around it. Water has fewer physical boundaries, so layout matters more than it would in a shower with a raised threshold. If the opening is too wide, the spray points toward the entry, or the glass stops too short, water can leave the shower area more easily.
That is why some households are happier with curbless than others. Families with small children, pets, or fast back-to-back morning routines may notice more water on the main bath floor if the design is tight. In those cases, the answer is not always “skip curbless.” Sometimes it means making the shower a little larger, adjusting the glass, or accepting that the waterproofed area needs to extend farther than people expect.
Cost Drivers and Budget Planning
A curbless shower can look simple on the finished side. Under the tile, it is usually the opposite.
The budget rises or falls on work you may never see again after the job is done. The installer may need to recess part of the floor, adjust plumbing to hit the drain location exactly, extend waterproofing farther into the room, and build a flatter, more controlled transition from the main bathroom floor into the shower area. That hidden assembly is why two showers with similar wall tile can land in very different price categories.
Where costs usually change
Instead of treating the shower like a tile upgrade, it helps to price it like a floor system with tile on top. The main variables are usually:
- Framing work: If the shower area needs to sit lower than the rest of the bathroom floor, the structure has to allow it. In some homes that is simple. In others, it means joist changes, added reinforcement, or a different subfloor build-up.
- Drain selection: A centered drain can be less expensive to rough in if it works with the room. A linear drain often simplifies tile layout and entry design, but it usually asks for tighter plumbing placement and a drain body that costs more.
- Waterproofing area: A curbless shower often pushes waterproofing beyond the shower footprint because there is no raised edge stopping water at the entry.
- Tile labor: The material price matters, but labor often changes more than homeowners expect. Small floor tile can follow compound slopes more easily. Large-format tile may require more prep, more cuts, or a different floor geometry.
- Glass and layout: If spray control depends on a fixed panel or a longer return, the enclosure design can affect both material and labor.
A good quote should show those pieces clearly. If a bid only lists tile, backer board, and a drain, it may be missing the work that makes a curbless shower function.
The hidden scope that catches budgets off guard
The quiet budget driver is often the floor framing.
If the bathroom was built for a standard shower pan with a curb, the crew may need to create room for slope without making the bathroom floor outside the shower feel awkwardly high. That can mean lowering the shower area between joists, building up the surrounding floor, or changing the drain approach. None of that is decorative work, but it is often what separates a clean curbless result from a shower that feels improvised.
Waterproofing can also spread farther than homeowners expect. Without a curb, the bathroom floor near the entry becomes part of the wet-zone strategy, at least to some degree. More membrane, more detailing at seams and corners, and more time spent flood-testing all add labor even when the visible tile area stays almost the same.
Budget for decisions, not just finishes
A helpful way to plan is to split the estimate into two buckets:
- System costs, such as framing, drain rough-in, slope creation, waterproofing, and testing
- Finish costs, such as tile, grout, trim, glass, and hardware
That keeps the conversation honest. Expensive tile does not create a curbless shower. Correct structure, drainage, and waterproofing do.
Recent design coverage also shows that more homeowners are choosing low-threshold and curbless layouts for long-term usability, not only for appearance, as noted in this walk-in shower ideas roundup. That trend helps explain why remodel budgets now include more discussion about floor structure, drain placement, and wet-room style waterproofing.
If you want to compare options before asking for bids, Trademaster Construction offers an instant pricing tool that helps sort the project by scope, finish level, and shower type.
Planning Checklist Before Tile Goes On the Floor
Most curbless shower mistakes happen before the tile order is even placed. Once materials are bought and plumbing is set, changing direction gets expensive fast.
Use this as a pre-order checklist.
Lock these decisions first
- Confirm the floor structure: Verify joist depth and whether the shower area can be recessed.
- Set the slope plan: A curbless shower floor still needs drainage engineered into the assembly.
- Choose the exact drain type and location: Don't leave this as a field decision.
- Match drain and waterproofing system: The membrane and drain body need to work together.
- Test with water before tile: A simple pour test can reveal weak spots in slope.
- Make tile size fit the geometry: Large tile belongs only where the floor planes allow it.
- Pick a safe finish: Wet-floor traction matters more than a showroom sheen.
What good planning sounds like
You want to hear a contractor talk in sequence. Structure first. Plumbing second. Waterproofing third. Tile last.
If the plan is clear, the tile installer isn't improvising around hidden problems. The shower gets built like a system, not assembled like separate parts.
Trademaster Construction helps homeowners in Southwest Michigan plan bathroom remodels with the structural, waterproofing, and tile decisions lined up before work begins. If you're pricing a curbless shower or comparing it to a standard walk-in design, visit Trademaster Construction to explore the process and get a clearer starting point for your project.

