
You're standing in a gutted bathroom, looking at darkened studs where the shower wall used to be. The tile looked serviceable before demolition, but the musty smell tells a different story. Whether you're replacing that shower or planning an upgrade in Portage or Kalamazoo, the important question isn't just which tile to choose. It's how the installer will keep water out of the structure.
Why Custom Tile Showers Fail Before They Look Bad
A shower can look finished while hiding unfinished water-management details. An untreated valve opening, an incorrectly connected drain, or a poorly prepared base can disappear behind attractive tile. Once covered, those details become difficult to inspect without taking the shower apart.
The exposed wall is where a homeowner finally gets to see what the old finish concealed.

Custom tile shower installation is a water-management project first. The installer needs to establish a sound supporting structure, a drainage path, and a compatible waterproofing assembly before the decorative work starts. Choosing grout color doesn't answer any of those questions.
A Durable Material Still Needs a Sound Assembly
Ceramic tile has a long architectural history, with surviving examples dated to approximately 3550 BCE and water-exposed applications extending back more than 5,500 years, as described in the history of ceramic tile. That history supports choosing tile as a durable finish, not assuming that every tiled shower is durable.
The distinction matters when comparing proposals. A quote that names the tile but says little about the underlying assembly leaves the most consequential work undefined. Ask the contractor to explain the sequence: assess the site, prepare the substrate, waterproof, set tile, grout, and establish maintenance requirements.
Buying rule: If you can't describe what's behind the tile, you don't yet know what kind of shower you're buying.
Read the Proposal Beyond the Finish Schedule
Look for a description of the shower base, wall substrate, waterproofing product, drain connection, and testing plan. Niches, benches, and entry transitions deserve their own details rather than a general promise to make everything watertight.
Separate moisture concerns from cosmetic ones. Discolored grout may call for cleaning, while a musty wall or recurring dampness calls for investigation. Don't approve a cosmetic repair until the contractor has considered where the water is coming from.
The strongest starting point is a documented assembly, not an assurance that the installer has always done showers this way.
Assessing the Site and Preparing the Substrate
Measure the structure and the finished layout before ordering the shower base. The existing drain opening isn't necessarily the right location for the new shower, and the exposed subfloor isn't the finished floor elevation. Tile, mortar, substrate, and the selected receptor all affect the entry height.
Start with a straightedge, level, tape measure, and photographs. Inspect the framing for damage and alignment, then examine the floor support before deciding how the shower will be built.
Check Structure Before Chasing the Drain
- Framing: Identify deteriorated wood and walls that need correction before backer board goes up. Don't ask tile-setting mortar to straighten a badly misaligned wall.
- Joists and subfloor: Record joist direction and spacing, inspect soft areas, and establish whether the proposed floor recess requires structural review.
- Plumbing: Confirm the drain route and rough-in height against the selected shower assembly. Moving a drain must not become an excuse to cut framing without an approved solution.
- Bathroom clearance: Mark the shower footprint alongside the toilet, vanity, and door swing. Check the actual approach, not just whether the enclosure fits on paper.
Use this checklist as a field-discussion aid, with the actual framing and drain design controlling the work.
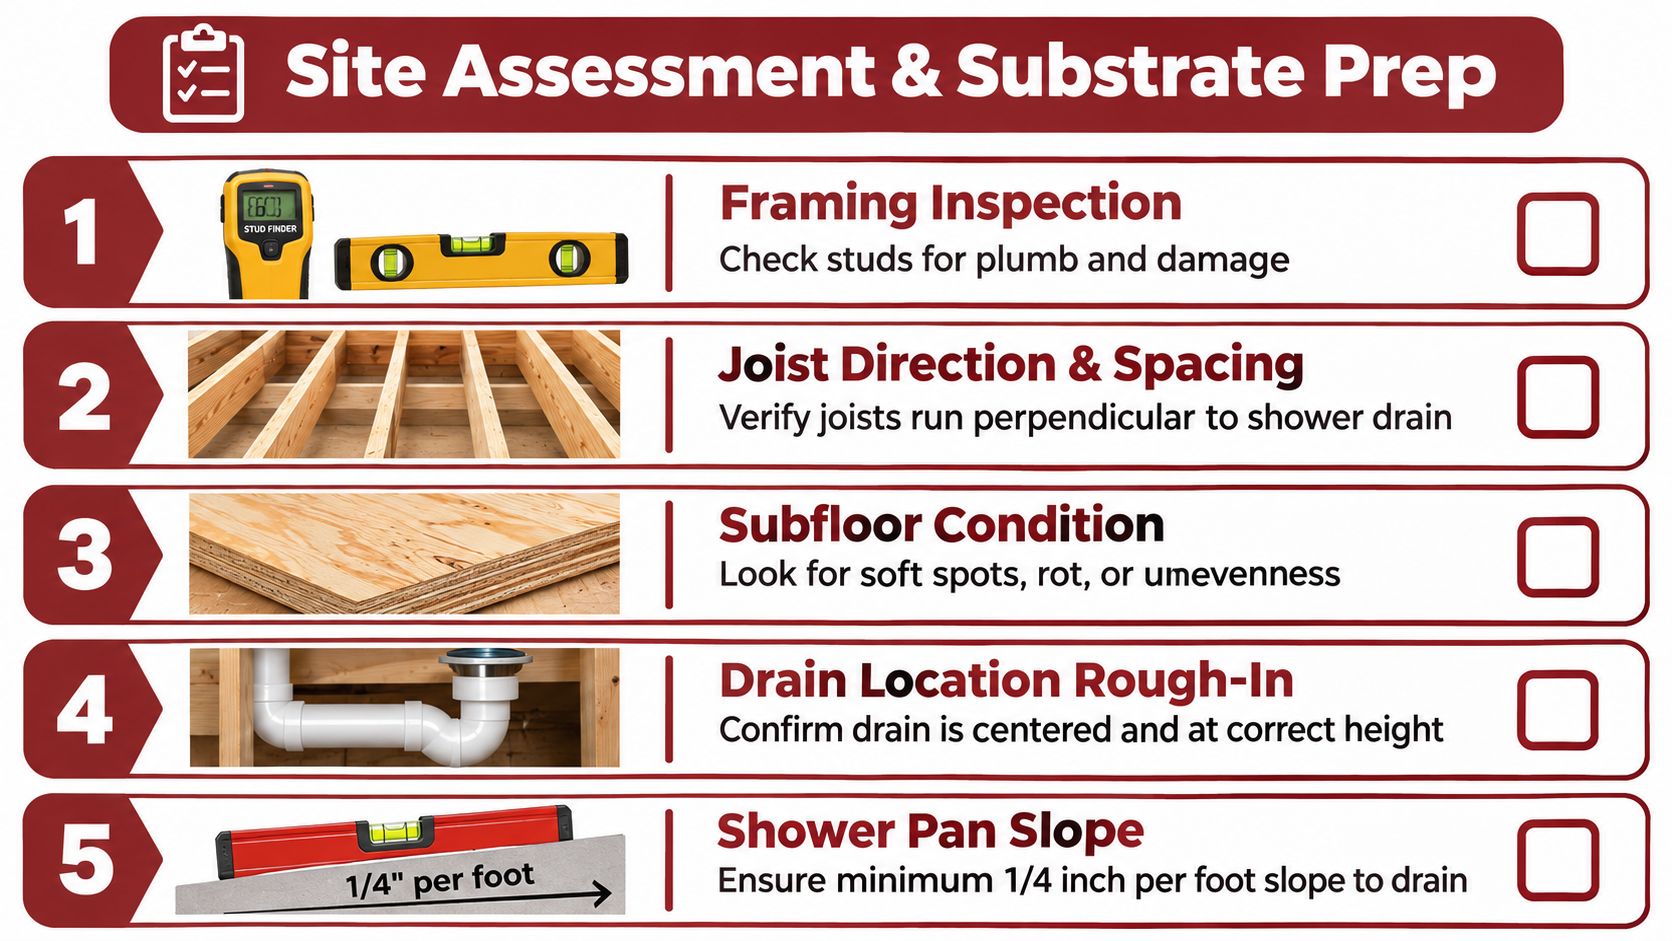
A drain doesn't have to be centered, and joists don't have to run in a particular direction relative to it. Those choices depend on the drainage layout and structural constraints.
Choose the Base to Suit the Site
Cement backer board provides a tile substrate, but it isn't a standalone waterproofing layer. Foam shower pans and pre-sloped rigid trays provide a manufactured starting shape, while a site-built mortar base allows the installer to work around a custom footprint. None removes the need to verify support, compatibility, and finished elevations.
Industry water-management guidance identifies a continuous slope of at least 1/4 inch per foot toward the drain, along with ANSI A118.10-compliant membranes, appropriate ANSI A108 installation methods, and pre-tile testing as installation controls in its shower waterproofing standards. Check that slope with a straightedge in multiple directions, including beside the drain.
Document the proposed finished height at the shower entry and bathroom doorway. That measurement can reveal a threshold conflict or door clearance problem before waterproofing makes corrections expensive.
Building the Waterproofing Assembly Behind the Tile
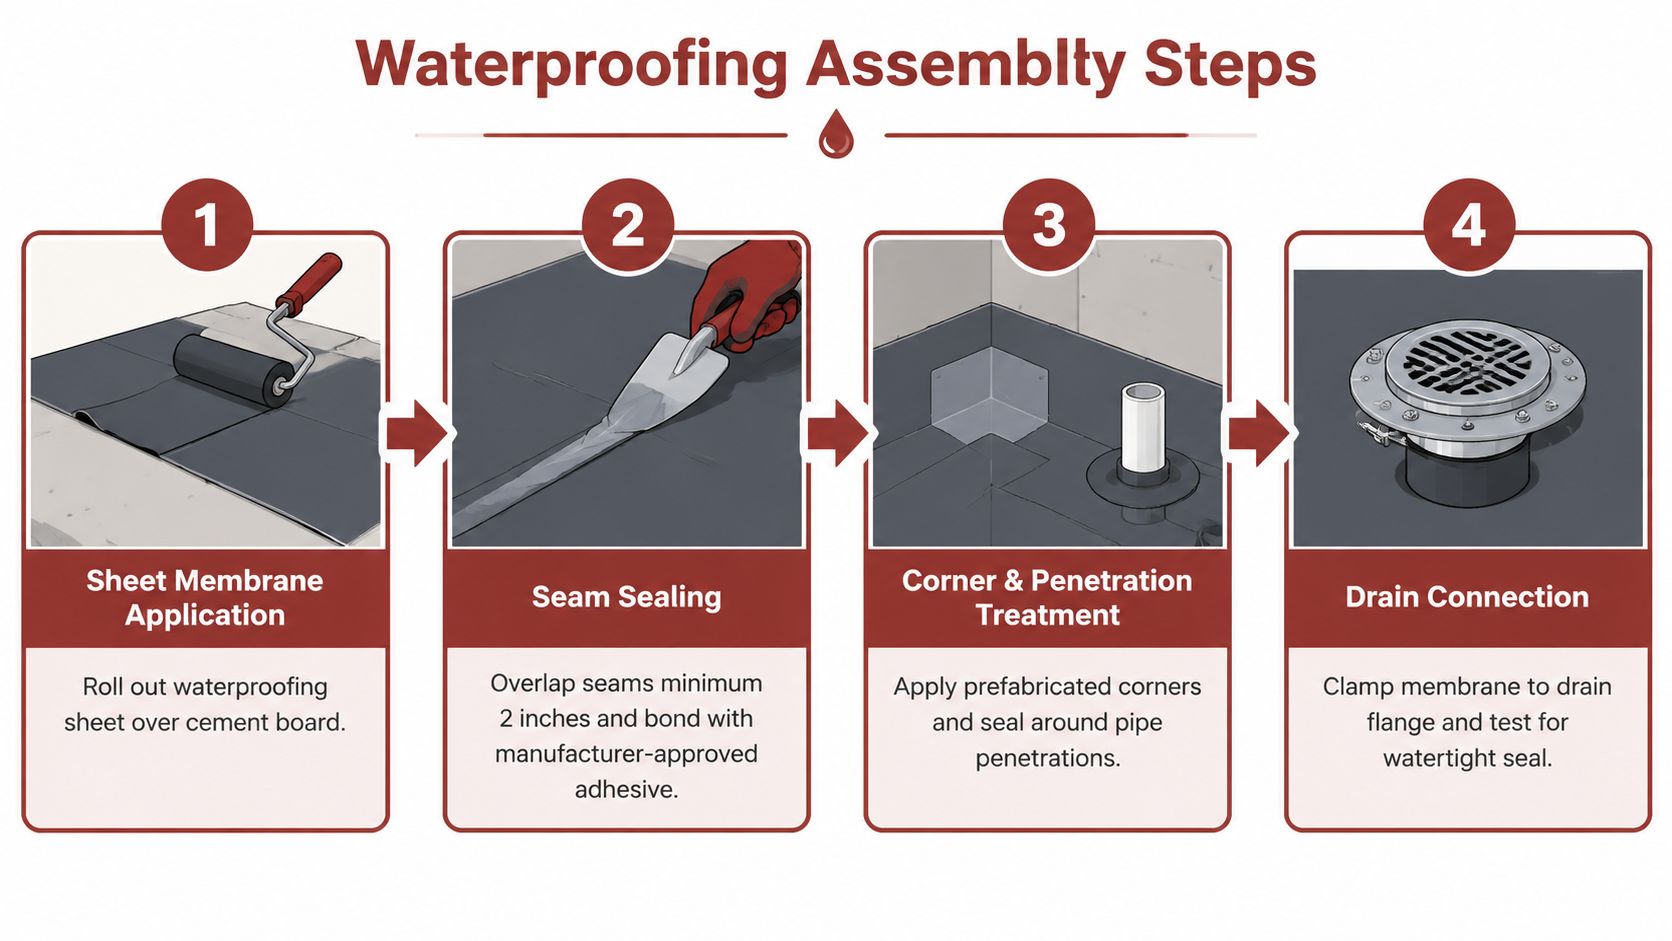
The waterproof layer must remain continuous through every change in shape. Flat wall areas are usually straightforward to inspect. Curb corners, niche openings, bench seams, plumbing penetrations, and the drain connection deserve closer attention.
The assembly diagram is a starting point, not a substitute for the chosen manufacturer's installation instructions.
Sheet Versus Liquid Membranes
With a sheet membrane, the installer must bond the material and complete every seam, corner, and accessory connection using the specified method. With a liquid-applied membrane, the installer must follow the product's application, coverage, reinforcement, and drying requirements. Choose a system the installer can explain and execute, rather than combining unrelated products because they're available.
Don't treat a diagram's overlap or drain-clamping detail as universal. Some assemblies use a bonded drain connection; others use a different approved arrangement. The membrane and drain must work together according to their system instructions.
TCNA-based shower and steam-room guidance calls for surface-applied waterproofing on shower floors and walls, with ceilings included for steam-room applications, and describes flood testing after the second liquid-membrane coat has thoroughly dried. It also makes the essential distinction: tile surfaces and grout joints aren't substitutes for the continuous waterproof layer.
Test Before Concealing the Work
A flood test belongs before tile installation, after the assembly has met its required curing conditions. Have the installer temporarily plug or dam the drain using the appropriate test arrangement, fill the receptor, mark the water level, and inspect for leakage or abnormal level loss.
The local authority and membrane manufacturer determine the applicable testing requirements. Record the test duration, result, and any corrective work rather than accepting a photograph of standing water as proof by itself.
- Inspect transitions: Request close-up photographs of curb corners, niche and bench details, seams, and the drain tie-in.
- Check penetrations: Confirm how the installer seals pipe and valve openings and avoids poorly positioned fasteners.
- Recheck drainage: Resolve reverse slopes around the drain before setting tile.
- Keep records: Save the membrane product information and the completed test record with the project documents.
For a visual companion to the assembly discussion, review this installation video alongside your selected system's instructions.
Don't let a delivery delay or a busy tile crew turn a required flood test into an optional step.
If the receptor doesn't pass, stop. Covering an unresolved problem with tile usually makes the eventual repair more destructive.
Choosing Tile and Planning the Layout
A tile that looks right on a showroom board may be wrong for a wet shower floor. Manufacturer approval for the intended use should come before color, format, or a sale price. Ask for the product's wet-use information and slip-resistance documentation rather than relying on the word porcelain.
Match the Format to the Drainage Geometry
Porcelain and ceramic both offer shower-design possibilities, but the product's intended application matters more than its category name. A wall-only ceramic tile shouldn't become floor tile because it matches the accent strip. Likewise, a polished porcelain surface shouldn't be assumed suitable for barefoot wet use.
Small-format mosaics are a practical choice where the floor changes slope toward a point drain. Larger tiles require a layout that respects those changing planes, or cuts that allow the surface to follow them. Large panels can simplify the visual pattern on walls, but they demand careful handling, cutting, and substrate preparation.
Tile options compared for shower use
| Material | Typical format | Slip resistance | Best fit for |
|---|---|---|---|
| Porcelain tile | Field tile, mosaics, large panels | Verify the specific wet-floor product | Coordinated walls and floors with appropriate product selection |
| Ceramic tile | Wall tile and decorative accents | Don't assume wall tile is floor-rated | Walls, niches, and accents approved for shower exposure |
| Porcelain or ceramic mosaic | Small pieces mounted in sheets | Verify the surface and wet-use suitability | Floors with multiple slope directions |
| Natural stone | Field tile and mosaics | Product-specific, especially when wet | Designs where the owner accepts material-specific care |
Use the table to narrow choices, not to rank every product within a category. When budgeting, compare the installed cost: delicate cuts, panel handling, and complicated patterns can change labor requirements even when tile prices look similar.
Draw the Cuts Before Mixing Mortar
Plan the shower-head wall, corners, niche borders, and drain cuts together. Full tiles on a focal wall may look appealing, but not if they leave awkward slivers at the opposite corner. Centered drain cuts are useful only when they also respect the actual slope.
Keep joint widths consistent with the tile and grout specifications. Dry-lay mosaic sheets to inspect their spacing, and mark transitions before setting begins. The layout belongs on paper or in a tile-planning app before any thin-set is mixed.
Grout, Sealers, and the 24-Hour Cure
Grout selection affects application and maintenance, not the waterproofing design. Choose it alongside the tile so the installer can account for joint width, cleanup requirements, and the manufacturer's curing instructions.
Compare the Grout, Not Just the Color
| Grout type | Practical advantage | Installation trade-off | Maintenance decision |
|---|---|---|---|
| Cementitious | Generally more approachable to apply and finish | Mixing and cleanup need control | Check whether the product requires sealing |
| Epoxy | Improved stain and water resistance | Higher cost and more demanding working-time management | Follow its cleaning instructions rather than adding grout sealer |
Epoxy can be useful for an owner who prioritizes stain resistance, but it isn't a repair for a defective shower assembly. Cement grout can be a sensible choice when its maintenance requirements suit the household, as discussed in this bathroom moisture-management guide.
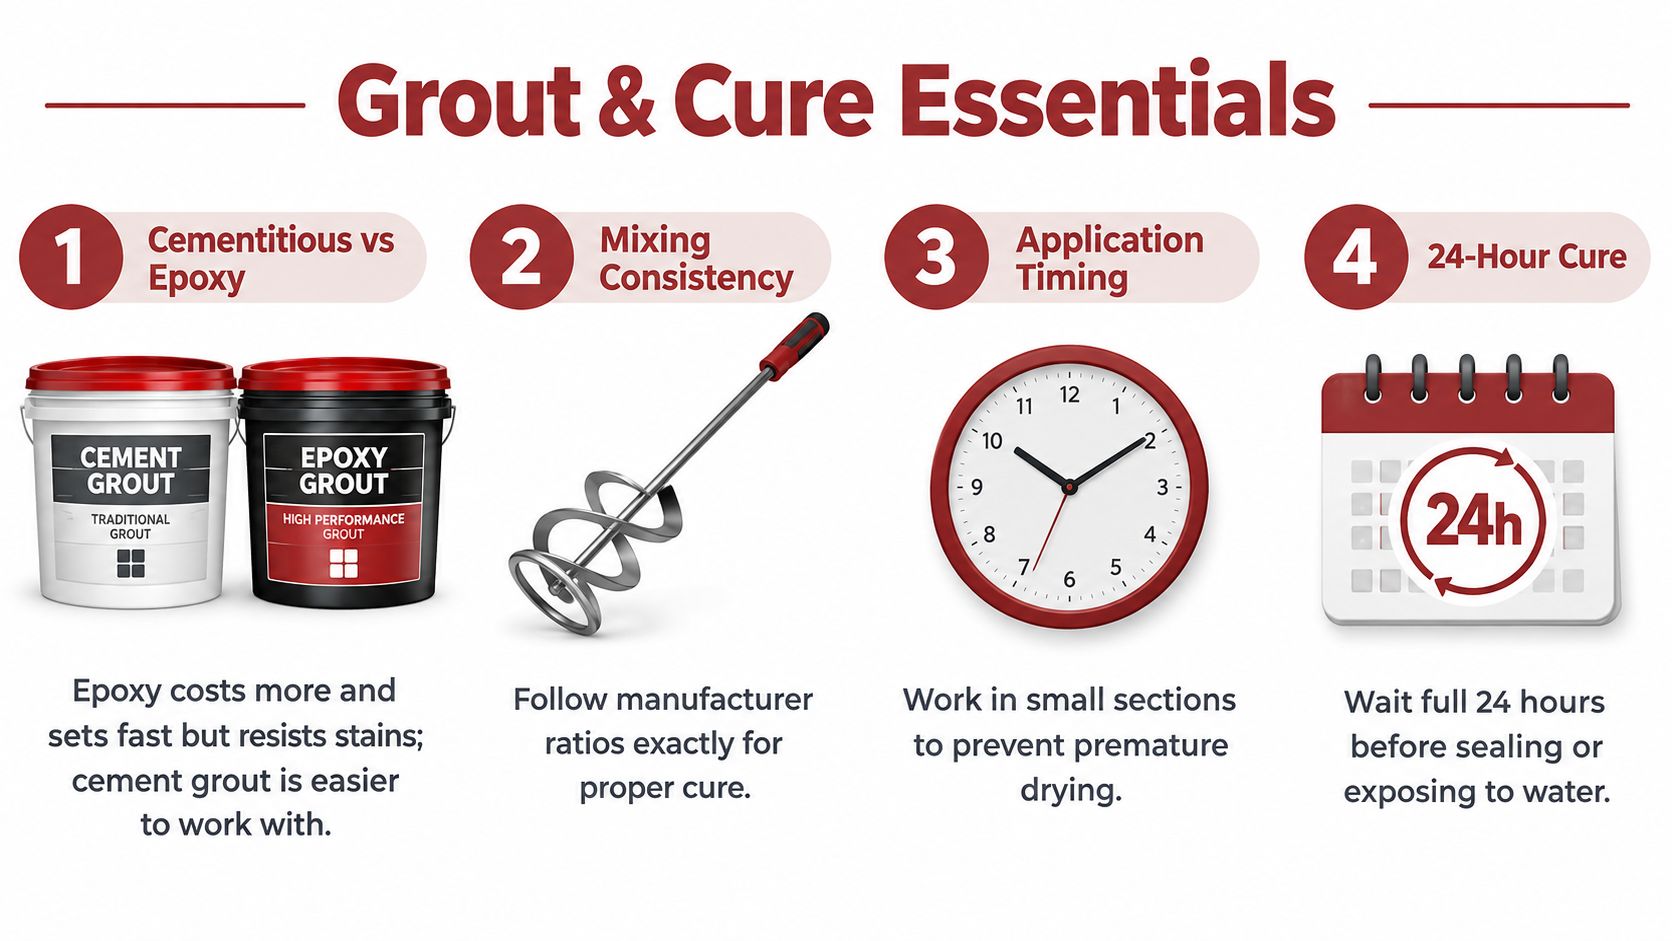
Use the following reminders with the product instructions, especially for curing and water exposure.
Separate Setting, Grouting, and Return to Service
Tile-setting specifications require tiles to be firmly set and a wait of at least 24 hours before grouting, while shower grout must fill the entire joint depth, as described in the ceramic-tile installation specifications. That waiting period isn't a universal permission to seal grout or use the shower.
Follow the actual mortar, grout, and sealer instructions for each stage. Don't skim grout over the joint surface, and don't substitute a calendar promise for product-specific curing conditions.
- Sealing: Some cementitious grouts need sealer; verify the product. Epoxy grout and glazed tile surfaces don't need a cement-grout sealer, while stone may have separate care requirements.
- Resealing: Use the manufacturer's maintenance guidance and observed condition rather than an invented universal schedule.
- Ventilation: Confirm that the bath fan exhausts outdoors, not into an attic or wall cavity.
For older joints that have lost their appearance, Restore Heroes' resource on how to restore dull grout lines offers a relevant maintenance starting point. Cleaning or sealing still shouldn't substitute for investigating recurring moisture.
Planning an Accessible Curbless Shower
Accessibility starts during framing, not after the tile is installed. A handheld spray, seat, and grab bar can all be useful, but their positions must work with the user's approach, transfer method, reach, and assistance needs.
Begin by deciding what the shower must support: easier entry for a walking user, independent wheelchair use, or assisted bathing. Those aren't interchangeable design goals.
Plan the Approach as Carefully as the Interior
ADA roll-in shower guidance specifies a clear interior of 60 inches long by 30 inches deep, plus a clear floor area outside the opening of at least 36 by 60 inches, running parallel to it. These are useful planning references, not proof that a private residential bathroom automatically meets every accessibility requirement.
Mark that surrounding space on the floor. Then check whether the door swing, vanity, toilet, or shower enclosure obstructs it. A generously sized shower can still be awkward to use if someone can't approach or transfer comfortably.
The most attractive accessibility feature isn't necessarily the most usable one. Test the person's movement through the layout before choosing the fixtures.
Put Reinforcement Where It Will Be Needed
Install structural blocking before wallboard for planned grab bars, seats, and future accessories. Record its location so a later installer isn't guessing through finished tile.
The U.S. Access Board's bathing-room guidance specifies that, in standard roll-in compartments with seats, grab bars belong on the back wall and the side wall opposite the seat, not above it. It also places controls and spray units beside the seat within 27 inches of the wall behind it, or on the back wall within 15 inches of the seat centerline, depending on the arrangement.
Drainage and wheelchair access must be coordinated. Accessible floor planning guidance uses a slope limit of approximately 1:48, with structural review, entry-zone waterproofing, and finished-elevation checks addressed before tile in its accessible shower remodeling guidance.
- Curbless: Can improve entry, but may require framing changes and a more involved transition.
- Low curb: May cost less when it avoids those changes, but a remaining threshold can still prevent independent wheelchair entry.
- Seat choice: Check whether a fixed bench consumes transfer space or restricts caregiver movement.
Build a field mock-up using the planned tile and mortar thickness. Test entry, seating, control reach, and assistance positions before waterproofing begins.
Timeline, Costs, and When to Hire a Pro
A reliable schedule separates active work from waiting periods. Demolition and inspection come first, followed by any structural repairs, rough plumbing, substrate work, waterproofing, testing, tile setting, grout, and final checks. Ask the contractor to show those stages rather than quote an unsupported completion window.
Tile delivery, concealed damage, membrane drying, and inspection availability can affect when the next trade proceeds. The grout waiting requirement described earlier also belongs in the schedule. Don't accept a plan that treats the entire assembly as a single finish task.
Budget for the Assembly
Compare proposals using the same scope: demolition, disposal, repairs, plumbing changes, shower base, waterproofing, tile, niches, enclosure, and ventilation work. A curbless conversion or elaborate tile layout deserves its own allowance rather than being buried in a general bathroom price.
For an initial project budget, use our instant pricing tool before scheduling a walkthrough. Treat the result as a ballpark estimate, then refine it after the contractor assesses the site and design.
Know When the Work Exceeds DIY
Hire a professional when you can't confidently establish the drainage geometry, connect the waterproofing to the drain, or perform and interpret the required testing. Structural floor recesses, accessibility-driven layouts, large-format panels, and complicated penetrations add reasons to bring in experienced help. Saving on tile-setting labor isn't useful if the concealed assembly needs rebuilding.
Before final payment, request a closeout record:
- Substrate photographs: Framing repairs, floor preparation, and accessibility blocking.
- Waterproofing details: Product identification and concealed transition photographs.
- Test result: The documented flood-test outcome and applicable duration.
- Finish specifications: Tile, grout, sealant, and maintenance instructions.
- Ventilation verification: Confirmation of the exhaust route and installed fan.
Keep these records with the bathroom's care instructions. They're more useful for future maintenance than photographs of the finished tile alone.
Trademaster Construction offers bathroom remodeling and custom tile showers for homeowners in Portage, Kalamazoo, and surrounding Southwest Michigan communities. Visit the team to discuss your shower layout, waterproofing scope, and accessibility needs, and turn your preliminary budget into a site-specific installation plan.

