
You're looking at scratched cabinet doors, a finish that won't come clean, and drawers that stick when you're trying to cook. Painting sounds sensible until you open the sink cabinet and notice that the bottom feels soft. Those problems might look like parts of the same renovation, but they need different solutions.
Learning how to remodel kitchen cabinets starts with separating what looks worn from what no longer works. Inspect the boxes, choose the smallest scope that solves the actual problems, and settle the measurements before ordering attractive doors that might end up attached to failing cabinets.
Decide Whether Your Cabinet Boxes Are Worth Keeping
Tired doors can be replaced. A soft sink base needs closer investigation. The cabinet box, not its face, determines whether refinishing is worth doing. Moisture around sinks, dishwashers, and floor-level cabinets often matters more than cabinet age.
Full replacement is common, but it isn't mandatory. The 2025 U.S. Houzz Kitchen Trends Study found that 69% of kitchen renovators replaced all cabinets, while 27% upgraded only some. Your decision should follow the condition of your kitchen, not the most popular renovation scope.
Inspect each box before choosing a finish
Empty the cabinets and use a flashlight, straightedge, tape measure, and screwdriver to check what the doors conceal.
- Separate cosmetic defects: Dated color, scratched doors, worn finish, and outdated pulls don't automatically justify new boxes.
- Check moisture exposure: Examine cabinet floors, plumbing penetrations, toe-kicks, and the dishwasher opening. Press gently on bottom panels and investigate staining or softness.
- Test structure: Look for open joints, swollen particleboard, peeling layers, sagging shelves, and boxes that are out of square.
- Operate everything: Test slides and hinges. A loose hinge may be repairable; crumbling material around its screws is a different problem.
- Measure usable storage: Confirm that shelves accommodate your cookware and that the run supports a workable preparation area.
Use this assessment guide while inspecting each cabinet.
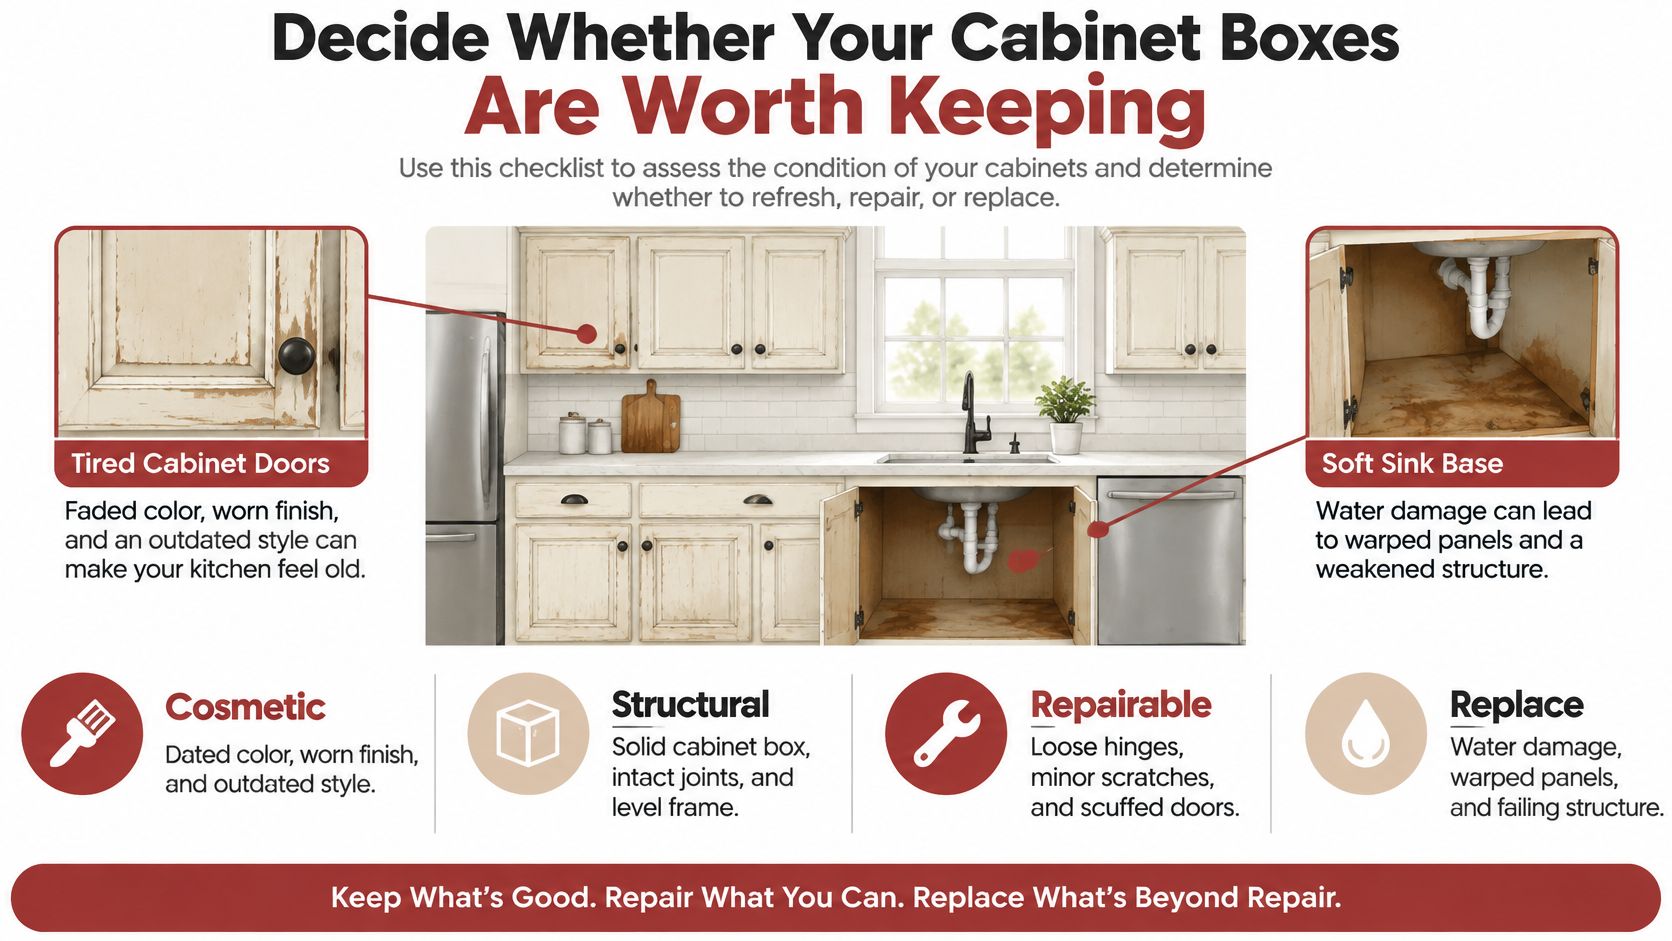
Mark each run keep, repair, or replace
| Decision | Condition | Appropriate action |
|---|---|---|
| Keep | Dry, square box with intact joints and secure fasteners | Retain it and update visible surfaces or fittings |
| Repair | Localized edging damage, loose hardware, or a replaceable shelf | Repair the defect before refinishing |
| Replace | Water-softened panels, delamination, failing structure, or an unworkable layout | Replace the affected cabinet or redesign the run |
Don't spend finish money on a substrate that can't hold a screw.
A sound box can still be wrong for its location if the layout prevents a safe work zone. Conversely, replacing a damaged sink base while retaining usable perimeter cabinets can leave budget for ventilation, electrical work, or countertops. Premier Builders' guide to assessing the value of kitchen upgrades offers useful context for judging those competing priorities.
Refacing, Partial Upgrades or Full Replacement Compared
Cabinet remodel paths compared
| Path | What Changes | Typical Cost | Choose It When |
|---|---|---|---|
| Refinish or paint doors | Surface color only; boxes and doors stay | Quote preparation, repairs, and coating labor | Boxes sound, layout works, look is dated |
| Replace doors and drawer fronts | New faces on existing boxes | Quote measured fronts, hinges, and installation | Boxes sound; fronts need a new style |
| Refacing | Veneer on boxes plus new doors and drawer fronts | $5,000–$13,000 for a kitchen, about $150–$450 per linear foot, in Carolina Renew's published comparison | Layout works and boxes are structurally sound |
| Partial replacement | Damaged or poorly planned runs replaced | Quote selected boxes plus adjoining finish work | Some boxes fail while others are sound |
| Full replacement | New boxes, doors, and drawers | Median $55,000 for a major kitchen remodel, not cabinets alone, in the 2026 U.S. Houzz Kitchen Trends Study | Layout, storage, or structure cannot be fixed in place |
Painting is appropriate when the existing door style still suits the room. It changes color, not door profiles, drawer capacity, or cabinet proportions. The labor can also be substantial when grease, damaged coatings, and detailed molding require extensive preparation.
Replacing fronts goes further visually, but new drawer fronts don't create better drawers. If you want improved storage, specify replacement drawer boxes, compatible slides, or pull-outs separately. Check the clear opening before buying organizers.
Match the scope to the failure
Refacing gives existing cabinetry a coordinated exterior without removing every box. Its limit is straightforward: veneer and new fronts can't correct water damage, poor workflow, shallow storage, or an unsuitable layout. Inspect face frames and shelf supports before treating refacing as the economical answer.
Home Pro's Remodeling & Repairs explains when to replace rather than reface, a useful comparison when the exterior looks salvageable but the interior needs substantial work.
Consider a kitchen with usable perimeter cabinets and an awkward corner. Replacing the corner and its adjoining cabinet with a compatible access solution may solve the storage problem without discarding the entire kitchen. Check door swings, neighboring drawer access, and countertop support before committing to that approach.
Scope check: Buy the improvement you need, not just the surface change you can see.
Before selecting a path, answer these questions:
- Are the boxes sound? Structural failure rules out a finish-only solution.
- Does the layout work? New faces won't move an inconvenient appliance.
- Are drawers and storage adequate? Specify interior improvements instead of assuming they come with new doors.
Measure the Room and Plan Clearances Before Ordering
Measure the finished room, not just the old cabinet widths. Walls may be uneven, openings may be out of square, and the existing installation may already contain compromises you shouldn't repeat.
Record measurements with a helper so dimensions and obstructions don't get missed.

Your survey should include drywall-to-drywall dimensions, ceiling height, doors, windows, trim, plumbing, electrical locations, flooring thickness, and appliance specifications. Note pipes, vents, radiators, and projecting handles.
Test the layout at full scale
- Draw a dimensioned plan, with separate wall elevations where needed.
- Mark the proposed cabinet and island footprints on the floor with painter's tape.
- Use available cabinet-width increments, allowing for end panels and finished sides.
- Reserve fillers wherever hinges, handles, or drawers need clearance.
- Specify a functional corner solution, checking its access and operating envelope.
- Test refrigerator, oven, dishwasher, and pull-out positions while open.
Nominal box dimensions aren't finished clearances. Include countertop overhangs and projecting hardware when checking circulation.
Kitchen clearances to plan before ordering
| Clearance | Minimum or Value | Why It Matters |
|---|---|---|
| Walking aisle | 36 inches, under NKBA planning guidance | Clear path between counters and appliances |
| Working aisle, one cook | About 42 inches, under the same guidance | Working and opening space |
| Working aisle, two cooks | About 48 inches, under the same guidance | Space for shared kitchen work |
| Work surface, accessible kitchen | 34 inches maximum, with an adjustable option of 29–36 inches, under applicable U.S. Access Board provisions | Establish height and required approach clearances before ordering |
| Toe space on floor-standing base cabinets | At least 2 inches deep and 3 inches high, under KCMA A161.1-2022 | Provides a recess for feet beneath the cabinet front |
Treat aisle guidance as a planning baseline, not a promise of comfort. Accessible work areas also need appropriate clear floor space and knee and toe clearance; height alone doesn't establish accessibility.
Use the video alongside your drawings when reviewing the proposed arrangement.
Once the taped layout passes appliance and clearance checks, send the dimensioned plan, elevations, and appliance sheets together for contractor verification. Don't release a cabinet order from an unverified sketch.
Choose Box Materials, Doors, Finishes and Hardware
A premium-looking door doesn't tell you what's behind it. Ask separately about the box core, door construction, exposed edges, finish system, and hardware.
Cabinet box materials compared
| Material | Strength and Fasteners | Moisture Tolerance | Emissions Note |
|---|---|---|---|
| Solid wood | Strong; holds screws well; moves with humidity | Good when sealed; can swell in wet areas | Wood itself is low-emitting; finishes and adhesives may emit VOCs |
| Plywood | Strong, stable, holds fasteners well | Better than particleboard; still needs sealed edges near sinks | Ask about formaldehyde in adhesives |
| Particleboard | Economical; fastener areas weaken when wet | Poor near sinks and dishwashers | Pressed-wood core can emit formaldehyde; request documentation |
| MDF | Dense, smooth surface for painted components | Poor when wet unless specifically engineered and protected | Pressed-wood core can emit formaldehyde; request documentation |
Moisture-resistant isn't waterproof. Plywood can be a sensible sink-base choice, but it won't compensate for an unresolved leak. Solid wood needs room to move with humidity, while MDF can provide a smooth painted door surface without being the best choice for a moisture-exposed cabinet bottom.
For more detail on construction trade-offs, Jennifer Gilmer Kitchen & Bath discusses durable materials for kitchen cabinetry. Compare the actual assembly, including joinery and edge protection, rather than buying by material name alone.
Specify the complete assembly
Pressed-wood products can release formaldehyde, and Colorado State University Extension's indoor-air guidance recommends asking about formaldehyde content and ventilating after installation. Request emissions documentation for panels and information about adhesives and coatings. A solid-wood door doesn't disclose the materials used elsewhere in the cabinet.
Paint provides a uniform appearance but may show chips at frequently handled edges. Stain reveals grain and can be difficult to match during later repairs. Wood-grain laminates offer consistent appearance, although damaged edges need a different repair approach from stained wood.
- Hinges: Match door weight, overlay, opening angle, and mounting style.
- Drawer slides: Select load ratings for the drawer and its intended contents.
- Pulls: Check hole spacing, hand clearance, and proportions before drilling.
- Finish products: Obtain cleaning instructions and retain product identification for touch-ups.
For example, you might specify sealed plywood sink-base construction with solid-wood upper doors. Before ordering, confirm the core, adhesives, finish products, edge treatment, and hardware ratings in writing.
How to Refinish or Install Cabinets Safely
Refinishing succeeds when the coating bonds to a clean, stable surface. Installation succeeds when the boxes are supported, aligned, and anchored correctly. Don't treat either job as a shortcut around preparation.
Use this workflow as a site checklist.
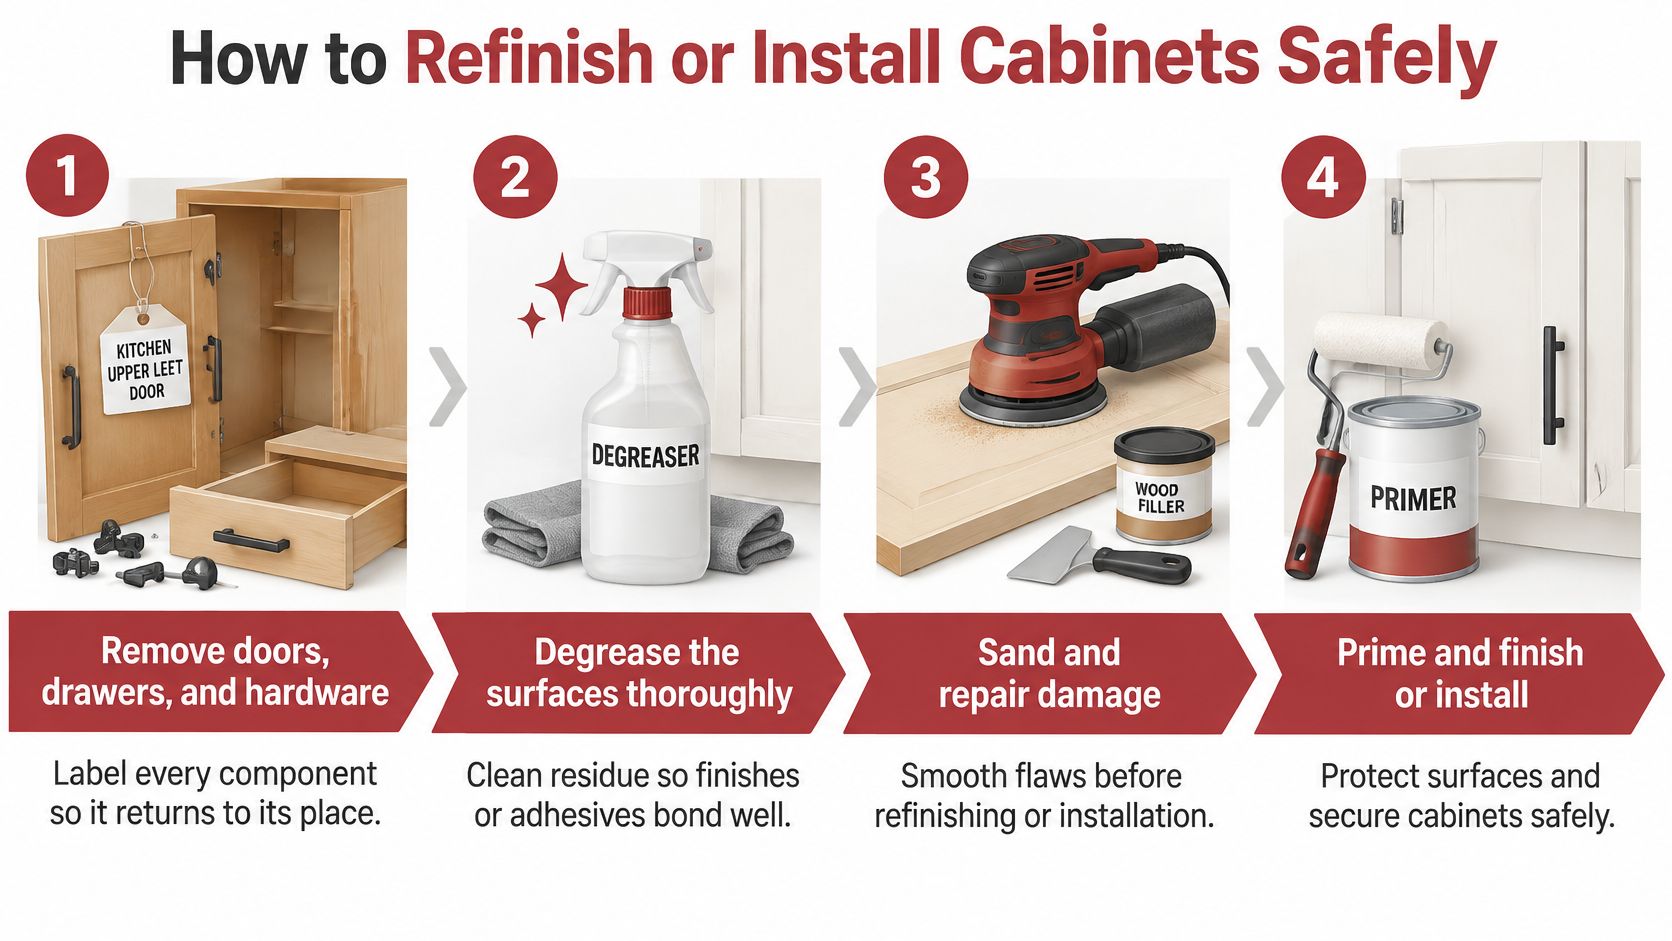
Prepare and prove the finish system
Remove and label components. Take off doors, drawers, and hardware, then mark their original locations in concealed areas. Bag the associated screws so reinstalling doesn't become a guessing exercise.
Degrease thoroughly. Use a cleaner compatible with the existing surface and remove its residue as directed. Sanding a greasy door can spread contamination instead of producing a bondable surface.
Repair only stable material. Reattach loose edging and repair localized defects after fixing the moisture source. Replace swollen, delaminated, or water-softened structural panels rather than hiding them beneath filler or veneer.
Abrade or degloss appropriately. Use the coating manufacturer's specified preparation method, remove dust, and test adhesion on a concealed area. Don't aggressively sand through a thin veneer or assume every factory finish accepts the same primer.
Make a test assembly. Confirm overlay, hinge-cup locations, boring patterns, slide ratings, and reveals before drilling the remaining parts. Once the fit is proven, use a drilling jig or template for repeatable positioning.
Prime and finish in controlled coats. Use a compatible primer and cabinet-rated finish, observing the specified recoat and cure times. A surface that feels dry may still be too soft for stacking, hardware pressure, or regular cleaning.
Control indoor air. Isolate the work area, exhaust outdoors, and maintain fresh-air ventilation during application and curing. New York State health guidance identifies new cabinets, finishes, and related products as VOC sources and recommends lower-VOC purchasing and ventilation.
Set and secure the cabinets
Establish the installation reference. Locate studs, mark a level reference line, and account for the floor's high point before setting boxes. Shim uneven walls and floors, fasten adjoining boxes appropriately, and anchor wall cabinets into structural framing, never drywall alone.
Verify before locking everything in. Check plumb, level, door swing, drawer clearance, appliance fit, and consistent reveals before final tightening. Secure and level the base cabinets before countertop templating, then protect finished surfaces during subsequent work.
Finish warning: Less odor doesn't prove a coating has fully cured.
Don't close the kitchen immediately after coating or rush doors back into service. Continued ventilation and careful handling reduce exposure and prevent avoidable dents, sticking surfaces, and damaged finishes. Structural fastening, electrical alterations, and uncertain wall conditions deserve qualified trade input rather than improvised fixes.
Timeline and Budget for Your Cabinet Remodel
Cabinet remodel time and cost by scope
| Scope | Typical Cost |
|---|---|
| Refacing | $5,000–$13,000 for a kitchen, about $150–$450 per linear foot, using the published comparison above |
| Partial replacement | Itemized quote for selected runs, matching work, removal, and installation |
| Major remodel with all-new cabinets | Median $55,000 in 2024, according to Houzz reporting covered by NOLA.com |
The major-remodel figure is a whole-project benchmark, not a cabinet price or an upper spending limit. A cabinet-only refresh generally involves much less work, but extensive repairs, premium fronts, and countertop changes can narrow the difference.
A standard kitchen remodel typically takes eight to twelve weeks, depending on project scope. Refacing and partial-replacement durations need confirmation against the actual repairs, product lead times, and finishing requirements. Don't assume the installation period equals the entire period from design approval to completion.
Build the estimate around scope
The important cost drivers are concrete:
- Box condition: Hidden damage adds removal, repair, and replacement work.
- Runs replaced: Isolated replacement can require matching panels and transitions.
- Materials and fronts: Door construction, finishes, and specialty storage affect the order.
- Utilities: Electrical and ventilation changes introduce work beyond cabinetry.
- Countertops: Removal, replacement, support requirements, and templating affect both cost and sequencing.
Set aside a contingency for concealed water damage and other conditions that can't be verified before demolition. Keep that allowance separate from upgrades you already know you want. An unselected backsplash isn't an unforeseen expense.
For an early ballpark kitchen estimate before scheduling a call, use our instant pricing tool. Treat the result as a planning starting point, then reconcile it with verified measurements and an itemized scope.
Compare complete totals
Ask for estimates that identify demolition, disposal, repairs, cabinet components, installation, finishes, and related trade work. Otherwise, a lower cabinet allowance may exclude work included elsewhere.
Estimate each viable scope, add a contingency, and compare the complete totals. Finalize measurements before ordering, and confirm who is responsible for checking appliance specifications and replacement-part availability.
Confirm the Plan with Your Contractor Before Ordering
Send the measured plan, cabinet assessment, material selections, hardware list, and budget together. A door sample alone can't communicate whether you're preserving the layout, replacing selected boxes, or changing the way the room functions.
Our planning process starts with how you use the kitchen and where you encounter frustrations or limitations. That information helps distinguish an appearance problem from a layout or storage problem before construction decisions become expensive.
Resolve the items that change scope
- Cabinet decisions: Identify every run to retain, repair, or replace, including any conditions that still need investigation.
- Utility work: Confirm electrical, plumbing, and ventilation changes before cabinet dimensions are finalized.
- Finish protection: Establish where coating work will occur, how ventilation will operate, and how adjacent rooms will be protected.
- Responsibility: Identify who verifies measurements, approves drawings, and checks delivered components.
Request a written schedule showing demolition, necessary trade work, cabinet installation, countertop templating, and final adjustments. The length of your project is determined by contacting Trademaster Construction with the project details, not by applying a generic cabinet-installation estimate.
Separate delivery readiness from field measurements
We don't start a renovation until all materials have been ordered, inspected, and delivered. Check doors, hardware, fillers, panels, and accessories as carefully as the main cabinet boxes.
Countertop material and fabrication arrangements should be confirmed before demolition, but final field templating must follow installed, secured, and leveled base cabinets. A template isn't a stock material you can inspect alongside an unopened cabinet order.
Use the instant pricing tool for your initial budget, then send the measured plan to our team to confirm scope and timing before placing the cabinet order. That sequence gives you a clearer commitment than choosing finishes first and trying to make the construction fit afterward.
Trademaster Construction offers kitchen remodeling in Southwest Michigan, from visible-surface updates to layout and storage redesigns. Visit Trademaster Construction to discuss your cabinet assessment and measured plan, then confirm a scope that addresses how your kitchen needs to work.

