
Two people, one sink, and the same 6:45 a.m. deadline. The shower has a six-inch step that's manageable now and won't be in fifteen years, the floor tile is cold from October through April, and the exhaust fan is louder than the conversation happening under it. None of those problems is about style. All three come from design decisions made once and never revisited.
That's the useful way to read bathroom remodel designs: as a set of construction choices that carry different costs, different install requirements, and different long-term consequences. A layout that looks effortless in a photo often depends on extra subfloor depth, hidden wall blocking, or a waterproofing system you'll never see again.
The category earns that scrutiny. In a May 2024 survey, NAHB Remodelers found that 65% of remodelers identified bathroom projects as a common remodeling job, placing bathrooms ahead of kitchens at 61%. Volume like that means good builders know these details cold, and most homeowners never hear them until demo day.
Here are ten designs worth comparing, judged on three things: how each one changes the layout, what it demands from the finishes, and what it does for accessibility five or twenty years out. Match the description to your household, not to a mood board.
1. Curbless Walk-In Shower
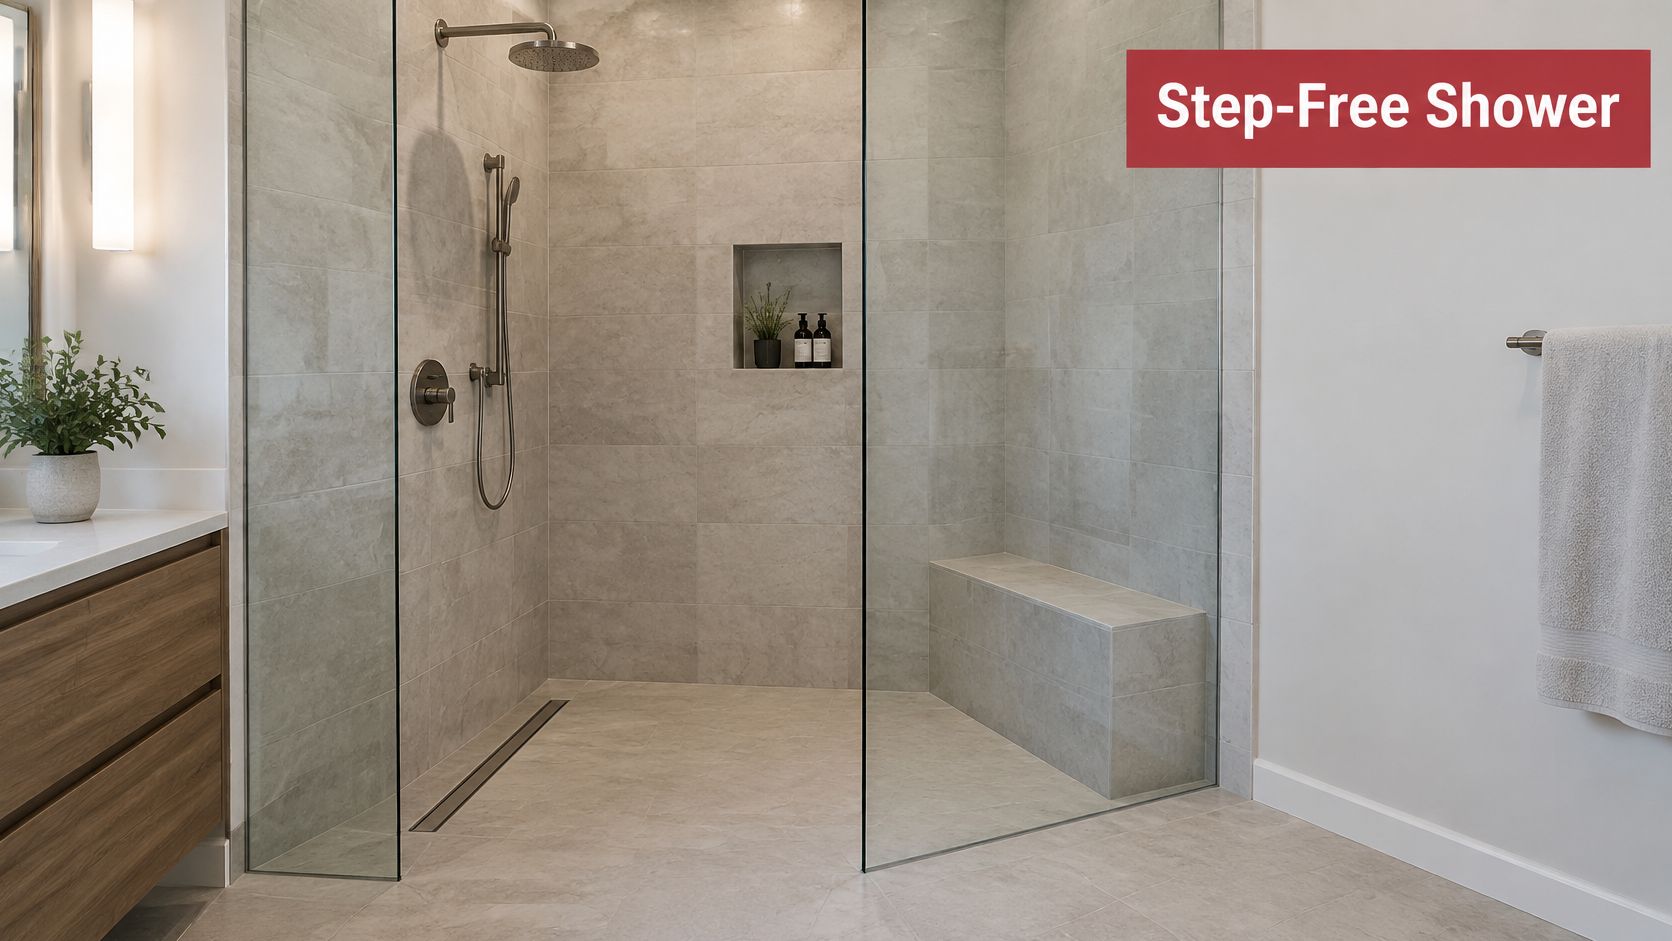
A curbless shower has no threshold. The shower floor sits flush with the bathroom floor and slopes toward a linear or point drain, so you walk in on one plane instead of stepping over a curb. It removes the biggest trip hazard in the room and makes a small bath read larger.
That missing curb changes the construction. Holding a level transition usually means a recessed shower pan or a dropped joist bay, and the entire pan becomes part of the waterproofed envelope instead of sitting inside a curb. The 2026 U.S. Houzz Bathroom Trends Study reports that 55% of renovating homeowners selected low-curb showers and 32% chose fully curbless, a split that reflects what existing floor framing allows.
What the Build Requires
- Subfloor depth, checked early. If you can't recess the pan, you're either raising the whole bathroom floor or accepting a small curb, so settle this before tile is ordered.
- A proven waterproofing system. A sheet membrane or a liquid-applied product installed to the manufacturer's written instructions, with corners and seams detailed properly.
- A slope of about 1/4 inch per foot toward the drain, verified before the membrane goes down.
- Blocking in the walls for a future grab bar and a fold-down seat, installed while the framing is open.
- A handheld shower on a slide bar and a matte or lightly textured floor tile so wet feet have grip.
A shower that is flush at the entry and pools at the back corner isn't curbless. It's a leak with good lighting.
2. Freestanding Soaking Tub as a Focal Point
A freestanding tub is the one fixture in the room that behaves like furniture. It stands on its own under a window or a pendant, usually with a floor-mounted filler, and it gives a primary bath a center the eye lands on.
The trade-off is structural, and it shows up before anything gets ordered. A filled tub carries its weight on four small feet, which puts a concentrated load on specific joists rather than spreading it across a deck. Floor-mounted fillers also require supply lines brought up through the floor, so the tub's position has to be fixed to the inch before rough-in.
Check the floor before the finish. A tub that settles or flexes will crack the caulk line at the base and squeak every time someone climbs in.
Clearances and Choices
- Leave at least 24 inches around the tub for climbing in, drying off, and getting a mop behind it.
- Choose a matte or gently textured finish. Glossy acrylic shows every water spot and scratch.
- Decide the filler type early. Floor-mounted needs floor access, wall-mounted needs blocking and the right wall.
- Keep the tub on the plumbing wall if you can. Long drain runs under a slab are the expensive version of this idea.
Say a homeowner wants a 67-inch tub centered under a picture window on an exterior wall. That's a beautiful plan and a cold one, because the window wall is where insulation is thinnest. It works, but the tub gets set out far enough to insulate and frame behind it, which eats floor space.
3. Floating Double Vanity with Ample Storage
A floating vanity hangs off the wall with nothing touching the floor. The open space underneath makes the room feel bigger, the floor easier to clean, and a toe-kick light possible. Add a second sink and a shared bath stops being a negotiation.
The wall carries all of it. A loaded vanity with a stone top and full drawers is heavy, so the cabinet needs blocking or a ledger board screwed into studs, not toggle bolts into drywall. Get that right and the vanity will outlast the house's paint.
Water use doesn't have to suffer for the look. The EPA WaterSense program sets WaterSense bathroom faucets at a maximum of 1.5 gallons per minute, compared with the conventional 2.2 gpm standard, a reduction EPA puts at 30 percent or more of sink-faucet flow without giving up performance.
Specs Worth Writing Down
- Countertop height of 32 to 36 inches. Go to the top of that range for tall households, and consider splitting heights if two very different people share the room.
- Drawers over doors for anything below waist level, because you can see what's in them.
- A moisture-resistant top. Quartz or a sealed wood counter holds up; unsealed wood around a sink does not.
- An outlet inside a drawer for the toothbrush and the razor, which keeps the counter clear.
4. Large-Format Porcelain Tile with Minimal Grout
Large-format porcelain, typically 24 by 48 inches and up, installed with tight grout joints, turns a wall into a continuous plane. Fewer joints mean less to scrub and a shower that looks like carved stone rather than a grid.
The substrate is where these jobs fail. A large tile rocks over every dip, so the wall or floor has to be flat, on the order of 1/8 inch across 10 feet, before the first piece goes up. Set them over a wavy wall and you get lippage you'll see every morning, plus a bond that's fighting the tile.
Ordering and Layout
- Order extra. Breakage, cuts around a niche, and future repairs all want matching dye lots, and next year's batch won't match.
- Dry-lay the room before setting. Confirm where full pieces land and keep cut slivers out of the most visible corner.
- Stagger joints by a third, not half, on a running bond. Half offsets on long tiles are where lippage complaints come from.
- Use a trim profile or a mitered edge rather than a bullnose that fights the slab look.
- Go matte or textured on the floor and save the polished finish for walls.
If a full tile job isn't in this year's budget, learning how to install tile stickers lets you test a pattern on a small wall before you commit to slab.
5. Radiant In-Floor Heating
Cold tile in February is the complaint that sells this upgrade. Electric mats or hydronic tubing go under the finished floor and warm it from below, so the room feels warm underfoot at 5:30 a.m. without waiting for air to come up to temperature.
Mechanical upgrades like this are common, not exotic. The 2025 U.S. Houzz Bathroom Trends Study reports that 61% of homeowners upgraded ventilation, heating, or plumbing systems during their remodel, and ventilation fans were the most common addition at 58%. In a Michigan bathroom, the fan and the floor heat solve the same problem from opposite ends: moisture and cold.
Install Order That Prevents Callbacks
- Test the mat or cable before tile goes down, then test it again after. A damaged wire found later means demolition.
- Use a thermostat with a floor sensor, not an air sensor, so the floor doesn't overshoot and crack the tile.
- Plan the floor height. Mat, thinset, and tile add thickness, and the transition at the doorway has to line up with the hall.
- Run it on a dedicated, GFCI-protected circuit. Follow a residential electrical safety checklist when planning bathroom circuits.
- Program a schedule for the hours the room is used instead of heating all day.
Practical rule: Floor heat is comfort, not space heating. Size the room's heat source separately and treat the warm floor as a finish upgrade.
6. Layered Lighting with Backlit Mirrors
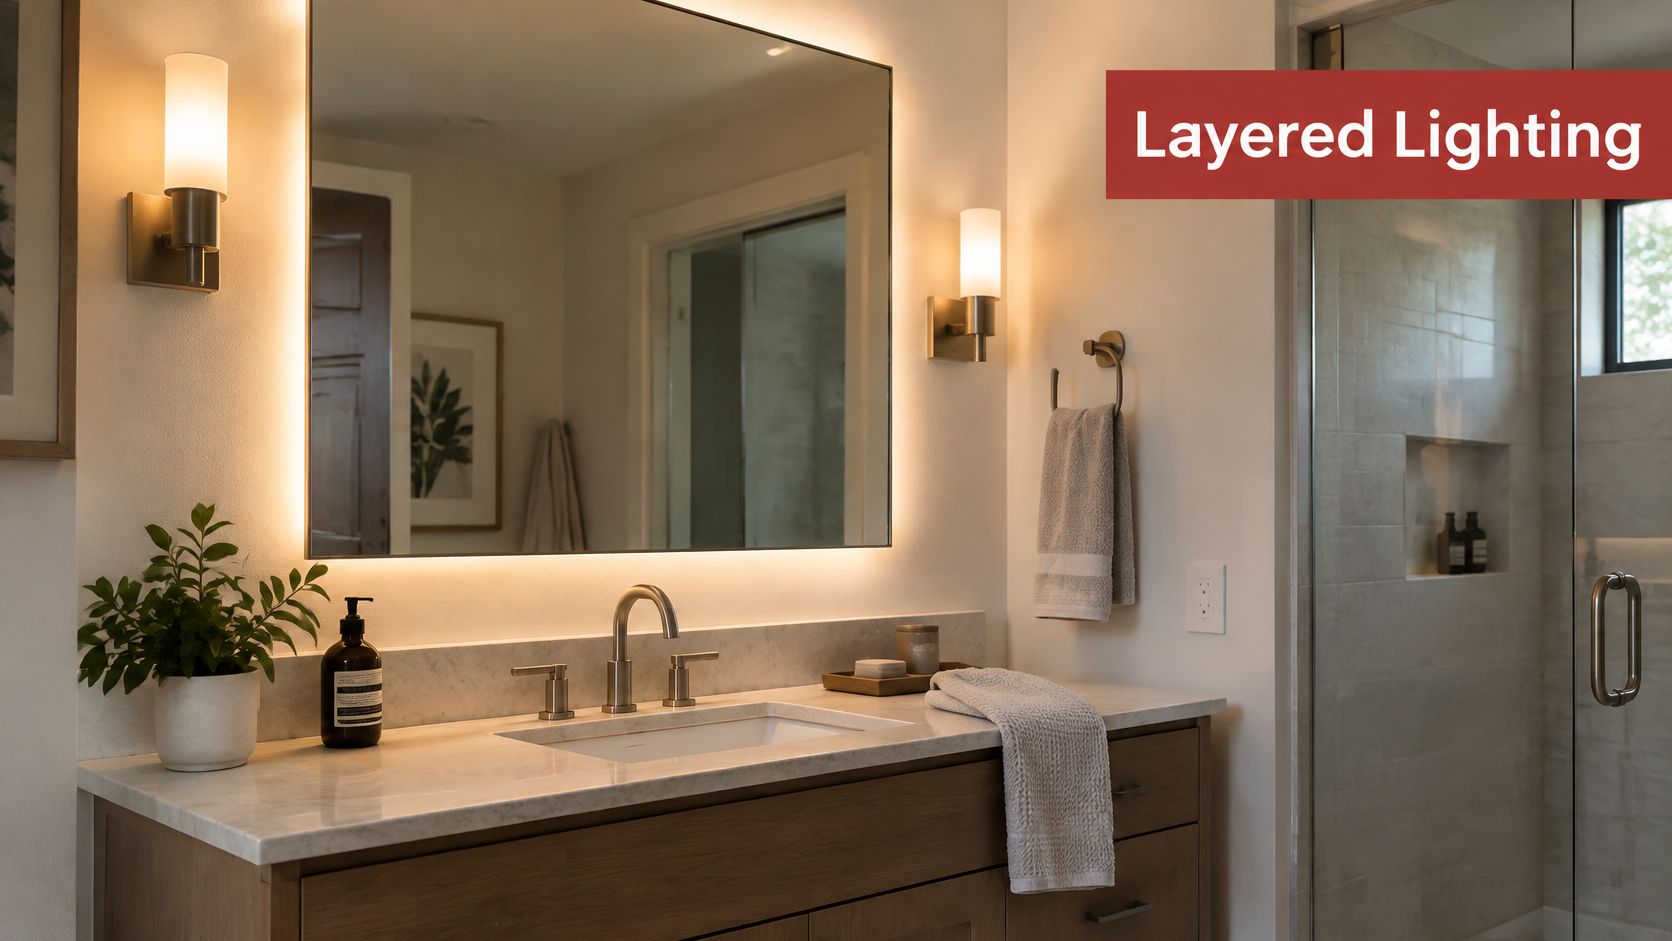
A single fixture in the middle of the ceiling is why people lean toward the mirror to shave. Layered lighting splits the job across ambient, task, and accent sources so faces are lit from the front and the room still has depth after dark.
The Three Layers
- Ambient: recessed cans or a central fixture that lights the whole room evenly.
- Task: sconces at eye level on both sides of the mirror, or a backlit mirror that throws even light across a face instead of shadows from above.
- Accent: toe-kick strips, niche lighting, or a dimmed pendant over a tub.
Place vanity sconces at eye level, roughly 60 to 66 inches from the floor, and keep them on the sides of the mirror rather than above it. A warm-neutral color temperature around 2700K to 3000K flatters skin tones and reads as relaxing at night.
Put every layer on a dimmer, and split the circuits so the shower light and the vanity light aren't married to each other. Inside the shower and over the tub, use damp or wet-rated fixtures with a proper gasket, because standard fixtures corrode fast in a steamy room.
7. Wet Room Design
In a wet room, the whole floor is the shower. Every inch is waterproofed and sloped to a drain, the shower area stays open to the rest of the room, and a glass screen handles splash instead of a full enclosure. In a compact bath, that trade buys real floor space.
It's a growing choice rather than a niche one. The 2025 U.S. Houzz Bathroom Trends Study found wet-room layouts in 16% of renovated bathrooms, up three percentage points year over year, with half of adopters citing better space utilization and 26% citing accessibility.
What makes or breaks the design is the floor, and nobody photographs the floor. You need one consistent slope to the drain, a waterproofing membrane that turns up the walls, and a transition detail at the doorway that stops water from tracking into the hall.
What Separates a Good Wet Room from a Bad One
- Slope of about 1/4 inch per foot to a linear drain placed at the low edge.
- A screen or a fixed panel for splash control, even if you skip a door.
- Wall-hung or moisture-resistant vanity, since the floor around it gets wet.
- A textured floor material rated for wet areas. The logic in choosing bathroom floors in Georgia applies just as well in Michigan.
8. Built-In Shower Niches and Benches
A niche costs very little during the build and a great deal afterward, because it lives behind the tile. The same is true of a bench. Both are framing and waterproofing decisions, and both get treated as finish selections far too often.
Placement and Framing
- Set the niche between shoulder and head level, roughly 48 to 60 inches off the shower floor, so you reach it without bending.
- Slope the shelf slightly toward the shower so water drains instead of pooling in the bottom.
- Wrap the niche and bench in the same membrane as the walls, with the corners taped and sealed per the system's instructions.
- Make the bench at least 15 inches deep for comfortable seating, and frame it from lumber rather than stacking tile or block.
- Add blocking for a future grab bar at the bench, since that's where someone will push up from.
Prefabricated foam niches are worth the money. They come waterproofed, they're square, and they install faster than a site-built box that has to be framed, wrapped, and flashed. Pick the size before the tile layout is set, because a niche that crowds a grout joint looks improvised.
9. Universal Design and Aging-in-Place Features
A homeowner who grabs a towel bar during a slip learns the difference between a finish and a safety feature in about half a second. Universal design means building a bathroom that works for a 30-year-old and a 75-year-old on the same day, without making it look institutional, and nearly everything it asks for is cheap during framing and expensive after tile.
The housing stock doesn't support that plan yet. AARP reports that about 9 in 10 adults age 65 and older would prefer to remain in their current home, yet only about 10% of homes nationwide are fully prepared for senior living.
Dimensions That Decide Whether It Works
- Grab bar clearance is a fixed number. The U.S. Access Board specifies a 1.5-inch clearance between the bar and the wall.
- Blocking in every wall where a bar might land later, at a minimum around the shower, the toilet, and the tub. Solid lumber behind the drywall means a bar can go anywhere the user eventually needs it, instead of only where a stud happens to sit.
- Turning space of 60 inches if a wheelchair or walker will ever be in the room.
- A shower footprint of 36 by 60 inches or larger, with a level entry.
- A comfort-height toilet at 17 to 19 inches, which is easier for knees and hips than a standard bowl.
- Lever handles and rocker switches for anyone with grip issues.
The most attractive choice isn't automatically the safest one. Dropping a vanity or lowering a mirror can help one person and frustrate another, so plan from the actual users before picking fixtures.
10. Modern Vanity Towers and Integrated Storage
Counter space disappears faster than anyone expects. A full-height tower beside the vanity, or a pair flanking a double sink, moves towels, toiletries, and the hair dryer off the counter and into a footprint that's usually only 12 to 18 inches wide.
Details That Keep It Usable
- Anchor into studs. A tall cabinet is a tipping hazard when a door is open and a child pulls on it.
- Measure the door swing before you place a tower at the end of a run.
- Specify pull-out drawers so items at the back of a deep cabinet stay reachable.
- Add an outlet inside the cabinet for the toothbrush and the shaver.
- Choose a moisture-resistant finish and keep the tower out of the direct shower splash zone.
Estimate your remodel budget with our instant pricing tool before you schedule a consultation with Trademaster Construction, which serves Portage, Kalamazoo, and surrounding Southwest Michigan communities.
How the 10 bathroom remodel designs compare on fit, trade-offs, accessibility, and structural needs
| Item | Best For | Main Trade-off | Accessibility Value | Structural Needs |
|---|---|---|---|---|
| Curbless Walk-In Shower | Step-free, open bathrooms | Careful waterproofing and drainage add cost | High; removes the entry barrier | Subfloor planning, sloped floor, waterproofing |
| Freestanding Soaking Tub as a Focal Point | Spacious, spa-like primary bathrooms | Needs more space; cleaning around the base is harder | Low; requires stepping into the tub | Floor support for filled tub; planned plumbing |
| Floating Double Vanity with Ample Storage | Shared bathrooms and a more open floor | Needs wall support and extra plumbing; storage may be limited | Moderate; open floor eases cleaning, but double sinks need space | Wall blocking, secure mounting, plumbing |
| Large-Format Porcelain Tile with Minimal Grout | Seamless, low-maintenance finishes | Heavy tiles require careful preparation and skilled installation | Moderate; fewer grout lines, with slip resistance depending on finish | Flat, prepared substrate; sturdy installation |
| Radiant In-Floor Heating | Comfort on cold bathroom floors | Adds cost and floor height; repairs can be difficult | Moderate; improves comfort underfoot | Heating mats or tubing, thermostat, floor-height planning |
| Layered Lighting with Backlit Mirrors | Grooming and adjustable bathroom ambiance | Requires wiring and careful fixture selection | Moderate; improves visibility for grooming | Planned wiring, circuits, and suitable damp- or wet-rated fixtures |
| Wet Room Design | Compact, open bathrooms | Whole-room waterproofing and splash control are essential | High; level floor supports access | Waterproofed room, sloped floor, effective drainage |
| Built-In Shower Niches and Benches | Organized showers with convenient seating | Requires careful framing, slope, and waterproofing | Moderate; bench offers seating and items stay within reach | Framing, waterproof backing, sloped niche and bench |
| Universal Design and Aging-in-Place Features | Long-term safety and use across abilities | May require more space and upfront planning | High; supports safety, independence, and future needs | Reinforced walls, accessible clearances, suitable fixtures |
| Modern Vanity Towers and Integrated Storage | Compact bathrooms needing vertical storage | Costs more and needs careful fitting and anchoring | Moderate; organized storage can improve access to essentials | Secure wall anchoring and clearance around doors and fixtures |
Turning Ten Bathroom Designs Into One Practical Plan
Rank the designs against how the room gets used, not how it photographs. Who gets ready there and at what hour, which single step causes the most frustration right now, and whether this house will be your home in ten years? Those three answers eliminate half the list before money is discussed.
Pick one or two anchors. If the anchor is a curbless shower, the budget conversation moves to waterproofing, subfloor depth, and drain placement, and everything else gets planned around that decision. If it's the floating double vanity, wall blocking, plumbing rough-in, and lighting layout come first and tile follows. Anchors are what make a bathroom feel intentional instead of assembled.
Sequence matters more than selection. Layout, then rough-in, then waterproofing, then tile, then fixtures. Homeowners who choose tile before deciding the shower configuration usually pay for both, because the tile order changes once the drain position moves. Settle layout, fixture locations, niche placement, heated floor power, lighting circuits, and ventilation before demolition starts.
Decide the accessibility pieces now, even if nobody needs them yet. Blocking costs very little during framing and a great deal after tile, and the difference between a low curb and a level entry is mostly a decision made early. Reinforced walls, a wider doorway, and clear maneuvering space can all disappear into a design that reads as modern rather than medical.
Budget realistically. Once the layout is settled, use the instant pricing tool linked in the vanity storage section to get a ballpark before you schedule a consultation, then hold a contingency for what demolition finds. Old bathrooms hide water damage, undersized framing, and wiring that needs attention, and that money isn't optional.
Last, choose designs whose maintenance you'll keep up with. Deep grout lines and glossy surfaces look great in photos but demand scrubbing. Fewer joints, matte finishes, and a fan that moves air will matter more in year five than the tile pattern did in month one.
Trademaster Construction remodels bathrooms across Portage, Kalamazoo, and the surrounding Southwest Michigan communities, from cosmetic updates that keep the existing layout to custom projects that move plumbing and reshape the room. Every project starts with a design consultation about your space, the challenges you're living with, and how you want the finished room to work, and a project manager and experienced artisans carry that plan through construction. Visit Trademaster Construction to see completed bathrooms in the inspiration gallery, download the idea book, and run an instant ballpark estimate before you book a call.

