
A Southwest Michigan thaw can expose a window well's weakest point in a hurry. Snow melts against the foundation, spring rain follows, and a basement window well that looked dry in winter suddenly holds muddy water below the sill. If the water stays there, the problem may not be the gravel you can see. The drain below it may be clogged, crushed, disconnected, or missing altogether.
Good basement window well drainage is a small part of a larger foundation-water system. The well, grading, gutters, perimeter drain, sump discharge, window seal, and cover all have to work together. Adding more stone can help a clean, properly connected drain, but it won't repair a failed foundation drain or stop roof runoff from pouring into the basin.
Why Your Window Well Keeps Filling With Water
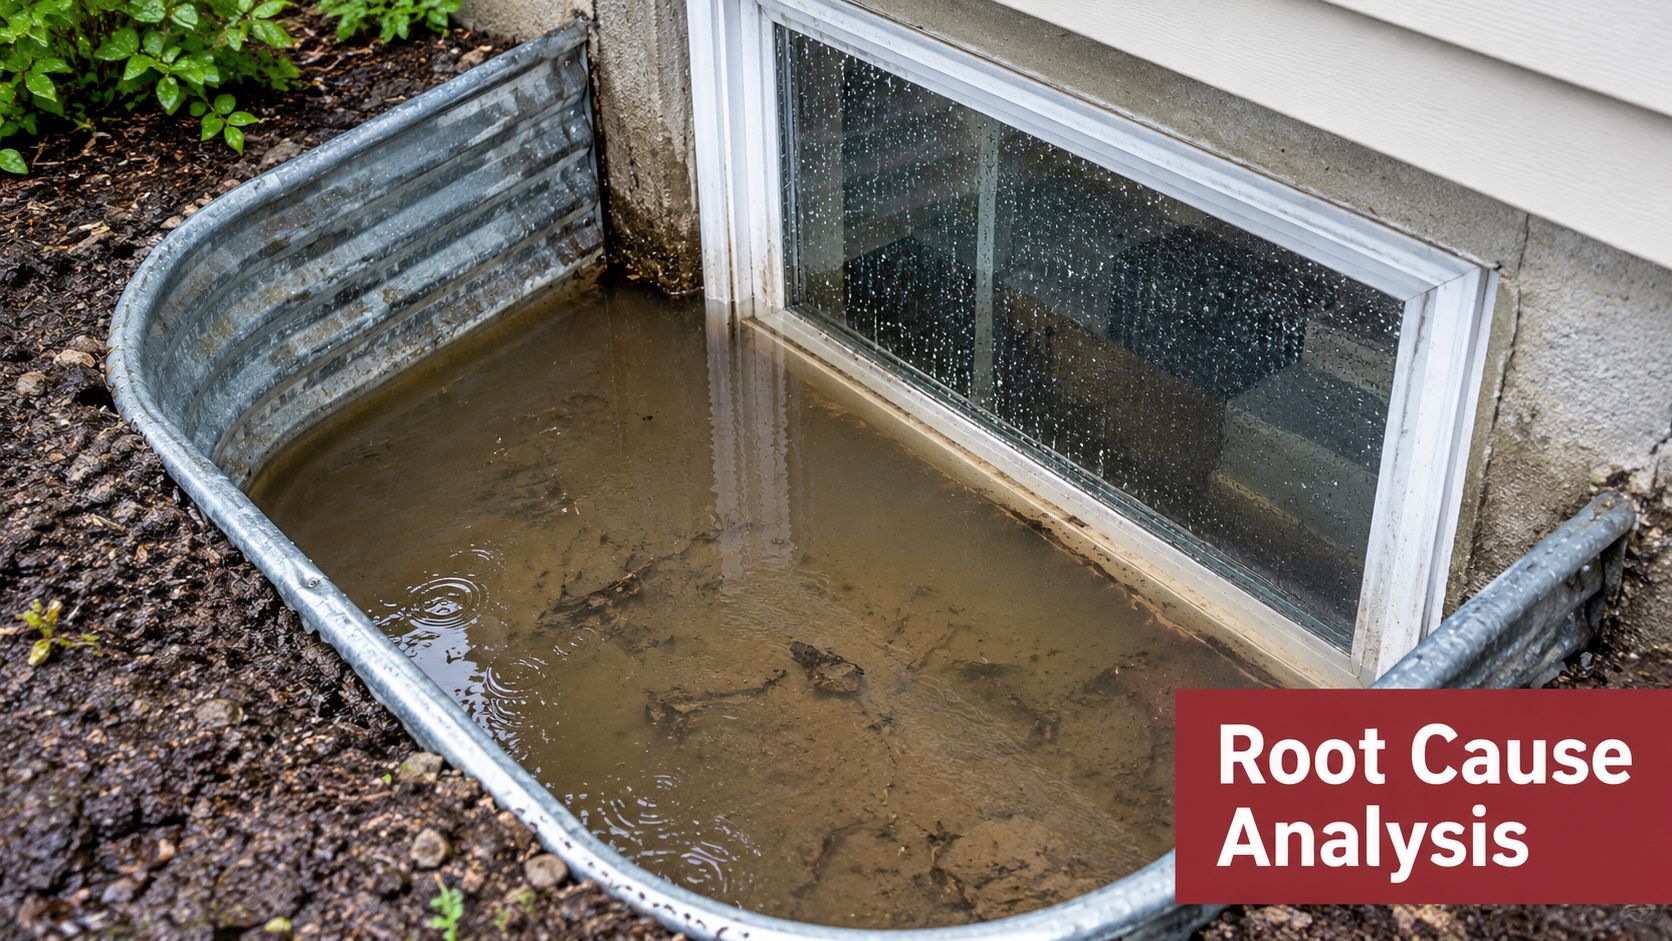
During a Southwest Michigan spring thaw, start by observing the well instead of immediately shoveling in gravel. Is water arriving from the surface, rising from the bottom, or entering around the window frame? Those patterns point to different failures.
Read the water pattern
Surface runoff is the simplest failure to identify. Water trails in from the uphill side, collects after a storm, or arrives in a sudden rush when a downspout discharges nearby. Low grading, roof overflow, and a missing or poorly fitted cover can overload a window well before the underground drain gets a chance to work. Canadian flood-prevention guidance specifically recommends keeping debris out of wells and maintaining gutters and downspouts so water doesn't collect in these low areas. Basement window maintenance guidance from the Government of Canada also recognizes that a cover can help divert heavy runoff away from the opening.
Sediment blockage produces a different clue. The well may drain slowly after light rain, then stop draining when leaves, fine soil, and roof grit wash into the gravel. Compacted material can seal the spaces between stones, turning the base into a muddy plug. Remove the debris and inspect the bottom. If the water level drops only after many hours, the issue may be restricted flow rather than a completely absent drain.
A well that fills from below, stays wet after the surrounding grade is dry, or floods repeatedly despite a clean base deserves more suspicion. The foundation drain may be blocked, crushed, poorly connected, or overwhelmed by groundwater. In older homes, the drain may not exist at the window location at all. A window well is a small drainage basin, not an isolated hole in the soil, and its performance depends on what happens beneath the foundation perimeter.
Practical rule: More gravel improves storage and filtration. It doesn't create a reliable outlet where the underground drainage system has failed.
Heavy clay makes gravel-only solutions less dependable because water moves slowly through compacted soil. Freeze-thaw movement can also lift the well, distort its connection to the foundation, and change the pitch of a short drain run. For a useful explanation of how below-grade drainage design connects to foundation performance, review this resource on foundation drainage in PA from Firm Foundations.
Check the basement side as well. Dampness at the bottom of the window opening suggests seepage or a failed seal, while cracking, bowing, or recurring moisture farther along the wall indicates a broader foundation-water concern. A clean well with persistent flooding is usually a system diagnosis, not a landscaping chore.
Inspecting and Planning Your Drainage Upgrade
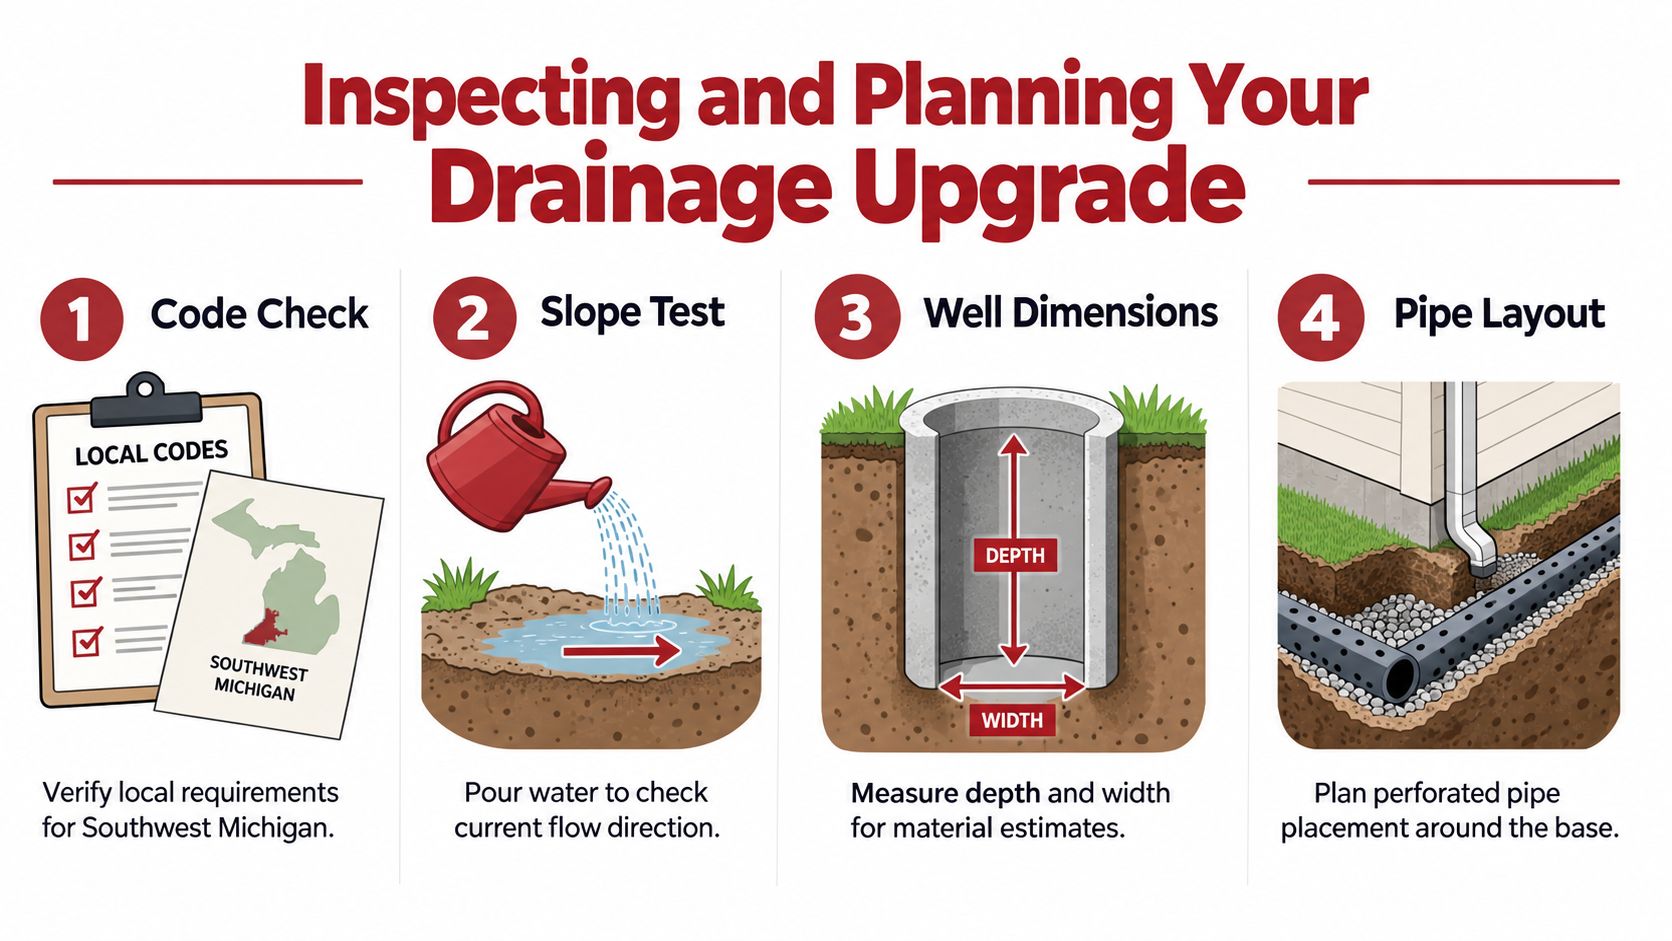
Before digging beside a foundation, map the water path. You need to know where the well sits relative to the footing, where the perimeter drain or weeping tile runs, and where the sump pump discharges. A shovel and a hose are useful, but a plan prevents you from burying a new pipe against a blockage.
Start above grade
Walk the area during or shortly after rain. Look for roof water, downspout discharge, soil washout, and a grade that slopes toward the well. Pouring a controlled amount of water uphill from the opening can reveal whether the surface carries water toward the foundation. Don't use a hose at full force against the wall, since that can create an artificial problem.
Inspect the liner for rust, cracks, separation from the foundation, and movement. A distorted liner can hold soil against the window or pinch a drain connection. The top of the well should remain above surrounding grade where the site allows, and the surrounding soil should shed water rather than form a depression.
Confirm the opening remains safe
Drainage work must not reduce the usable egress area. The International Residential Code commonly cited for basement egress requires a window well with at least 9 square feet of area and at least 36 inches of horizontal projection. The code also calls for a ladder or steps when the well is deeper than 44 inches. These requirements are summarized in this egress window code handout.
Measure the clear space, not just the outside of the metal liner. Check that a cover can be removed from inside, that a ladder won't be obstructed by a pipe, and that gravel won't reduce the escape route. Local requirements can vary, so confirm the details with the building department serving your Portage, Kalamazoo, or nearby property before changing an egress well.
Trace the underground route
Find the sump discharge outside and determine whether it carries water away from the foundation. A discharge line that ends beside the house can put the same water back into the soil. Inside, locate the sump basin and listen for pump cycling during wet weather. If you can safely test the pump, make sure its outlet remains open and doesn't back up.
A contractor may use a camera, probe, test excavation, or controlled water test to determine whether the perimeter drain accepts flow. That distinction matters. If the existing system takes water normally, a new well connection may be practical. If it backs up, installing another pipe at the well only gives water a more complicated route to the same obstruction.
Make a materials list only after this inspection. Clean washed stone, a compatible perforated pipe, fittings, filter protection where appropriate, a stable liner, and a cover may be enough for a straightforward repair. Excavation near the footing, unknown utilities, a high water table, structural movement, or a history of basement seepage calls for professional assessment rather than a weekend experiment.
Installing Gravel and Perforated Pipe Systems
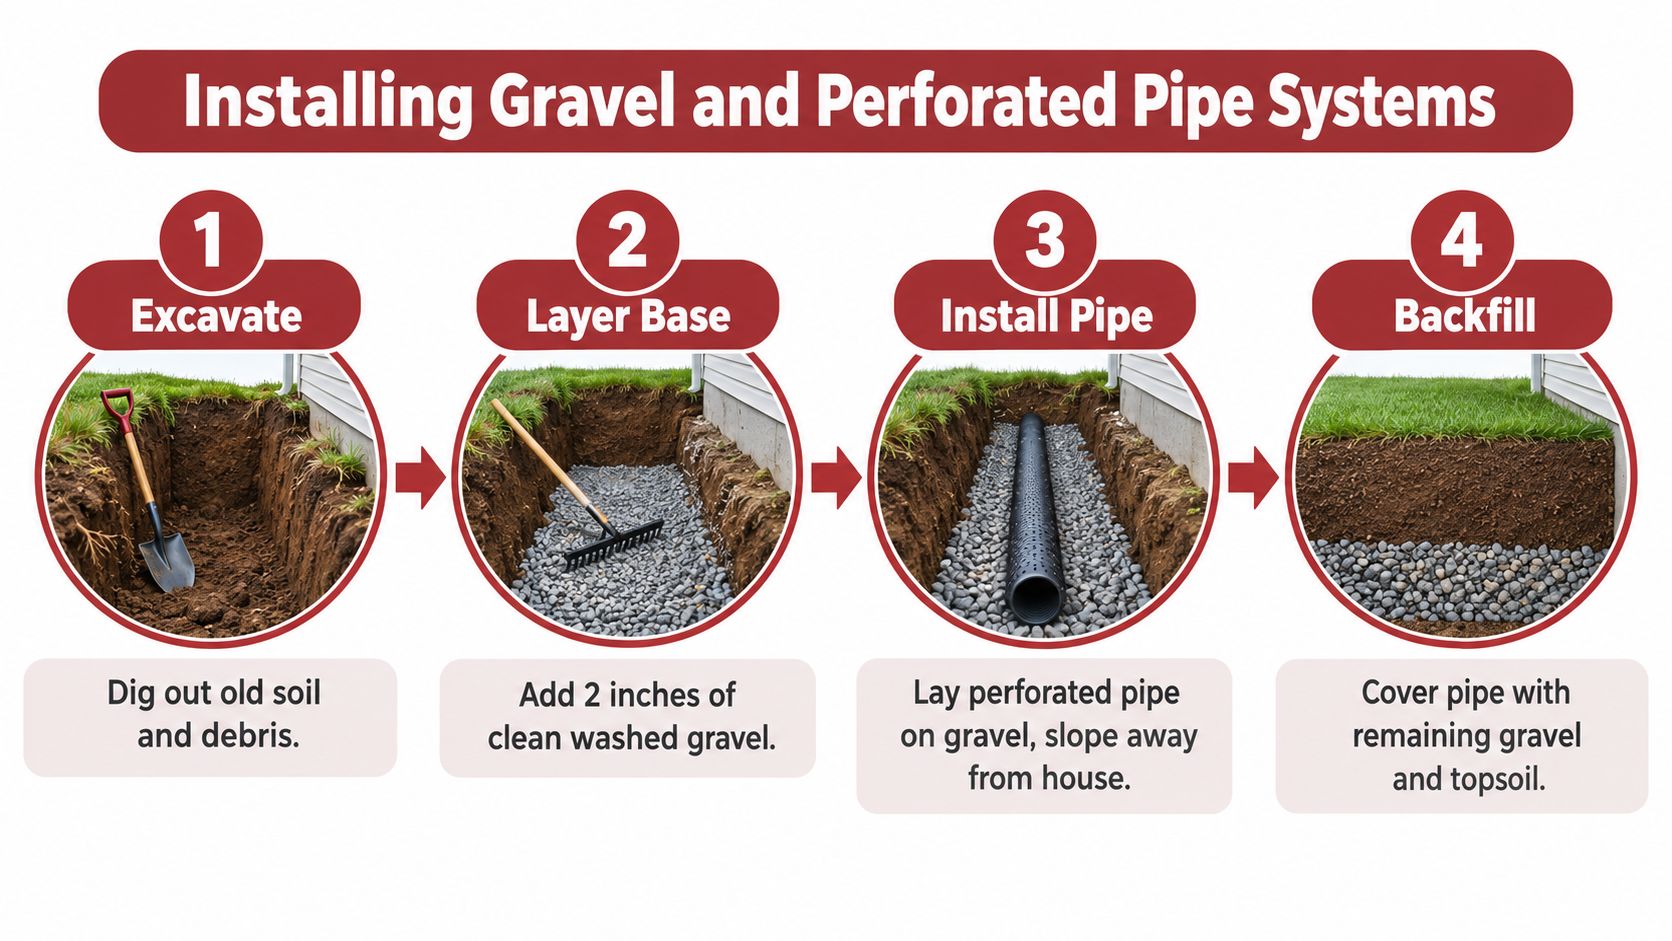
A durable installation gives water a clean collection layer and a dependable route out. The usual sequence is excavation, clean stone, pipe placement, connection to an approved outlet, and protective backfill. The details matter because fine soil mixed into the stone can clog the system before it has had much service.
Build the base correctly
Excavate enough material to remove mud, roots, collapsed soil, and contaminated gravel. Protect the foundation wall and the window frame while working. Don't undermine the footing, and don't assume the original excavation is deep enough for both drainage and a safe egress opening.
Use clean, washed coarse gravel at the bottom. Industry guidance commonly specifies 8 to 12 inches of coarse gravel in a window well, while code interpretations also describe perforated foundation drainage installed on at least 2 inches of washed gravel or crushed rock and covered by at least 6 inches of the same material. These construction details are outlined in this IRC foundation drainage interpretation.
The difference between those figures reflects different parts of the assembly. A base layer supports and surrounds the pipe, while the total stone depth depends on the well, footing, soil, and connection design. Keep sand and unwashed fill out of the drainage layer. They carry fine particles into the perforations and gradually reduce the void space that water needs.
Install a real outlet
A common window well arrangement uses a 4-inch perforated PVC or corrugated pipe running vertically from the gravel layer to the perimeter drain tile at the footing. Water enters through the gravel and perforations, then travels through the foundation drainage system toward a sump basin or daylight outlet. This window well drainage mechanics guide illustrates that standpipe pattern.
Where conditions allow a gravity route, the drain run should have a positive pitch. Installers often use a slope of at least 1% toward daylight to reduce standing water, as described in the Canadian maintenance guidance cited earlier. A flat run can hold sediment and freeze, while a poorly connected run can send water against the foundation rather than away from it.
The International Residential Code requires window wells to be designed for proper drainage by connecting to the building's foundation drainage system or another approved method. For wells no greater than 10 square feet, one commonly cited approach permits direct drainage into a foundation drain through a minimum 2-inch drain, or indirect drainage through a porous filter bed. The applicable installation should follow the local code interpretation, soil conditions, and available discharge route, as summarized by window well drain guidance.
Don't drill blindly into a foundation wall or cut a footing drain without confirming the layout. A connection should remain accessible enough for cleaning, and it must not compromise the wall, footing, waterproofing, or egress clearance. If the perimeter system is suspect, it may be safer to route the well to a sump system than to make an unverified connection.
Control what enters the basin
A well cover is not merely cosmetic. A properly fitted heavy-duty cover keeps leaves, roof grit, and snow from filling the gravel, while still allowing the cover to be released for emergency egress. Secure the liner so freeze-thaw movement doesn't pull it away from the foundation or create a gap for runoff.
Use grading and downspout extensions to reduce the volume entering the well. The cover should shed water away from the opening, not direct it into the liner. If the site needs broader drain-tile work, homeowners may also call Modern Yard Landscapes for drainage to evaluate a perimeter connection instead of treating the window well as a stand-alone repair.
This installation video provides a visual overview of the work sequence:
Troubleshooting Deep Foundation Drain Failures
You cleaned the well, replaced dirty gravel, and installed a new pipe. The next storm arrives, and the basin still fills like a bathtub. At that point, the gravel isn't the diagnosis. It's only the visible part of the system.
Separate a well failure from a foundation failure
Test the well after clearing it, then observe the water level during a storm. If water enters from the top, correct grading, gutters, and cover problems first. If it rises through the base or backs up through a connected pipe, investigate the perimeter drain, sump discharge, and groundwater conditions.
A crushed or root-filled drain tile can accept water slowly or not at all. Roots may enter joints, sediment may fill the pipe, and freeze-thaw movement may alter a shallow connection. In older homes, a window well may have been installed without a functioning connection to the footing drain. A new perforated pipe cannot overcome an outlet that is blocked downstream.
Gravel is a filter and temporary storage layer. It isn't a substitute for a working drainage route.
Gravel-only soak-away systems can work where native soil drains well. Some guidance describes 6 to 12 inches of washed stone below the well floor for water to percolate into suitable native soil, and code guidance may recognize an exception where a separate well drain isn't required in qualifying well-drained sand and gravel soils. The approach is much less reliable in heavy clay, saturated soil, or a lot with a high groundwater condition. This remodeler's guide to basement egress discusses that distinction.
Choose the next test, not the next material
A contractor can inspect the line, expose the connection, or test the sump route. If the main drain is open and the well connection is sound, cleaning and regrading may finish the repair. If the line is blocked, the correct work may involve cleaning, localized replacement, or a larger perimeter drainage repair.
When gravity drainage has no dependable outlet, routing the window well to an interior sump basin can be more predictable. That approach requires a suitable pipe route, a reliable pump, backup planning, and an approved discharge point. It also brings work inside the basement, including concrete removal and restoration, so it isn't a casual retrofit.
Watch for related evidence: moisture along other basement walls, efflorescence, a sump that runs constantly, soil settlement, or roots close to the foundation. Root management belongs in the broader plan, and a resource on foundation root barriers from Advanced Foundation Repair can help explain why vegetation control may matter around below-grade drainage.
Don't seal the window and call the problem solved if water remains outside it. Sealing may hide the symptom while hydrostatic pressure continues against the wall and frame. The durable repair follows the water to a functioning discharge point.
Estimating Costs and Hiring Local Professionals
The cheapest project is the one that matches the actual failure. Clearing leaves and replacing contaminated stone is a manageable maintenance task. Excavating to the footing, locating a buried drain tile, or replacing a perimeter system is a different project with different equipment, restoration needs, and risk.
| Project Type | DIY Material Cost | Professional Installation |
|---|---|---|
| Gravel cleanout and well maintenance | Usually limited to stone, hand tools, and a cover if needed | Efficient when the liner and outlet are sound |
| Perforated pipe retrofit | Materials vary with pipe, fittings, stone, and discharge route | Appropriate when excavation and foundation connections are required |
| Perimeter drain replacement | Not a practical material-only comparison for most homeowners | Excavation, drain tile, stone, waterproofing, sump work, and surface restoration may be involved |
Compare the work involved
A DIY cleanout makes sense when the well is stable, the drain is visible and open, surface runoff is the clear cause, and no structural or egress issue is present. Wear protective equipment, keep the escape opening clear, and don't dig below the footing.
A pipe retrofit becomes less suitable for DIY work when you can't identify the existing drain, the well sits beside a finished basement, or the soil collapses into the excavation. Southwest Michigan's clay, wet spring conditions, and freeze-thaw movement can turn a neat trench into unstable work quickly. Utility conflicts and foundation damage are not acceptable trade-offs for saving labor.
A full perimeter repair is a drainage and excavation project, not a larger version of a gravel cleanout. It may include interior slab cutting, perforated pipe, clean stone, a sump basin, approved discharge, exterior excavation, waterproofing, and restoration. Get the proposed route and outlet in writing, and ask how the contractor will protect the footing, egress opening, landscaping, and basement finishes.
For budgeting, use our instant pricing tool to establish a ballpark before you commit to digging. Treat the result as planning information, not a substitute for an on-site diagnosis. A contractor still needs to confirm whether the problem is surface runoff, a single well connection, or a failed foundation drainage system.
Ask prospective installers three direct questions:
- What is the suspected failure? They should explain the evidence, not only recommend more gravel.
- Where will the water discharge? A pipe that ends beside the foundation hasn't solved the route.
- What happens if the existing drain is blocked? The proposal should identify testing and an alternative, such as a sump connection, where appropriate.
Seasonal Maintenance for Southwest Michigan Homes
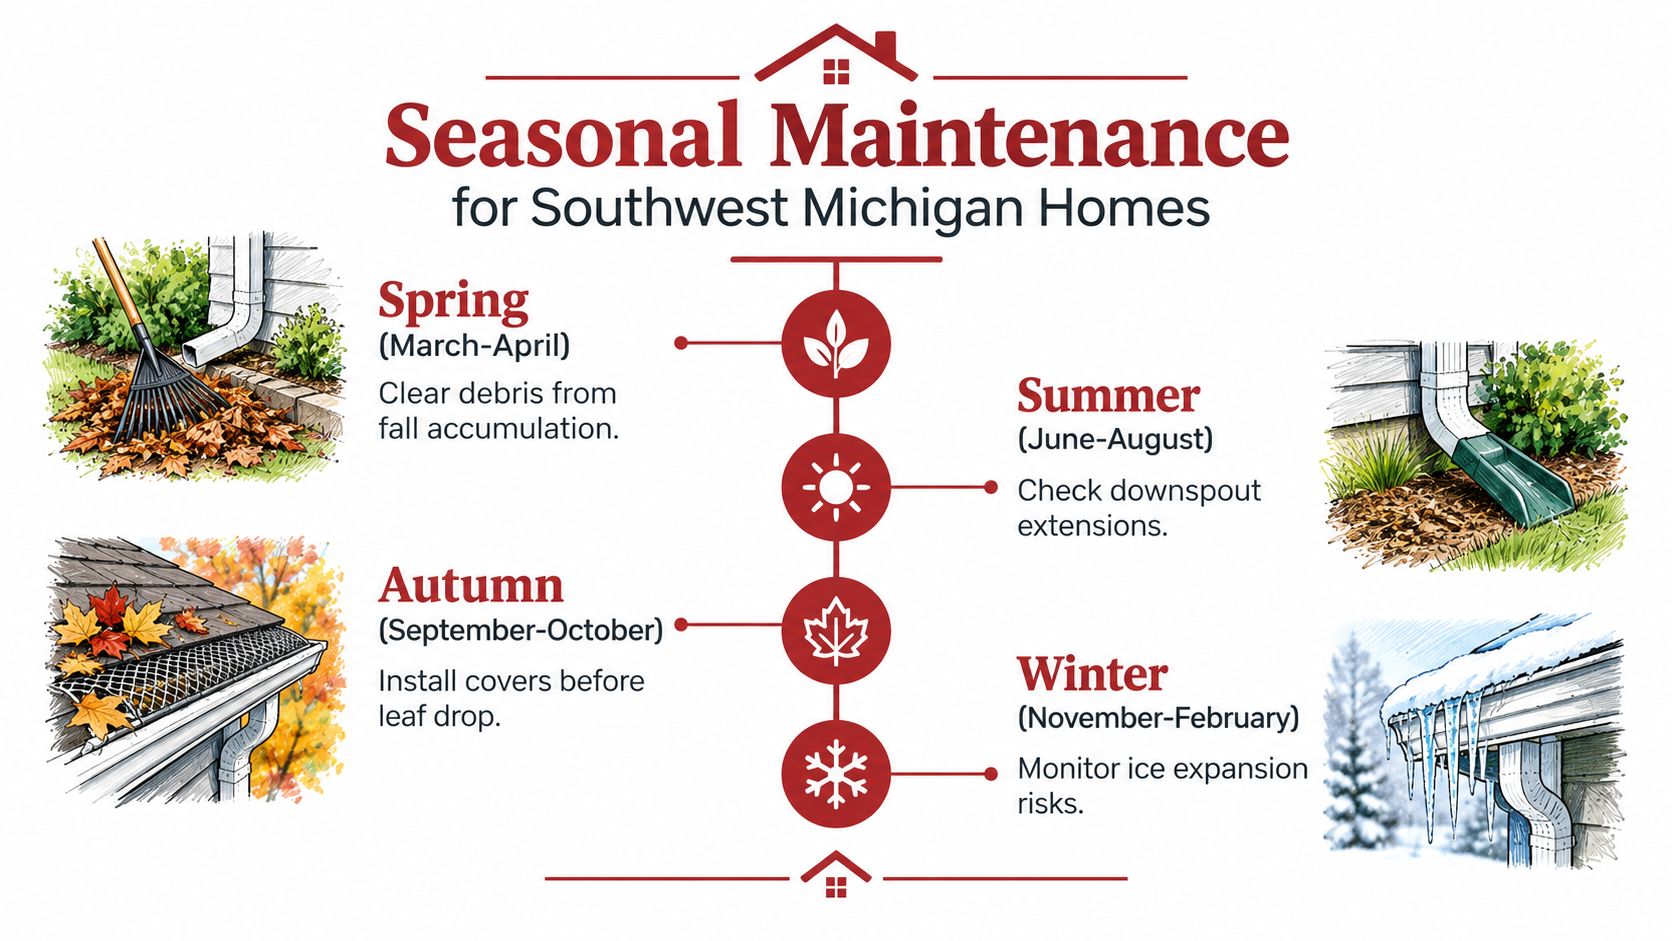
A sound drainage installation still needs seasonal attention. Southwest Michigan homes see leaf accumulation, snow, spring runoff, saturated clay, and repeated freeze-thaw movement. Those conditions can fill the well, shift the liner, or expose a weak downspout route before a homeowner notices water inside.
Use the calendar as a checklist
Spring, March through April: Clear leaves, silt, and winter debris from the well. Look for a heaved liner, displaced gravel, cracked cover, or a drain that remains full after the surrounding ground begins to dry. Check the basement window seal and the wall below it for new dampness.
Summer, June through August: Test downspout extensions during rain and confirm that discharge travels away from the foundation. Inspect the grade for settlement and repair low spots before autumn storms. If irrigation sprays into the well, redirect it.
Autumn, September through October: Clean gutters before leaf drop and install the cover before debris begins accumulating. Make sure the cover doesn't block emergency release or reduce the required egress opening. Remove vegetation that can drop roots and organic material into the basin.
Winter, November through February: Keep snow from being piled against the well. Watch for ice expansion that pushes the liner outward or traps water against the window. Don't chip aggressively against a metal or plastic liner, since impact can deform it and damage the seal.
A quick inspection after the first major thaw is more useful than waiting for a basement finish to show damage. If the well repeatedly holds water, if the gravel has become mud, or if the liner moves with the seasons, schedule a drainage assessment before the next wet cycle.
Trademaster Construction works with Southwest Michigan homeowners on basement drainage, egress window drainage, sump routing, and related remodeling work in the Portage and Kalamazoo area. Use the Trademaster Construction website to review project options, plan the scope, and request help before a flooded window well becomes a larger basement repair.

