
You're standing in a kitchen or bathroom before demolition, holding two tiles. One is the safe builder-grade option. The other is closer to a sketch you made yourself, with a pattern, color, or texture that feels more like your home. The question isn't just which tile looks better. It's whether your favorite idea can handle the room beneath it, the water around it, and the installation work required to make it last.
Custom tile design works best when visual ambition and installation complexity stay in balance. A successful plan connects three decisions, the pattern, the color palette, and the layout, with less visible choices such as substrate movement, movement joints, tile absorption, grout, and maintenance. A test board viewed in the actual kitchen or bathroom can reveal problems that a showroom sample won't, including how a color changes in daylight and whether a busy pattern overwhelms the room.
What Custom Tile Design Really Means for Your Home
A Pinterest image can show you a mood, but it can't tell you whether the floor is stiff enough, whether the wall is flat, or whether the chosen tile belongs in a wet area. Custom tile design begins when you translate inspiration into a buildable plan.
Start by writing down the intended pattern, color palette, and layout. Then place those choices against the room itself. A dramatic hand-painted backsplash may work beautifully behind a range, where it becomes a focal point, but the same amount of visual activity could make a small shower feel crowded. A quiet porcelain floor may provide the right foundation for a stronger shower niche or accent wall.
Turn inspiration into a room-specific plan
Ask a contractor to check the surfaces before you order materials. A wood-framed floor needs a different conversation from a concrete slab. A shower wall needs waterproofing and carefully resolved penetrations. A curved or irregular area may require smaller pieces, flexible layout planning, or a custom cut pattern rather than a large-format field tile.
Test boards matter. Set samples in the actual room, not only under showroom lighting. View them beside cabinets, countertops, plumbing fixtures, trim, and the room's light sources. This simple step can prevent an expensive commitment to a color that looks warm in a store but flat or overly intense at home.
The tile industry is large enough to support both mass-produced surfaces and highly individualized finishes. One estimate places the global tile market at about USD 230.2 billion in 2024, with a projection of roughly USD 394.5 billion by 2031 at an 8.0% CAGR. Another forecast places the market at USD 285.1 billion in 2025 and projects USD 587.72 billion by 2035 at a 7.5% CAGR. These are industry estimates, not a budget guide for your renovation, but they help explain why homeowners can choose from such a broad range of sizes, textures, printing methods, and custom finishes. Tile industry estimates and production data
Practical rule: Design the room you have, then make the most visible surface custom. You rarely need every wall, floor, and trim detail to compete for attention.
That approach keeps a personal idea at the center without forcing every installation decision to become complicated. The story of how tile reached this point begins with much older forms of personalization.
How Tile Design Evolved Into a Personal Canvas
In an ancient Mediterranean bathing space, a hand-formed mosaic could follow a curved floor more naturally than a rigid field of large pieces. Each small fragment helped the maker respond to the shape of the room. The result was practical, decorative, and specific to its setting.
Centuries later, Moroccan zellige brought a different kind of individuality through hand-shaped, glazed pieces whose variations became part of the finished surface. Decorative tilemaking also flourished in Europe, where patterned floors and walls turned repeated modules into architectural identity.
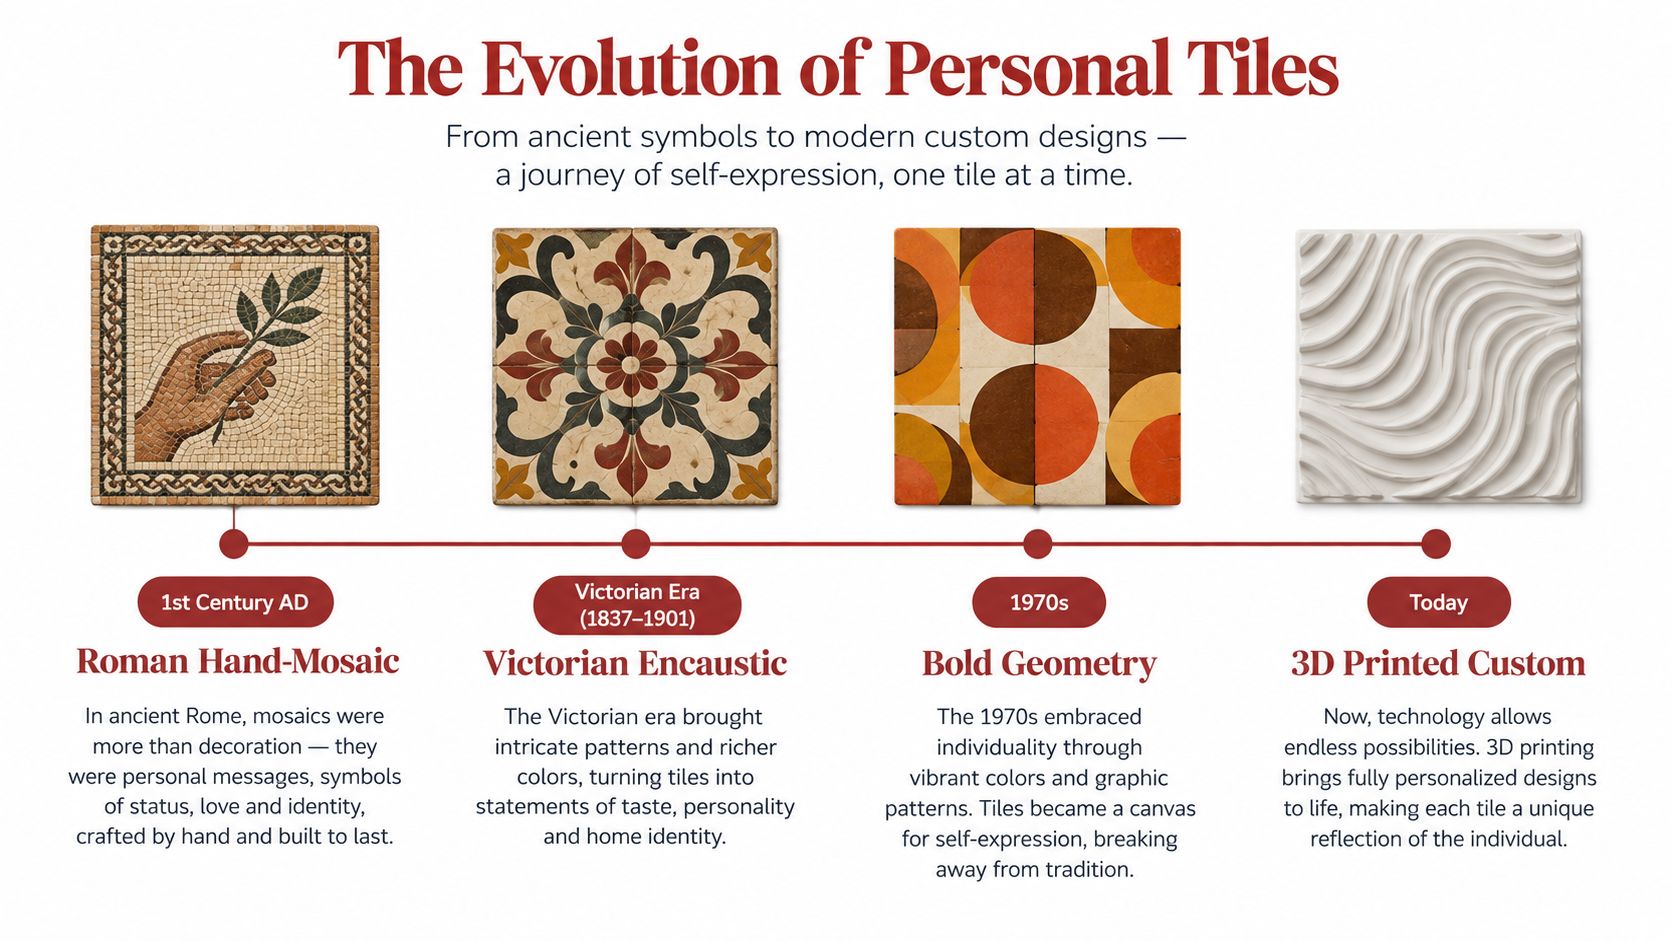
The transition from craft to wider availability changed what homeowners could request. Ceramic tiles made from fired clay have been used since around 4,000 BCE, with early examples associated with ancient Egyptian, Babylonian, and Roman contexts. In 1843, Herbert Minton revived encaustic tilemaking in England, while the dust-pressing method developed in the 1840s supported the mass production of patterned tile. Decorative tile production began in the United States around 1870 and flourished until about 1930. History of ceramic tile and tile adhesives
From repeated modules to personal expression
An early twentieth-century subway could use terracotta or ceramic tile in a regular factory-made pattern, creating a consistent look across a large public space. Today, a homeowner can borrow that same orderly structure and alter the scale, color, orientation, border, or focal detail.
Digital printing has widened the canvas further. A tile can carry a stone-like image, a geometric composition, a botanical motif, or artwork commissioned for one room. Hand-painted pieces can add a family motif to a backsplash, while textured and three-dimensional surfaces can bring shadow to a feature wall.
The important continuity is that custom work has always responded to both the shape of a room and the identity of its owner. Modern production gives you more ways to specify that identity, but the installation still needs a material suited to the room. That choice starts with what the tile is made of and how it responds to water, impact, and cleaning.
Choosing Materials That Fit How You Live
Material selection should follow the room's workload before it follows a color trend. A busy kitchen floor, a powder-room wall, and a shower floor ask different things from a tile, even when the same pattern could technically be adapted to each space.
Porcelain is often a practical choice for floors and wet areas because it can offer low water absorption, strong wear resistance, and a broad range of printed appearances. Ceramic can work well on many walls and lighter-use surfaces, but the specific product classification matters more than the label alone. ISO 10545-3:2018 measures water absorption, apparent porosity, apparent relative density, and bulk density, and uses those results for tile classification and product specifications. ISO 10545-3:2018 tile testing method
A natural stone such as marble brings variation, depth, and a softer visual character. It also asks for more maintenance awareness because the surface may react to staining, moisture, or household products differently from a manufactured ceramic or porcelain tile. Glass can create a luminous mosaic effect, especially on a backsplash or carefully selected shower surface, but the installer must match the adhesive and setting method to the product.
| Material | Durability | Water absorption | Best use for |
|---|---|---|---|
| Porcelain | Strong option for floors and demanding areas when the product is correctly specified | Often low, but verify the product data | Kitchen floors, bathroom floors, shower walls, feature walls |
| Ceramic | Broad range of finishes and practical wall applications | Varies by product classification | Backsplashes, bathroom walls, decorative areas |
| Natural stone | Durable when properly selected and maintained, with natural variation | Varies by stone and finish | Feature walls, floors, vanities, restrained luxury details |
| Glass | Resistant surface with reflective visual quality, but installation-sensitive | Product-specific | Backsplashes, accent mosaics, selected shower applications |
Read absorption as a specification
Water absorption isn't a vague quality label. Under ISO-based ceramic tile classifications, tiles with absorption greater than 10% fall into Group III, while lower-absorption groups are divided at 3% and 6% thresholds. ISO 13006 ceramic tile classification
A kitchen floor near a sink, a bathroom floor, or a moisture-prone basement deserves a product chosen with its exposure in mind. A dry wall gives you more flexibility, but it still needs a surface that suits the cleaning routine and the visual weight of the room.
For aging-in-place bathrooms, don't stop at appearance. Smaller mosaics can help an installer form slopes and can create more grout lines underfoot, but the specific surface must still provide appropriate traction. A smooth, glossy tile may look elegant on a wall yet feel unsuitable where standing water and mobility concerns exist.
Patterns, Layouts, and Grout That Shape the Look
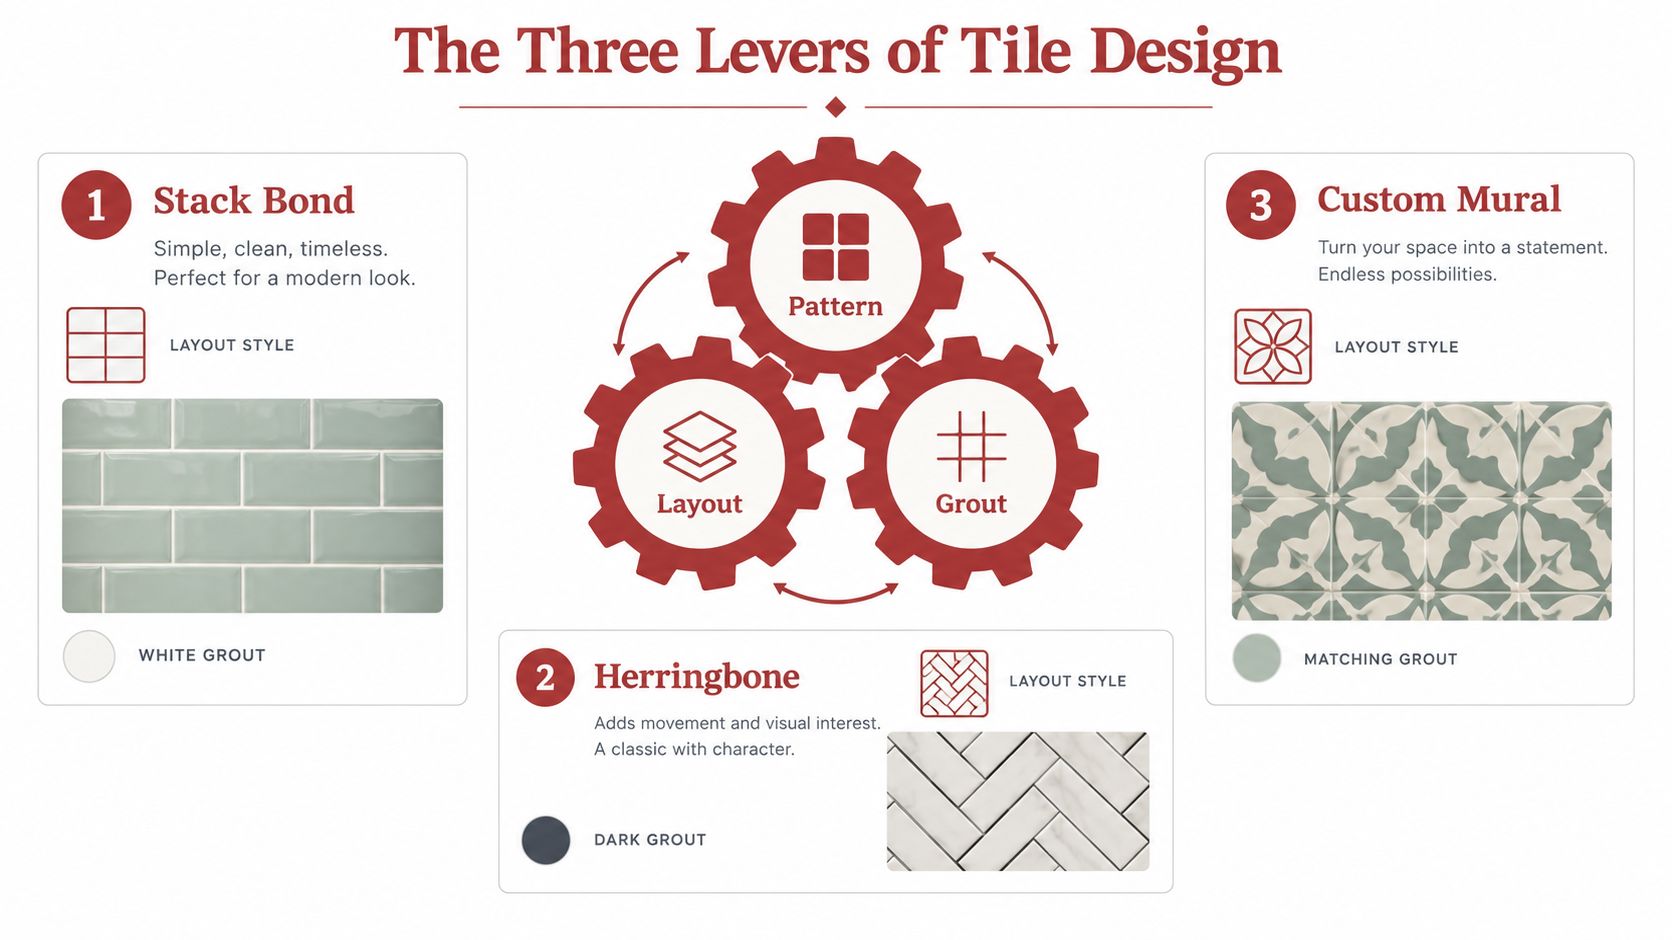
A primary bathroom becomes easier to design when you treat pattern, layout, and grout as three connected levers. Change one lever and the other two may need to change with it.
A straight lay keeps the visual field calm and makes the tile's shape easy to read. A stack bond, with joints aligned in both directions, feels orderly and architectural. A brick or running-bond layout introduces a horizontal rhythm that can make a wall feel longer, while a vertical orientation can draw the eye upward.
Movement-rich patterns create more energy. Herringbone uses angled pieces to create a zigzag texture. Chevron has a sharper, continuous V-shaped effect. Basketweave feels more decorative because small pieces interlock into repeated blocks, while a Versailles-style arrangement produces a less regular, old-world surface.
Let the room guide the orientation
Run a long linear pattern parallel to the room's long wall if you want to reinforce its length. A diagonal layout can soften awkward corners and make a compact area feel less rigid, though it creates more cuts and requires careful planning around doors, drains, niches, and plumbing fixtures.
Grout changes the apparent size of every piece. A color-matched grout allows the tile field to read as one surface. A contrasting grout outlines each tile and makes the pattern more prominent.
Width also changes the character. A 1/16-inch joint can create a tight, refined appearance when the tile and substrate allow it. A 1/8-inch joint gives the pattern more definition and may be more forgiving visually. A 3/8-inch joint becomes part of the design and can suit rustic or strongly articulated layouts, but it also creates more grout to clean.
Use unsanded grout where the joint and product requirements call for it, and use sanded grout where the wider joint and manufacturer guidance support it. The installer should select the grout based on joint width, tile finish, exposure, and product instructions, not only on color.
Quick rule: Busy tile wants quiet grout. Quiet tile can carry bold grout.
A shower niche often benefits from a restrained mosaic and coordinated grout because the niche already adds an interruption to the wall. A herringbone kitchen backsplash can handle stronger contrast when the surrounding cabinets and counters remain calm.
Engineering Rules Your Contractor Will Follow
The most beautiful tile pattern still depends on the structure beneath it. Before installation, a contractor should understand whether the floor is wood-framed or concrete, how the substrate is built, and where movement can occur.
For a thin-bed ceramic tile floor, the commonly referenced deflection limit is L/360 under live, dead, and impact loads. Natural stone on wood-framed systems typically requires L/720, which is a stiffer requirement. On a 12-foot span, the ceramic-tile allowance works out to about 0.4 inches of total deflection. Excess movement can contribute to cracked grout, debonding, and broken tile. Tile substrate deflection guidance
The assembly also matters. Cement board, an uncoupling membrane such as a Schluter DITRA-style system, and foam backer board don't handle every condition in the same way. The appropriate choice depends on the existing floor, moisture exposure, structural movement, waterproofing design, and manufacturer requirements.
Flatness and movement need a plan
Tile needs a reasonably flat setting surface, especially when the pieces are large or the layout has long, continuous joints. Commonly cited ANSI A108.02 guidance allows no more than 1/4 inch variation in 10 feet from the required plane and no more than 1/16 inch in 1 foot. Adjacent plywood panel edges should not differ by more than 1/32 inch in height. ANSI A108.02 dimensional tolerance guidance
Movement joints give the tile assembly room to respond to changes in temperature, moisture, and structure. Interior joints belong at changes of plane, around perimeters, over structural joints, and at field intervals of roughly 20 to 25 feet in each direction. Exterior installations typically need tighter spacing of about 8 to 12 feet, with wider joints often at least 3/8 inch. Movement-joint guidance from the TCNA Handbook
| Substrate or rule | Best for | Key tolerance | Common pitfall |
|---|---|---|---|
| Deflection check | Wood-framed floors | L/360 ceramic, L/720 natural stone | Assuming a stiff-looking floor is adequate |
| Cement board | Suitable prepared wall and floor assemblies | Follow system and fastening requirements | Treating it as a substitute for structural correction |
| Uncoupling membrane | Selected tile assemblies with movement concerns | Follow the specified system | Installing without correcting major substrate problems |
| Flatness check | Large or visually continuous layouts | 1/4 inch in 10 feet, 1/16 inch in 1 foot | Filling major dips with excessive thinset |
| Movement joints | Interior and exterior fields | Use location and spacing guidance | Grouting the perimeter or field joints solid |
A good contractor raises these issues before mixing thinset. Those invisible decisions determine whether your custom pattern remains intact through seasonal changes and daily use.
Where the Money Goes in a Tile Project
A homeowner planning a custom shower may start with a striking tile pattern, then discover that the pattern affects nearly every part of the estimate. The visible tile is only one layer of the project. The budget also covers the surface beneath it, preparation and setting labor, waterproofing, movement systems, and finishing details that make the design look deliberate.
Review the estimate for separate line items. Materials can include tile, thinset, grout, waterproofing, membranes, edging, sealers, and backer products. Labor may cover demolition, disposal, substrate repair, layout, installation, grouting, sealing, and cleanup. Showers may add niches, benches, drains, profiles, transitions, and precise slope work.
For an early project-cost check, run a ballpark estimate before finalizing the pattern. That number helps you decide whether to customize the whole floor, one wall, a niche, or a backsplash.
Complexity changes labor
A straight-lay wall gives the installer a steady rhythm. Herringbone interrupts that rhythm with angled cuts and repeated alignment checks. Mosaic sheets arrive attached, but the installer still has to control sheet joints, spacing, corners, outlets, and transitions. A curbless shower requires accurate slopes so water reaches the drain without uncomfortable or unsafe changes in elevation.
The room's construction can increase cost before the first decorative decision. A floor that needs substrate correction takes more preparation. A design crossing different surfaces may require planned movement joints so seasonal changes do not crack the finish. Tile absorption also affects the work. Porous stone or handmade tile may need sealing, conditioning, or slower layout decisions, while pieces with uneven thickness require careful adjustment.

Natural stone can add sealing and maintenance steps. Handmade or irregular tile may require extra layout time because the installer must distribute variation intentionally instead of treating every piece as identical.
The tile itself may represent a smaller share of the decision than expected. Choosing a simpler layout, an in-stock product, a standard grout width, or a focused backsplash feature can preserve personality while reducing cuts and transitions.
Protective work deserves room in the budget. Skipping substrate preparation, waterproofing, or required movement joints can lead to failures that cost more to correct than the original allowance. Weigh each design choice against the installation complexity your room can support, and spend the effort where it creates the clearest visual impact.
Working With a Contractor From Concept to Install
A family bathroom may begin with a mood board, but installation starts with a different question: how will the room perform every day? A contractor turns the desired atmosphere into measurements, materials, and details that can survive real use.
The discovery conversation should cover the room's purpose, cleaning expectations, accessibility needs, preferred style, and working budget. An aging-in-place shower may need safe entry, stable footing, grab-bar planning, and space for future use. A kitchen backsplash has more freedom for artwork because it does not carry foot traffic. Reference images work like evidence, helping separate the feature you love from the conditions that made it practical in the original room.
Five decisions shape the build
Discovery: Bring sketches, cabinet samples, countertop information, reference images, and a list of must-have features. The contractor can identify which ideas suit your room and which depend on a different floor plan or lighting setup.
Measurement and inspection: The installer records walls, floors, openings, corners, drains, niches, and transitions. The team checks framing, flatness, existing finishes, and moisture-sensitive areas before the design becomes an order.
Scaled layout: The plan should show orientation, starting points, cut locations, grout width, borders, trim, and movement-joint placement. Like a floor map, it reveals narrow corner slivers, awkward niche interruptions, and difficult transitions before tile is set.
Material approval: View samples in the actual room's lighting. Confirm tile, grout, trim, waterproofing products, and sealers before ordering. Review absorption as well as appearance, since porous or uneven materials may require different handling. A dry layout shows how color and variation will distribute across the surface.
Preparation and installation: Demolition is followed by substrate correction, waterproofing where required, dry-lay checks, setting, grouting, sealing, and cleanup. Niches, benches, thresholds, baseboards, and transitions need the same planning as the main field.
Ask what happens if the existing substrate fails inspection, including who approves the added work and how it affects the schedule. Use the instant project pricing tool while the design is still flexible, so you can compare a full custom floor with a focused feature wall before material orders and demolition limit your choices. Confirm in writing what happens if the existing substrate fails inspection, so a low early estimate does not become a surprise change order after demolition.
Maintenance, Mistakes to Avoid, and Your Next Step
Custom tile design earns its place in a home when the finish remains attractive and practical after installation day. Before approving the plan, walk through this checklist:
- Material: Confirm that the tile's absorption, surface, and slip characteristics suit the room.
- Layout: Review orientation, focal points, cuts, niches, drains, transitions, and grout width.
- Substrate: Ask how the contractor will address deflection, flatness, cracks, and changes between materials.
- Movement: Confirm perimeter joints, changes of plane, structural joints, and field locations where required.
- Maintenance: Get written guidance for routine cleaning, grout care, and any sealing schedule.
Routine cleaning should follow the tile and grout manufacturer's recommendations. Use products that won't damage the surface or leave a film. Grout haze should be addressed with the appropriate post-installation method, and spills should be handled promptly when the material is vulnerable to staining.
Sealing isn't a universal instruction for every tile. Some stone and grout products need periodic protection, while other surfaces may not require the same treatment. Ask which product was installed, whether it was sealed, and what the installer recommends for future cleaning and resealing.
Mistakes that create avoidable trouble
Skipping primer or using the wrong adhesive can weaken the bond. Ignoring flatness tolerances can leave uneven edges and visible lippage. Treating a perimeter joint as ordinary grout prevents the assembly from responding to movement. Choosing a beautiful but high-maintenance surface for a frequently used shower can turn a design victory into a cleaning burden.
The smartest custom detail is one you can maintain, repair, and live with comfortably.
A qualified tile installer can help you decide where to spend design effort and where simplicity protects the project. For homeowners in Portage, Kalamazoo, and nearby Southwest Michigan communities, Trademaster Construction offers design-build remodeling for kitchens, bathrooms, basements, and custom tilework, guiding projects from concept through construction.
Trademaster Construction can help turn a custom tile idea into a measured plan that accounts for layout, substrate preparation, waterproofing, and long-term use. Visit Trademaster Construction to explore remodeling options and use the instant pricing feature to move from inspiration to a realistic project conversation.

