
You're standing in a hallway looking at two floors that don't quite agree with each other. The new kitchen tile is in, the living room still has LVP, or the basement finish now runs into an older hallway, and the question becomes less about style than about where the flooring should stop, how it should move, and what keeps the doorway from turning into a problem later.
A flooring transition between rooms looks like trim on the surface, but on real job sites it's doing structural work too. It has to handle height, movement, and the change in material without creating a buckle, a rock, or a lip that people catch a foot on. In Southwest Michigan homes, especially with mixed-material remodels, that's usually where the cleanest-looking projects either stay solid or start coming apart.
Why the Flooring Transition Between Rooms Matters More Than Most Remodels Expect
A common job in Portage or Kalamazoo starts with a kitchen refresh. The homeowner wants tile at the cooking zone, but the living room already has floating LVP, and the doorway between them looks simple until the measurements come out. That strip people notice last is the one that should be decided first, because it sets the stopping point for the floor, the movement allowance, and whether the doorway stays safe after the house cycles through humidity and temperature changes.
Practical rule: if the floor can move, the transition has to let it move. If the height changes, the transition has to absorb that change cleanly.
Floating floors need room to expand and contract, and installers commonly plan for an expansion gap of at least 1/4 inch every 30 feet as noted in installation guidance. That same threshold shows up in other installation guidance too, because once a run gets long enough, the doorway stops being a visual detail and becomes a control point for movement 1/4-inch expansion gap at least every 30 feet. If the strip is skipped or placed late, the flooring can push against the next room, and that's when installers start chasing issues after the fact instead of preventing them.
Why the doorway is never just a doorway
Transitions solve three problems at once, different materials, height differences, and floor movement as described in industry guidance. That's why the transition shouldn't be treated like an accessory picked from a sample board after the hard work is done. It's part structure, part safety, and part design.
On real remodels, the most expensive mistake isn't always the wrong color. It's letting a floating field run too far without a break, then trying to force a trim piece to fix a movement problem it was never meant to solve. In homes where the kitchen, hallway, and basement all tie together, the transition is often the point that keeps the whole layout stable and intentional.
The Four Transition Profiles and Where Each One Belongs
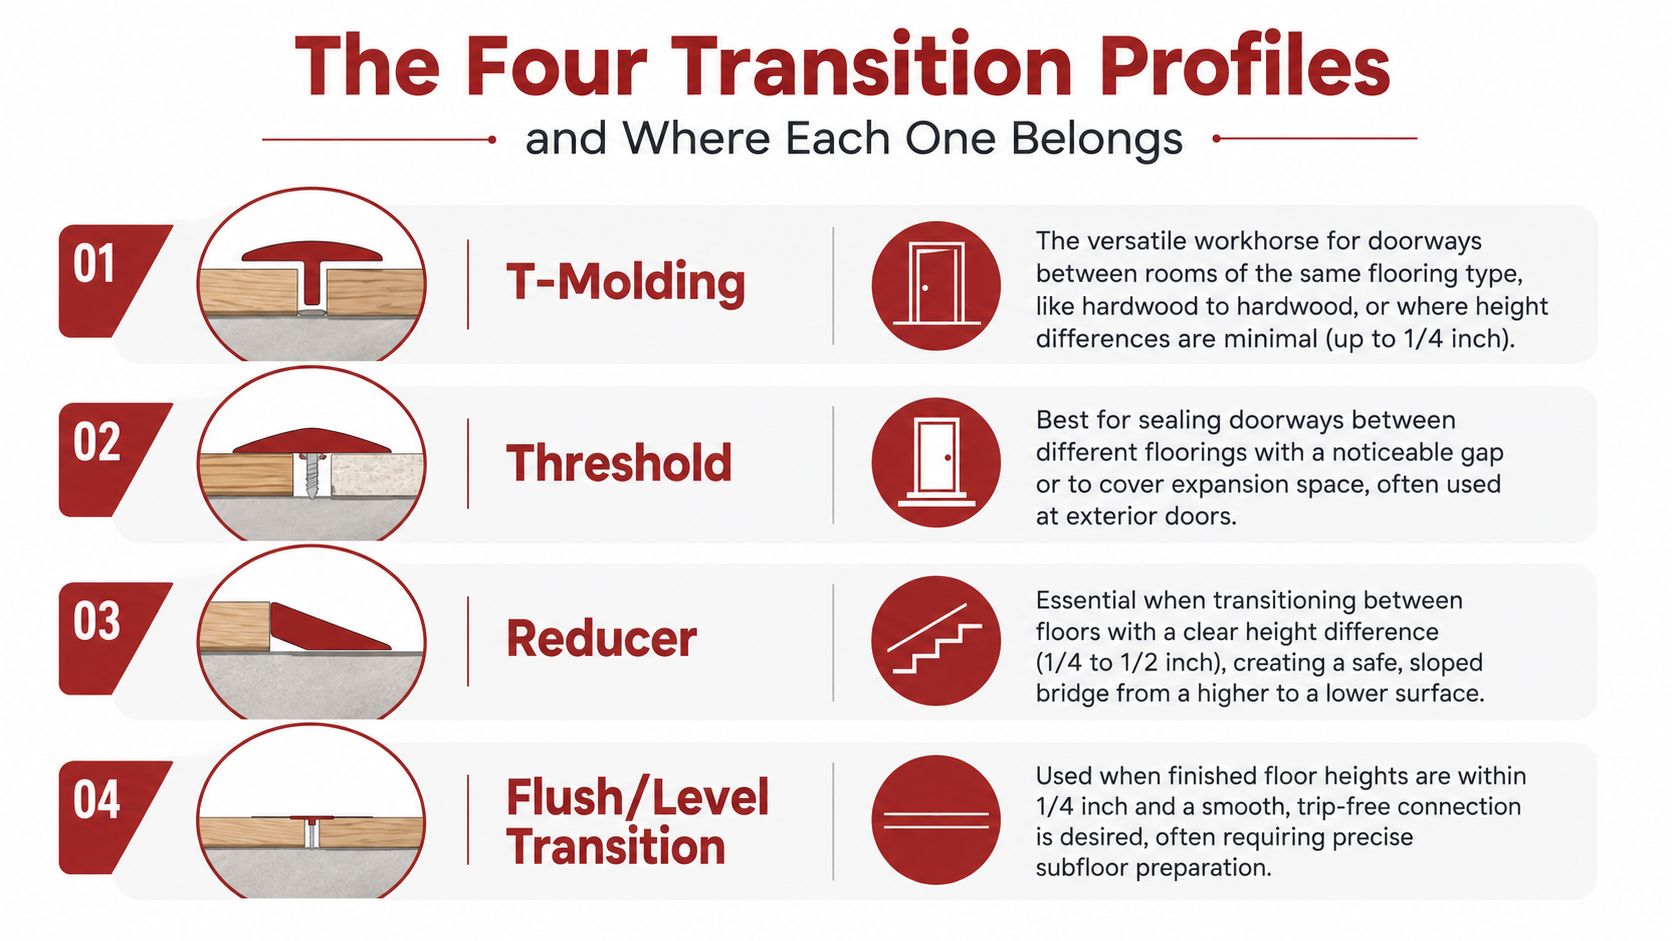
The right profile starts with the actual floor conditions, not the label on the box. A strip that looks elegant in the showroom can be the wrong answer if the two finished floors don't sit at the same elevation or if one side still needs movement room.
T-Molding
T-molding is the workhorse for same-height floating floors. It sits in the doorway and bridges two surfaces that already line up closely, so it's the clean answer for hardwood-to-hardwood, LVP-to-LVP, or similar room-to-room runs where expansion still has to be preserved.
Threshold
A threshold is better when the doorway needs more definition, especially at carpet-to-hard-surface changes and exterior entries. The strip does more than cover a seam, it gives the opening a firmer visual and physical break, which is useful where weather, dirt, or carpet edges come into play transition strips are commonly used where carpet meets vinyl, laminate meets carpet, or hardwood meets another material.
Reducer
A reducer belongs where one finished floor sits lower than the other. That sloped shape matters because it eases the height change instead of forcing a hard step, which is why reducers are the normal answer for tile-to-vinyl, hardwood-to-LVP, or similar mismatches where the edge has to be safe and comfortable underfoot.
Flush or level transition
A flush transition is for the polished, continuous look. It works when the finished heights are nearly even and the substrate is prepared tightly enough to avoid rocking or visible lippage. The result reads more like one surface flowing through a doorway than two separate floors meeting.
Bottom line: the profile choice comes after you know the finished elevations. If the heights are wrong, the profile won't rescue the doorway.
Matching Finished-Floor Heights Before You Pick a Profile
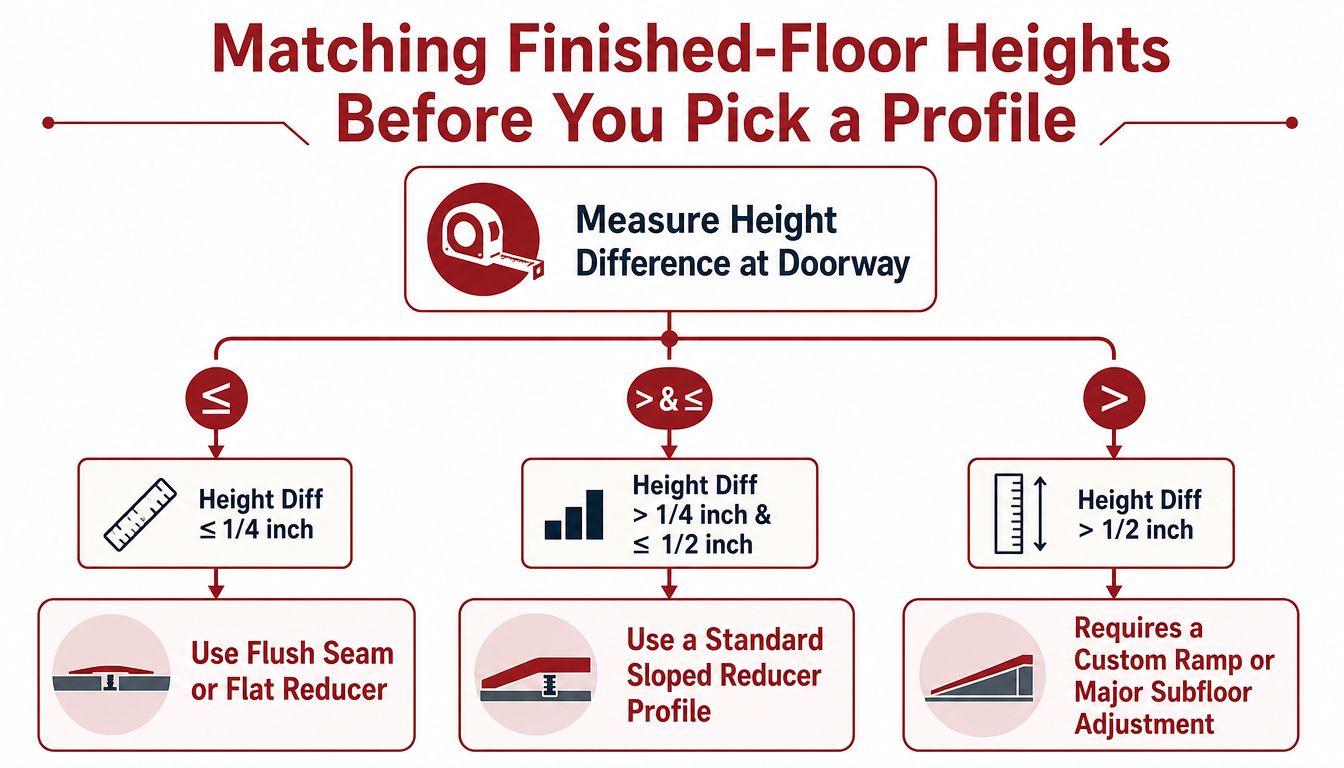
The fastest way to get a bad transition is to choose the trim first and measure later. On site, the finished-floor elevation decides the rest of the job, because the profile only works if the actual height difference falls inside its range.
For a doorway with a height differential of 1/4 inch or less, a flat seam strip or flush reducer can work based on professional guidance. Once the difference lands between 1/4 inch and 1/2 inch, a beveled reducer with a gentle slope is the right move, and anything above 1/2 inch needs a ramped threshold or accessible ramp assembly same source. That isn't just a visual preference. It's the difference between a doorway that feels finished and one that rocks, lifts, or becomes awkward to walk across.
What changes the number
Underlayment thickness can change the target. So can tile build-up, mortar, patched subfloor sections, and even the way a doorway was framed years ago. On tile work, flatness matters too, because ANSI A108.02 flatness tolerance is commonly cited as 3/16 inch over 10 feet in the same design guidance. If the substrate is off, the strip may sit unsupported and telegraph a rock every time someone crosses it.
The practical move is simple. Check the doorway with a straightedge, confirm both finished heights before you buy the profile, and fix soft spots or high points first. A transition cannot flatten a bad floor, it only hides the seam between floors that already make sense together.
Choosing the Right Transition for Common Room Pairings
The same product won't solve every doorway in a Southwest Michigan remodel. Kitchen moisture, basement entries, carpet edges, and age-in-place access all pull the decision in different directions, so the safest choice is the one that matches the surfaces and the way people move through the house.
| Room Pairing | Recommended Profile | Why |
|---|---|---|
| Tile kitchen to hardwood living room | Reducer or threshold, depending on the finished height | Tile and wood rarely land at the same elevation, and the edge has to stay stable where traffic is heaviest. |
| Carpet to tile at a basement entry | Threshold | Carpet needs a clean, secure edge, and the doorway often needs a firmer break between soft and hard surfaces. |
| LVP to carpet in a bedroom | Threshold or carpet trim | The carpet edge needs to be held down, and the transition should avoid a loose lip at the room entry. |
| Curbless shower to hallway floor | Flush or level transition if heights allow, otherwise a ramped solution | Accessibility matters more than a perfect visual seam, and the path needs to stay low-profile and safe. |
How these pairings behave in real homes
Kitchen-to-living-room transitions usually need the most patience because the surfaces are both visible and heavily used. A reducer can make a small height change feel intentional, while a threshold can provide more forgiveness if the materials don't line up tightly.
Basement entries are different. Carpet edges can fray, tile edges want support, and lower-level rooms often expose little height surprises that don't show up in the showroom. That's why the strip has to be chosen for the actual seam, not the catalog picture.
For households planning accessible updates, the transition has to respect movement as much as finish. A clean, low-profile connection matters when someone is using a walker, wheelchair, or needs a doorway with less visual and physical interruption.
Preparing the Doorway and Installing the Transition
Before any strip goes in, the doorway has to be measured from the finished surfaces, not the rough floor underneath. That means checking both sides after the flooring is set, because the profile is only as good as the elevations it lands on.
Undercut the door casing so the flooring can slide underneath cleanly. That keeps the trim from looking pinched and avoids awkward notches around the jamb. Then confirm the expansion gap on each side, because floating floors need that room to move and the transition track has to respect it installers are advised to leave a 1/4 inch to 1/2 inch gap near the room break.
How the install stays clean
The track should be fastened to the subfloor, not to the floating floor itself as multiple installation guides explain. Once the field flooring is complete, acclimated, and cured, the transition strip can snap or tap into place. If the track is nailed or screwed into the wrong layer, the floor loses its ability to move underneath it.
A typical DIY setup uses a pull bar, tapping block, miter saw or oscillating saw for the casing undercut, and track screws. Thresholds may also need construction adhesive, especially where the profile is meant to sit fixed and stable rather than clip into a track. If an adhesive spill does happen on wood or tile, this guide on removing construction adhesive is worth keeping nearby before the finish hardens.
Track the subfloor, not the floating floor. If the strip locks the floor in place, the movement problem just moves somewhere else.
The cleanest installs usually come from dry-fitting before anything is fixed. That gives you a chance to check door clearance, equal overhangs, and whether the profile sits flat without forcing it into a bowed shape.
Common Mistakes That Cause Buckling, Rocking, and Trip Points
The failures on flooring transitions are usually predictable. They show up when someone wants the doorway finished before the floor is ready for it.
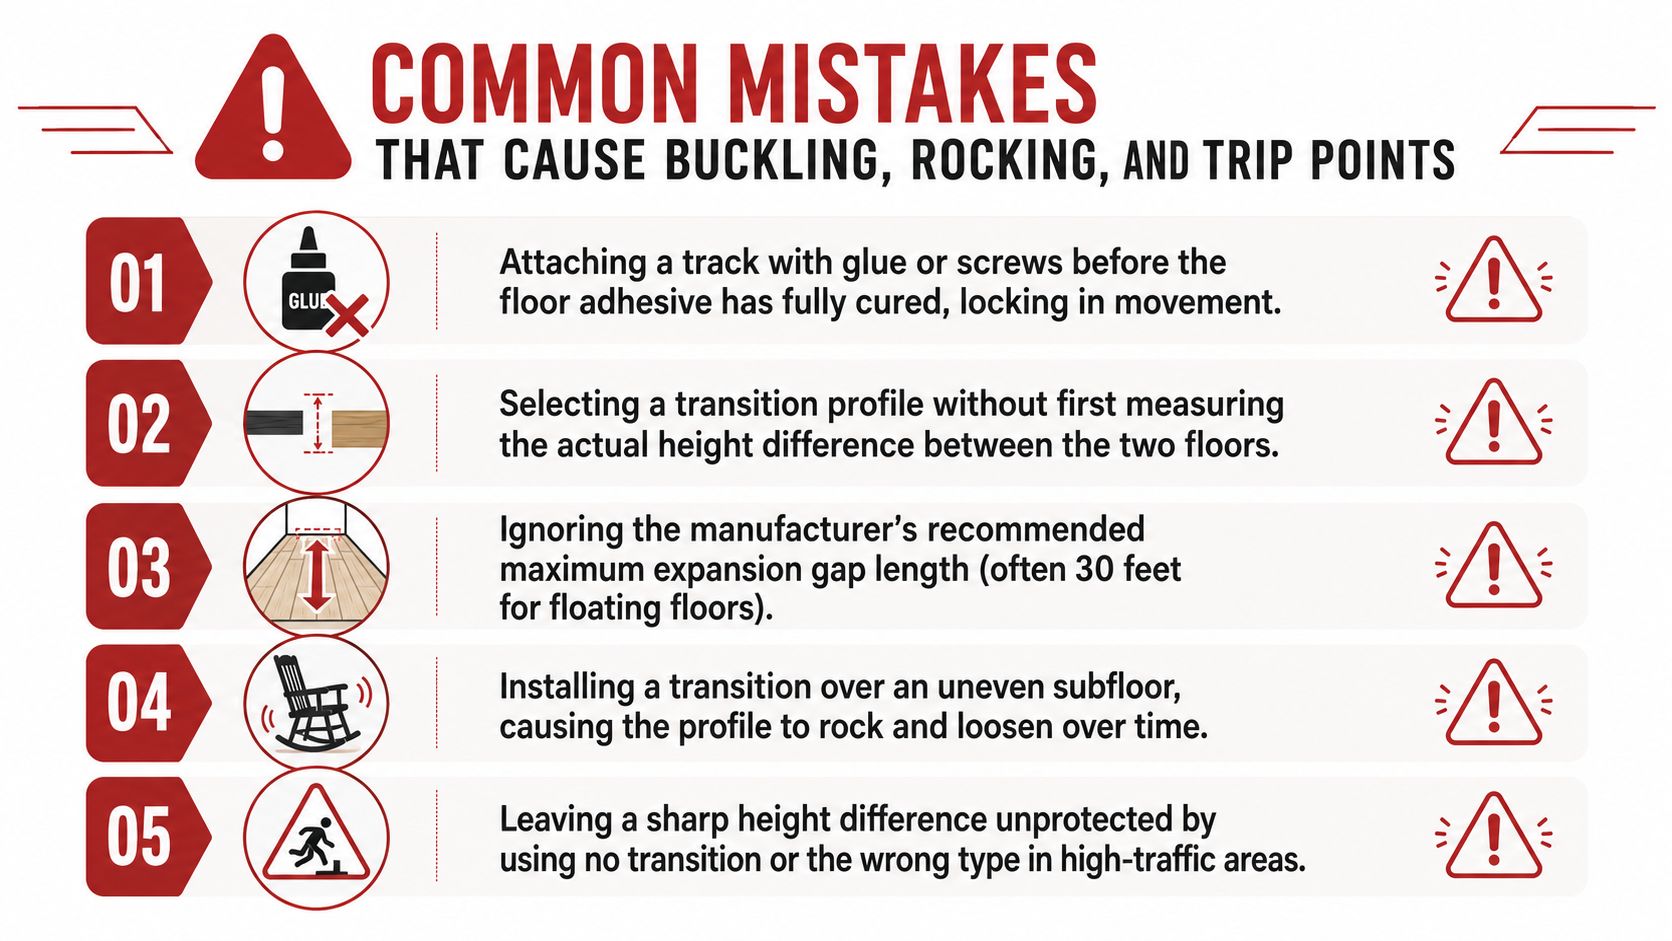
The mistakes I see most often
- Fastening too early: A track gets glued or screwed in before the adhesive under the floor has cured, and the pressure can pull the molding loose. The fix is patience, then final fastening after cure.
- Picking the wrong profile: The installer chooses a T-molding when the doorway needs a reducer. Re-measure the finished heights with a straightedge and swap to the profile that matches the height difference.
- Ignoring the long-run movement rule: A floating floor runs too far without a transition break. Add a transition at the practical 30-foot milestone so the floor can keep moving as installation guidance notes.
- Locking the floating floor down: Screws or adhesive tie the floor to the strip in a way that stops movement. The strip should anchor to the subfloor, while the flooring stays free to float beneath it doorway transitions should be fixed to the subfloor rather than the floating field.
- Leaving a height edge exposed: The doorway gets no transition at all, or the wrong one for a traffic area. That's how trip points and edge damage start.
A transition can only do its job if the floor can still behave like the floor it is. If the joint is rock-solid in the wrong places, it usually becomes the weakest point in the room.
Costs, Tools, Maintenance, and Planning Your Project
Most homeowners only budget for the flooring itself, then get surprised by the doorway details. Transitions are part of the finish package, not an extra afterthought, and they should be priced with the rest of the room before the job starts. For a fast ballpark on the full remodel, including transitions, the instant pricing tool is a practical place to start.
What the job usually needs
A straightforward DIY install calls for a tape measure, straightedge, pull bar, tapping block, undercut saw, and the right profile for the finished heights. A pro crew brings the same basics plus the judgment to adjust underlayment, spot subfloor issues, and decide when a doorway needs a reducer instead of a standard T-molding. On the material side, the profile itself, the track, screws, and any adhesive all have to be matched to the substrate and the expected movement.
Maintenance stays simple if the strip was installed correctly. Tighten loose track screws if they back out, re-secure a carpet gripper if the edge starts lifting, and replace a damaged cap rather than forcing the whole assembly to stay in service. A good transition should be serviceable, not disposable.
For homeowners comparing options, it also helps to know when a flooring project is more than a trim swap. If buckling has already started or a doorway is rocking, the problem may be in the floor build-up, not the visible strip. Savera Wood Floor Refinishing's notes on buckled floors are a useful reminder that movement problems usually have a cause upstream of the doorway.
A practical planning checklist
- Measure the finished heights first so the profile type is chosen from reality, not guesswork.
- Decide whether the floor needs a break at the doorway or along a long run.
- Match the strip to the room pairing so carpet, tile, vinyl, and wood each get the edge detail they need.
- Budget for the doorway work early so the trim doesn't become the item that throws off the schedule.
Trademaster Construction handles flooring installation, tile work, and the kind of room-to-room details that keep a remodel from looking patched together. If you're in Portage, Kalamazoo, or a nearby Southwest Michigan community and you want the transitions, flooring, and finishing details handled as one plan, use Trademaster Construction to talk through the layout and move from estimate to scheduling with a clearer scope.

