
You've chosen the tile, removed the old surround, and exposed a wall that looks perfectly ordinary. That's where many shower remodels go wrong. The tile may be attractive, the grout lines may be straight, and the first few showers may seem fine, but water can still move through joints, corners, fastener holes, and pipe openings if the waterproofing behind the tile is incomplete.
In Southwest Michigan homes, I've seen enough failed showers to know the visible tile is rarely the real problem. The damage usually starts behind it, where a missed seam or unsealed transition lets moisture reach framing, insulation, and interior finishes. Learning how to waterproof shower walls before tiling means treating the wall as a continuous waterproof assembly, not as a decorative surface that happens to resist splashes.
Why Shower Walls Must Be Waterproofed Before Any Tile Goes Up
A failed shower often gives homeowners little warning. The grout may darken in one corner, a tile may loosen near the valve, or the baseboard on the other side of the wall may begin to swell. By the time those signs appear, moisture may already have traveled behind the wall surface.
Tile and grout help shed water, but they aren't the primary waterproof barrier. Water can migrate through grout joints, hairline cracks, changes of plane, and small gaps around plumbing. The membrane behind the tile is the layer that protects the wall assembly from that moisture.
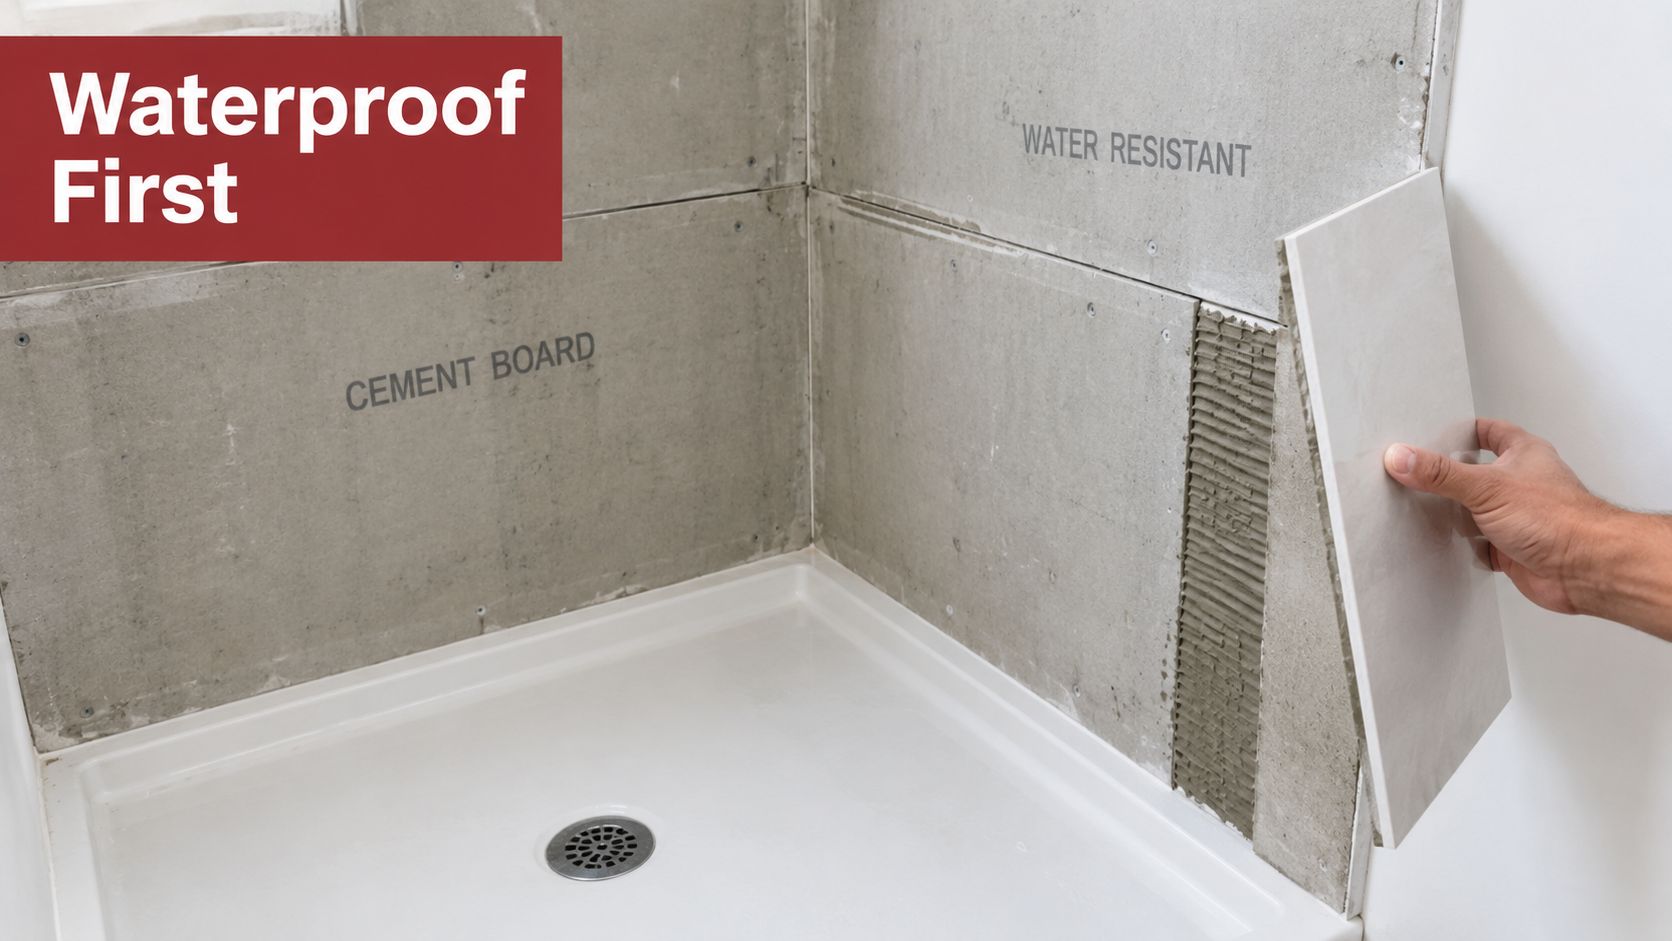
Code height makes the work measurable
Modern waterproofing requirements give installers a defined protected zone instead of leaving coverage to personal preference. The Australian National Construction Code 2022 waterproofing requirements state that shower-area walls must be waterproof not less than 1800 mm above the floor substrate, while wall junctions and joints within the shower area must be waterproof not less than 40 mm on either side of the junction.
Comparable New Zealand wet-area guidance uses the higher of 300 mm above the shower rose and 1800 mm above the shower floor or tray for the minimum wall membrane height, as described in the same code discussion. In the United States, a technical guide citing the 2024 International Residential Code and Uniform Plumbing Code describes a continuous waterproof layer extending to a minimum of 72 inches above the finished drain, with the membrane meeting ANSI A118.10 requirements. See the technical guide to waterproofing shower walls for tile for that code and standard context.
The exact requirement for your project depends on the applicable jurisdiction and approved system. The practical lesson is consistent: the membrane must cover the wet area continuously before tile installation begins.
Practical rule: If you can see unprotected board at a corner, fastener, niche, or pipe penetration, the wall isn't ready for tile.
The wall behind the tile is the asset you're protecting
A cement backer board can provide a stable tile substrate, but it is moisture-resistant, not waterproof. A separate liquid or sheet membrane must cover it before tile is set, as explained in this guide to cement backer board for shower walls.
That distinction changes every decision that follows. You aren't merely making a surface suitable for adhesive. You're building a continuous barrier that keeps water away from framing, insulation, and finishes, including the colder exterior-wall assemblies that deserve extra attention in this region.
Choosing the Right Waterproofing System for Your Shower Walls
The right system depends on the substrate, wall location, detailing, and the amount of vapor control the assembly needs. A liquid membrane can work well when the installer can apply the required thickness consistently. A bonded sheet membrane offers a visible, manufactured layer with consistent thickness, but seams and penetrations still require careful treatment.
Cement board belongs in the substrate discussion, not the waterproofing category. It can be a sound base for tile, but it needs a compatible membrane over its face and properly treated joints before the tile goes up.
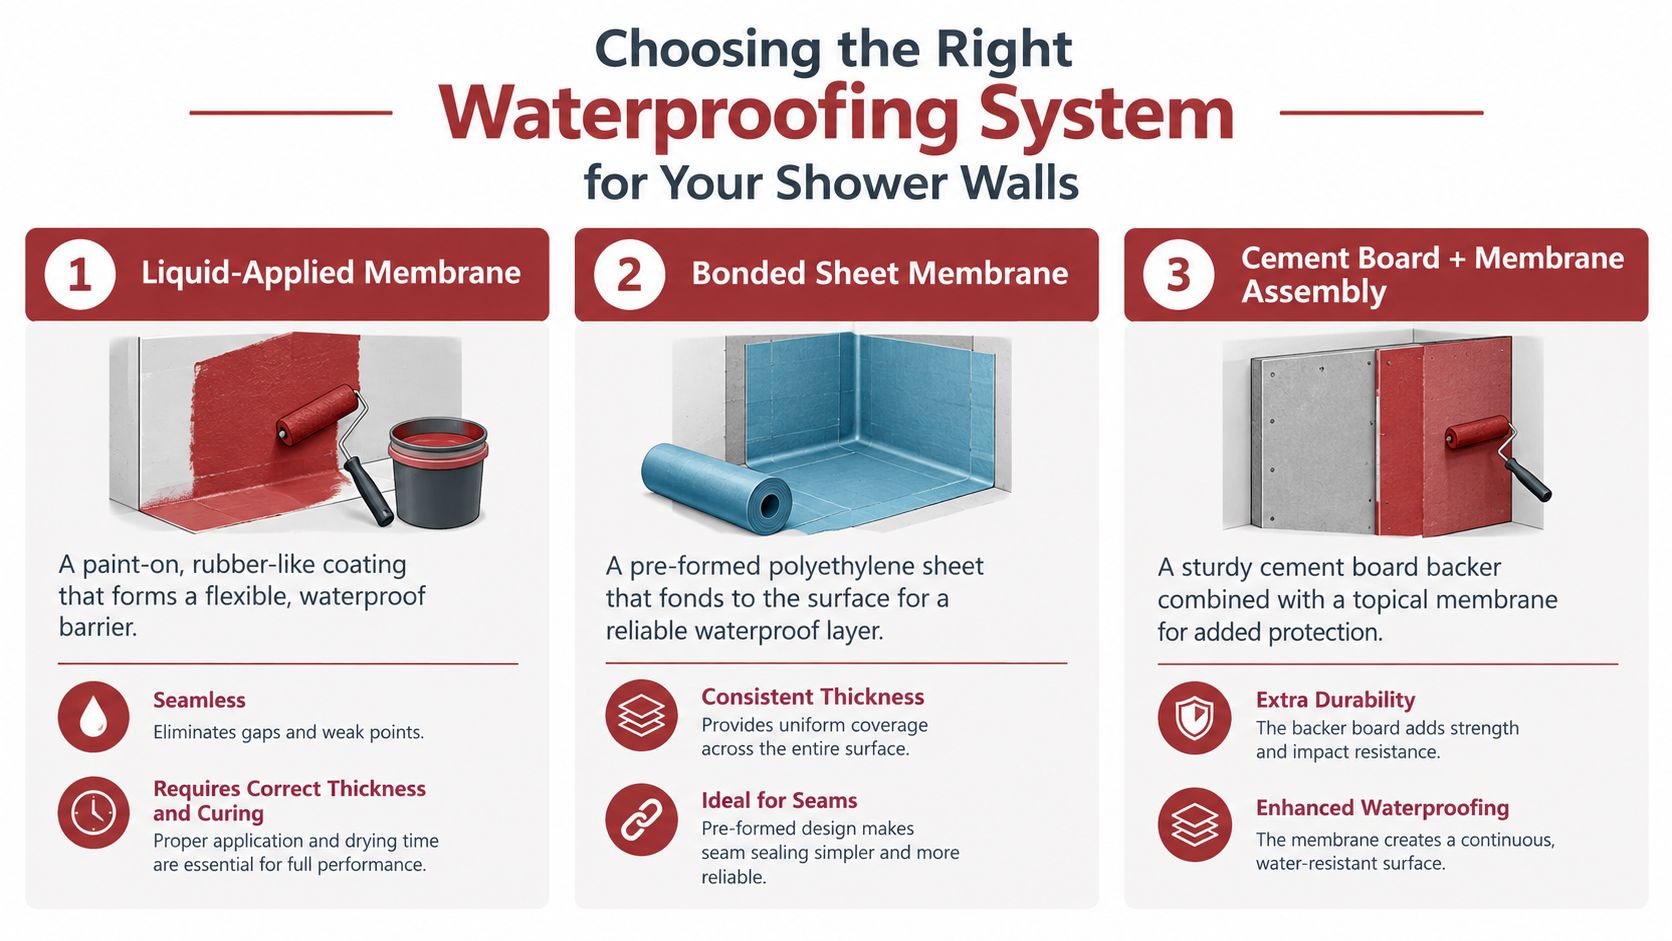
Compare the assemblies before buying materials
| System | Best For | Vapor Control | Detailing Difficulty |
|---|---|---|---|
| Liquid-applied membrane | Straightforward walls where careful coating and curing are practical | Depends on the selected product and applied thickness | Moderate to high, because thin spots and pinholes can be hard to see |
| Bonded sheet membrane | Remodels and installations where consistent membrane thickness matters | Product-specific, with low-perm options available | Moderate, seams, corners, and penetrations require compatible accessories |
| Cement board plus membrane assembly | Rigid tile backing combined with a separate waterproof layer | Determined by the membrane and full wall assembly | Moderate, board joints and membrane details both need attention |
For a standard interior shower wall, a quality liquid-applied system can be a reasonable choice when the substrate is flat and the installer follows the manufacturer's coverage requirements. The trade-off is application control. A roller can spread the coating, but it can't tell you whether the cured film is thick enough everywhere.
A bonded sheet membrane makes the waterproof layer easier to inspect visually and provides consistent manufactured thickness. The installer still has to bed it fully, avoid wrinkles and air pockets, and seal every overlap. A sheet system isn't automatically leak proof just because it arrived in a roll.
Exterior walls need a more deliberate vapor decision
An outside shower wall deserves more than a generic recommendation. In a colder climate, warm, humid shower air can interact with a cooler wall assembly, so the membrane's vapor permeability becomes part of the system choice. An industry discussion of waterproofing shower walls on exterior walls identifies low-perm sheet membranes such as Wedi Subliner Dry, Kerdi DS, and Nobleseal TS for those conditions.
That doesn't mean every exterior wall needs the same product. It means you should evaluate the wall location, insulation, interior finish, and the membrane's tested properties together. A low-perm sheet membrane may be more appropriate than a basic liquid coating when vapor control is a central concern.
For design planning, waterproofing should happen before the tile selection is finalized. Layout, niche placement, accent strips, and large-format pieces all affect seams and penetrations. These ideas for shower wall tile design can help you plan the visible finish without losing sight of the waterproof layer underneath.
Preparing Walls and Tools for a Leak Proof Result
Waterproofing can't rescue a wall that's loose, dirty, badly bowed, or full of unplanned openings. The membrane follows the substrate, so bumps and voids can create poor contact, awkward tile setting, and thin coverage at the very places that need protection.
Start by exposing the wall assembly far enough to understand what you're working with. Check framing for movement, straighten or shim where needed, and address damp or damaged materials rather than covering them. A shower wall should feel solid when pressed, with no soft spots or loose panels.
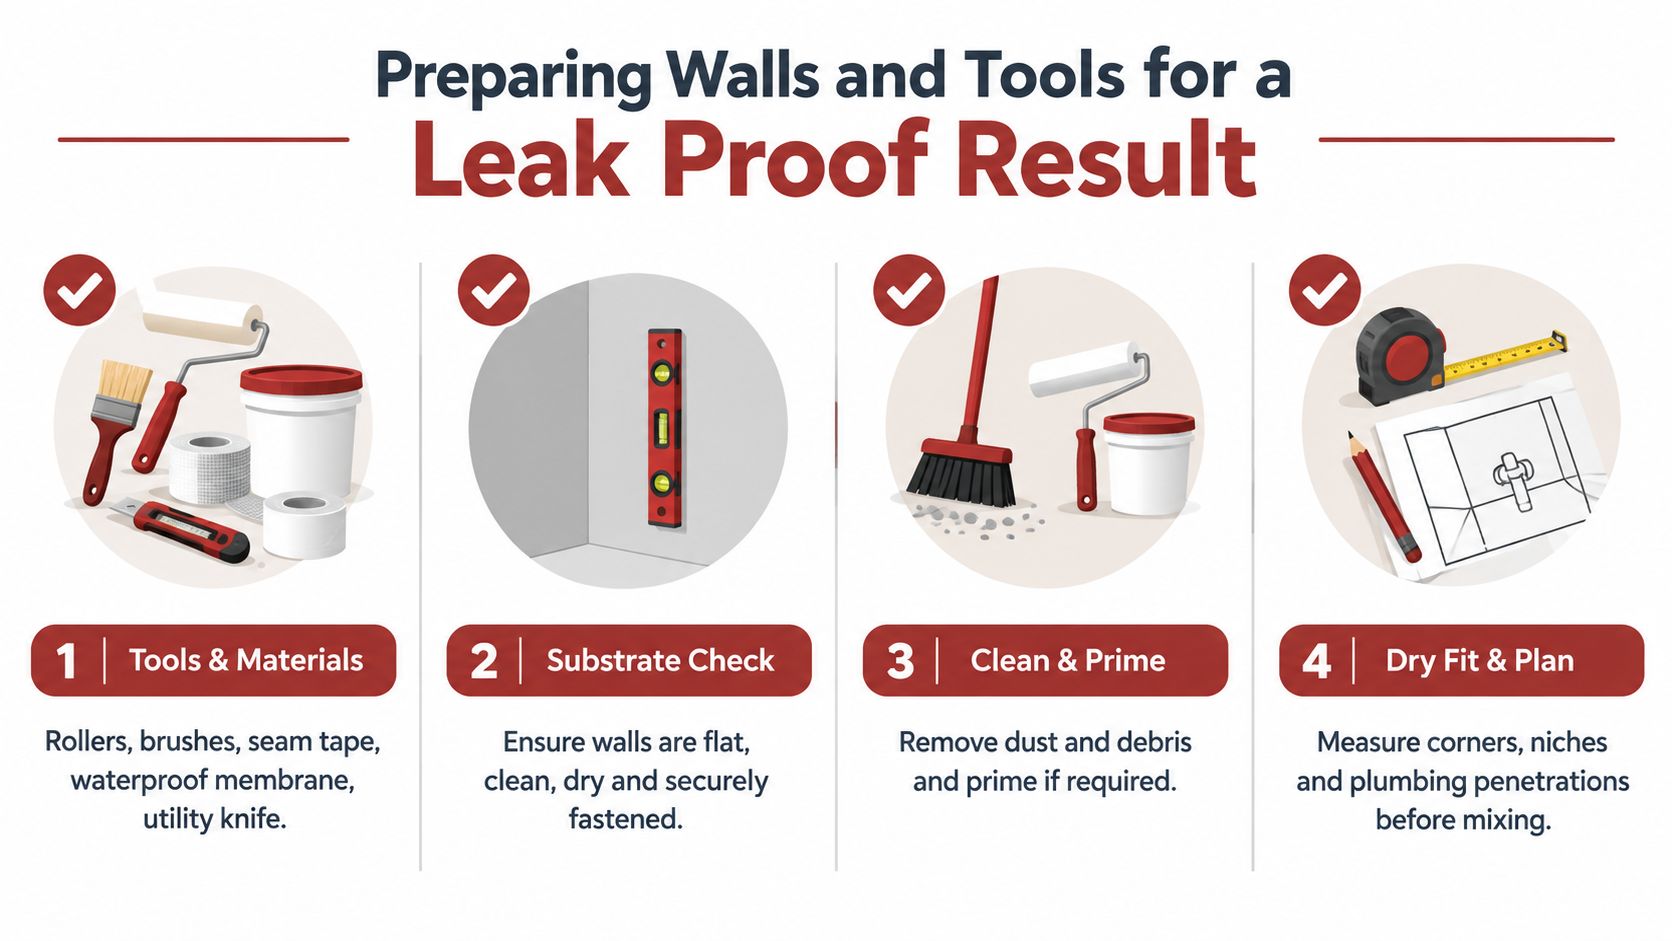
Build a prep station before mixing anything
Gather the materials that belong to the selected membrane system, not a random collection of products from different manufacturers. At minimum, that usually means a utility knife, straightedge, level, clean buckets, rollers, brushes, the specified mortar or liquid membrane, reinforcing tape, corner accessories where required, and sealant for penetrations.
Use a wet-area board suitable for the assembly. If you install cement board, follow the board manufacturer's fastening requirements and keep the face clean enough for the membrane to bond. Every fastener should sit properly without breaking through or creating a loose spot.
A straightedge helps find ridges and dips that a small level may miss. Mark problem areas, repair them with compatible materials, allow repairs to dry, and check the wall again before applying the membrane.
Treat board joints as part of waterproofing prep
Cement-board seams need alkali-resistant mesh tape and thinset at the joints, according to independent shower installation guidance from Custom Building Products. That treatment supports the board assembly, but it doesn't replace the topical waterproof membrane.
Plan plumbing openings before the board is covered. Valve bodies, shower arms, body sprays, niches, benches, and wall-to-floor transitions all need room for their specific seals or reinforcing details. A pipe opening cut too large creates a harder waterproofing problem than a carefully fitted opening.
For adjacent plumbing and metal components, understanding specialty protection methods, including WhatsDemand pipe coating, can provide useful background. That information doesn't replace the shower membrane system, but it reinforces a basic trade practice: protect penetrations and components before finishes hide them.
Finish the substrate with a clean inspection
Remove dust, loose fibers, drywall compound, and debris. Prime only when the selected product requires it, and use the compatible primer rather than assuming every membrane bonds the same way.
Before moving to waterproofing, confirm that the wall is:
- Flat and stable: No loose boards, flexing sections, or unaddressed framing problems remain.
- Clean and suitable: Dust, grease, loose coatings, and damp-damaged materials have been removed.
- Fastened correctly: Board fasteners are seated without damaging the substrate.
- Planned around openings: Niches, corners, valves, and transitions won't force improvised patches later.
Applying the Membrane and Sealing Every Seam and Corner
The membrane should read as one uninterrupted surface from the shower floor or tub transition through the wet wall area. The broad field is usually straightforward. Failures concentrate at the places where one surface meets another, where a fastener pierces the board, or where a pipe interrupts the wall.
Start with the system instructions in front of you. Liquid membranes and sheet membranes don't use the same installation method, and accessories from one system may not be compatible with another.
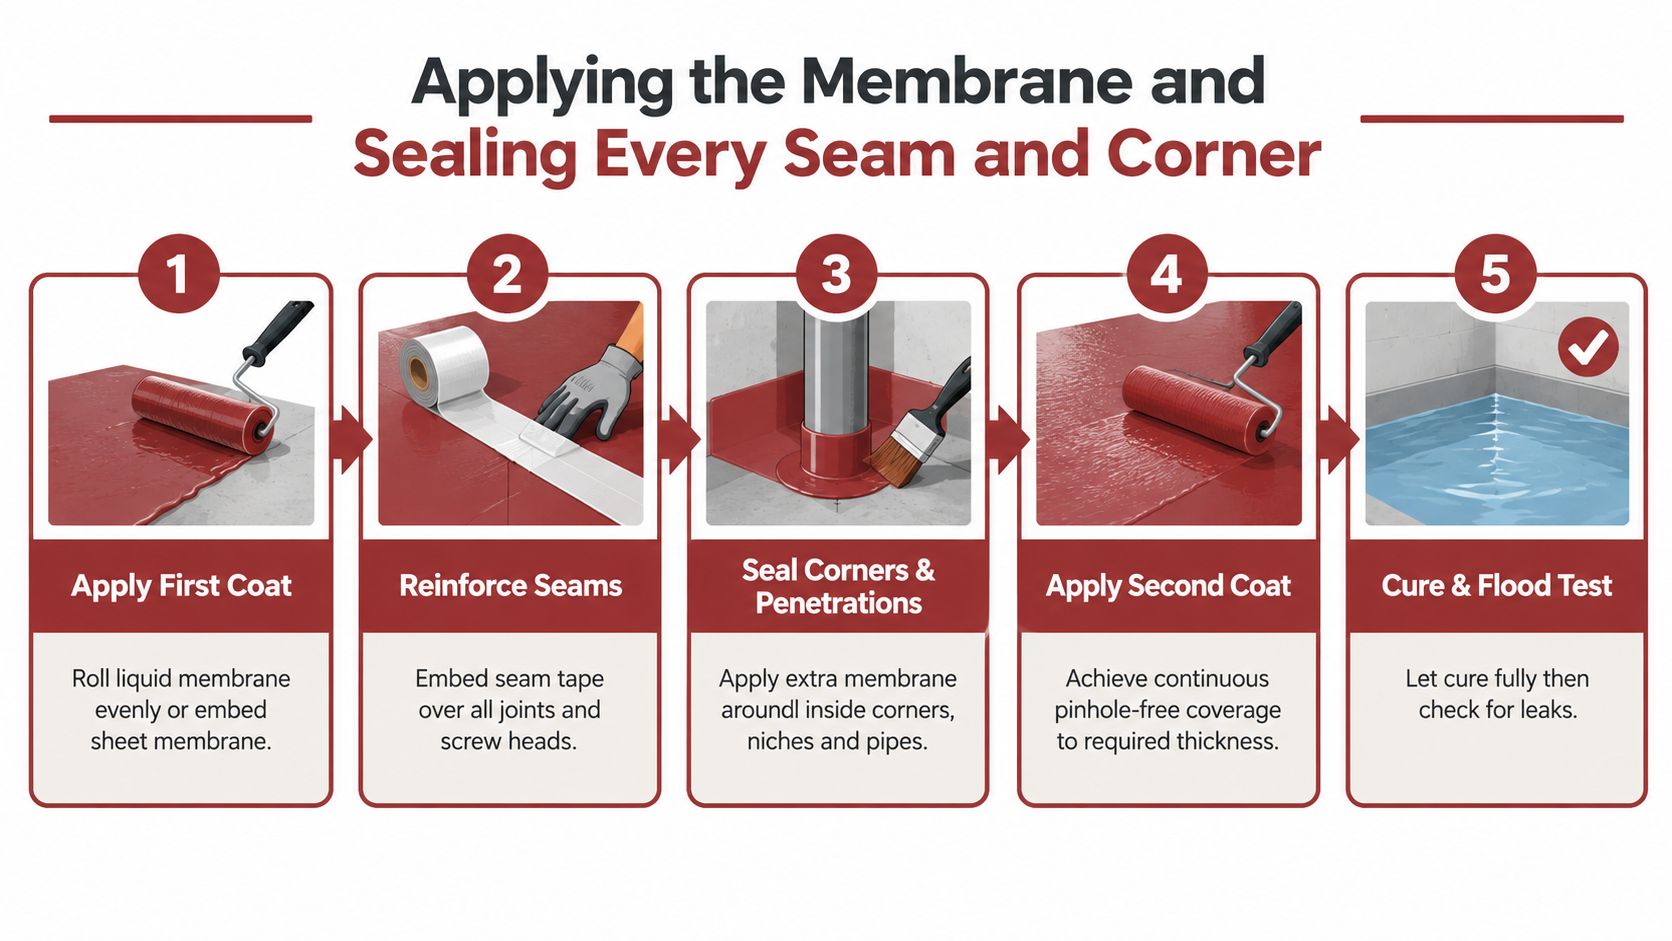
Liquid membrane requires thickness discipline
Roll or brush the liquid membrane evenly over the prepared surface. Treat the first coat as part of a system, not as a quick color change. Work it into corners and around details without leaving holidays, pinholes, or obvious thin areas.
A second coat is commonly part of liquid-applied systems, but the product's required coverage, thickness, and curing instructions control the work. The coating needs to cure fully before tile setting. Applying the next layer too soon can trap moisture and create a weak assembly.
Liquid products have one clear advantage: they can form a continuous surface around complicated shapes when applied correctly. Their weakness is less visible. A wall can look coated while still having thin coverage at edges, fastener heads, or textured board faces. Wet-film gauges or other manufacturer-approved checks can help confirm application thickness where the product allows them.
Sheet membranes make continuity visible
Bonded sheet membranes are embedded into the specified mortar while maintaining full contact with the substrate. Press the sheet firmly with the appropriate trowel, roller, or smoothing tool so the membrane lies flat without wrinkles, folds, or air pockets.
Treat seams according to the selected system. That may involve overlapping sheets or using a manufacturer's seam strip and sealant. Don't assume a butt joint is waterproof, and don't cover a seam with tile adhesive as a substitute for membrane treatment.
The membrane must extend from the floor or tub transition to at least above the showerhead area, while also satisfying the applicable code and manufacturer requirements. Standard shower guidance also calls for continuous treatment of wet surfaces, including walls, corners, and transitions, as described in this shower waterproofing installation guidance.
Detail the places that cause callbacks
Inside corners need reinforcement or preformed corner pieces that remain bonded through the change of plane. Wall-to-floor joints need a continuous connection to the shower pan, tub, or floor waterproofing. Niches and benches need careful treatment because their corners collect water and their horizontal surfaces must direct water toward the drain.
Seal every plumbing penetration with the selected system's compatible collar, gasket, sealant, or reinforcing detail. Don't smear an unrelated caulk around a pipe and call the opening finished. The material needs to bond to the surrounding membrane and remain part of the tested assembly.
Fastener heads and board seams also need coverage. If the membrane system calls for reinforcing tape, embed it without wrinkles and remove excess mortar or liquid buildup that could interfere with tile. The finished surface should have no exposed board, open joint, or visible path behind the barrier.
On an exterior wall, pause before choosing a basic liquid product. If vapor control is important, use the low-perm sheet strategy discussed earlier and follow the complete system details. The strongest membrane on paper still fails if its seams, corners, and penetrations aren't connected.
A visual overview can help newer installers understand the sequence. Watch the following demonstration, then compare every step with the instructions for the product being installed.
How to Verify Waterproofing Is Ready Before You Tile
The wall isn't ready because the membrane changed color or because the surface feels dry. Readiness means the system has continuous coverage, sealed details, correct thickness where applicable, and enough cure time for the next layer.
Use strong, angled lighting. Light aimed across the wall reveals pinholes, holidays, ridges, bubbles, and thin edges that disappear under flat room lighting. Inspect the main wall field, but spend more time on transitions and interruptions.
Use a detail-first inspection
Check the following areas deliberately:
- Inside corners: Look for gaps, lifted edges, folds, and missing reinforcement.
- Wall-to-floor transitions: Confirm the wall membrane connects to the pan, tub, or floor waterproofing without a break.
- Fastener heads: Make sure every screw or washer is covered as the system requires.
- Pipe penetrations: Verify that valve openings, shower arms, and other pipes have their intended seals.
- Niches and benches: Check every inside corner and horizontal surface for continuous coverage.
- Membrane field: Look for pinholes, bare board, blisters, bubbles, and thin spots.
A sheet membrane can be checked for full bedding by reviewing coverage during installation, before the mortar closes the work from view. A liquid membrane should be checked for the manufacturer's specified thickness rather than judged by appearance alone. The Schluter shower system handbook reports ASTM E96 vapor-perm ratings of 0.90 perms for KERDI, 0.19 perms for KERDI-DS, and 0.36 perms for 1/2-inch KERDI-BOARD, while noting that ANSI A118.10 addresses liquid-water barriers rather than vapor transmission. Those values show why vapor performance must be evaluated separately from liquid waterproofing.
Don't tile over a question mark
If you find a thin area, let the surface reach the required condition, then repair it with the compatible membrane and detail. Don't bury the defect beneath mortar. Once tile covers the wall, finding a missed fastener or open corner becomes destructive and expensive.
Where the complete shower system calls for a flood test, perform it after the waterproofing has cured and before tile installation. The AS 3740 compliance guidance emphasizes inspection details such as full coverage, correct thickness, sealed corners and seams, and testing before finishes cover the assembly. Local requirements and the shower system's instructions determine the exact test procedure.
Before tile, you should be able to explain how water travels from every wet surface to the drain without passing behind the membrane.
Photograph the completed waterproofing before tile hides it. A simple record showing sealed seams, corners, penetrations, and transitions gives the homeowner useful documentation and gives the installer a reference if a future fixture change is needed.
Final Checks Common Mistakes and Planning Your Project Cost
The most damaging shortcuts are usually simple. Someone relies on grout as the waterproofing, installs cement board without a membrane, leaves a corner untreated, skips reinforcement at a seam, or sets tile before the membrane has cured. Each shortcut saves little time compared with opening a finished wall later.
Other warning signs deserve attention before tile begins:
- Exposed substrate: Any visible board within the wet zone needs the selected membrane system.
- Unsealed movement points: Corners and changes of plane need compatible reinforcement or sealant details.
- Unplanned penetrations: A large gap around a valve or pipe requires a proper system detail, not a surface smear.
- Uncured coating: Follow the product's cure instructions instead of relying on touch-dry appearance.
- Mixed system components: Use accessories approved for the membrane you selected.
Budgeting should include more than tile and grout. The scope may involve demolition, framing repair, board or panel installation, membrane materials, plumbing adjustments, niche construction, the shower base, tile setting, grout, trim, and final sealing. Exterior-wall conditions and accessibility goals, including a curbless shower, can change the planning conversation before work starts.
For a Southwest Michigan remodel, homeowners can use Trademaster Construction's instant pricing tool to develop a ballpark budget for the broader shower and tile scope before scheduling detailed planning. It won't replace a site assessment, but it can help compare the project against your available budget and identify questions to ask a remodeling contractor.
Trademaster Construction can evaluate the wall assembly, waterproofing details, shower layout, and tile scope as one coordinated remodel rather than treating the membrane as an afterthought. Visit Trademaster Construction to review remodeling options for homes in Portage, Kalamazoo, and nearby Southwest Michigan communities, then use the pricing tool to begin planning your shower with clearer expectations.

