
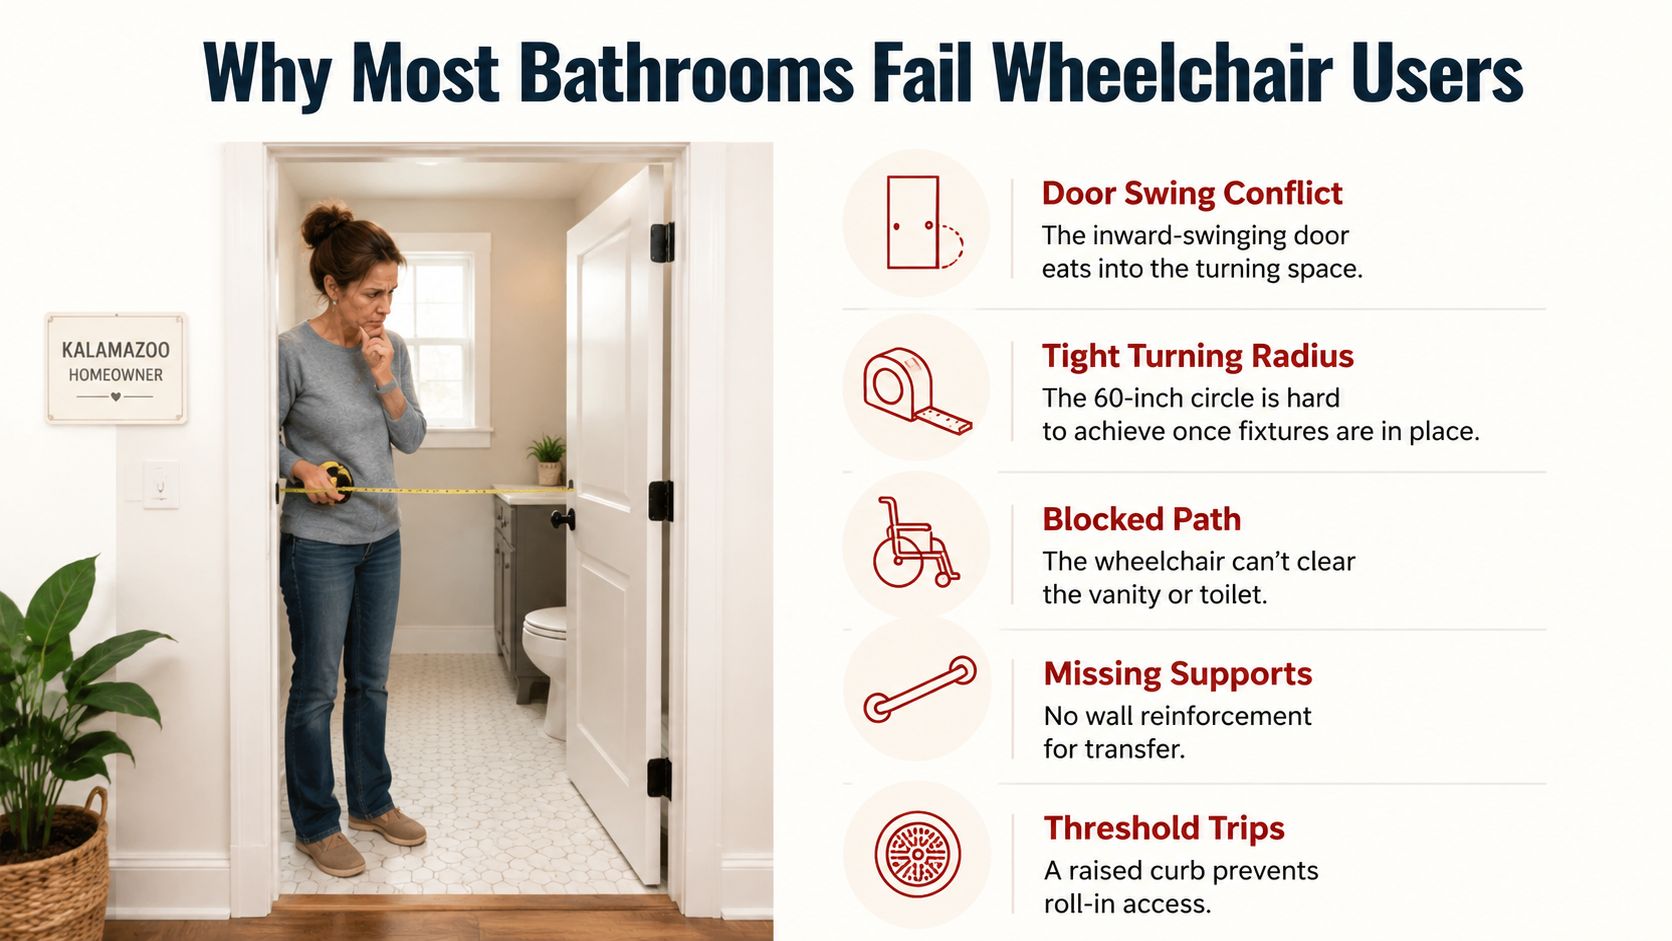
A homeowner in Kalamazoo can stand at the bathroom doorway with a tape measure and still have no clear answer about whether her father's wheelchair will work inside the room. The fixtures may fit on paper, yet the door swing steals the turning area, the vanity blocks the approach, and the shower threshold leaves no safe path from chair to seat.
That's the central problem with wheelchair accessible bathroom design. Accessibility isn't a collection of products added after the layout is finished. It's a precision planning exercise involving the user's chair, the room's centerline, transfer direction, reach range, plumbing, framing, and door movement. The 2010 ADA Standards for Accessible Design provide a useful baseline, including clear floor space and turning requirements, but a private bathroom still has to work inside the walls you own. The federal ADA standards are a starting point, not a substitute for field measurements.
Why Most Bathrooms Fail Wheelchair Users
The Kalamazoo bathroom in question is a familiar Southwest Michigan layout, a 5-by-8-foot room with a swinging door, a tub on the far wall, a toilet beside it, and a vanity opposite the toilet. From the hallway, it looks serviceable. A standing adult can walk in, turn, and reach every fixture without thinking about the floor plan.
The wheelchair changes that calculation immediately. A chair footprint that takes up roughly 25 inches of floor width leaves little tolerance once the door, toilet, vanity, and tub are all competing for the same path. A 28- to 30-inch doorway can make entry awkward, an inward-swinging door can occupy the only open portion of the room, and a tub with a 14-inch apron can turn a transfer into a lift over an obstacle.
The failures usually arrive as a chain rather than a single dramatic mistake:
- Door conflict: The leaf swings into the maneuvering area or leaves too little clear opening.
- Lost centerline: A vanity projects into the route needed to approach the toilet or shower.
- Blocked transfer: The toilet sits tight against a wall, leaving no usable side space for a lateral transfer.
- Raised shower entry: A tub edge or curb forces the user to cross a vertical barrier before reaching the bathing area.
- Poor reach: Controls, shelves, towels, and faucets sit where a seated user can't operate them safely.
Start with the centerline
The first question isn't whether the room can hold an accessible toilet or a curbless shower. It's whether the user can enter, turn, approach, transfer, and leave without fixtures cutting across that sequence.
I check four points before discussing finishes:
- Door width and swing
- Turning zone
- Shower entry
- Fixture reach
A bathroom that feels spacious to someone standing may fail at all four. The right measurement exercise begins by taping the chair footprint and the intended turning area directly onto the floor. That reveals problems that a fixture catalog never will.
The Core ADA Dimensions Every Homeowner Should Know
A bathroom can meet an ADA number on paper and still fail once the door, plumbing, and wall thickness take their share of the room. The measurements below describe usable clearance, not the outside dimensions of a vanity, toilet, or shower. The Access Board's toilet-room guidance includes turning space as part of the room layout.
The baseline includes 30 inches by 48 inches of clear floor space for a wheelchair approach and a 60-inch minimum turning space, either as a circular diameter or a T-shaped area. These zones must stay usable after finished walls, trim, fixtures, and door hardware are included.
A 60-inch circle is easy to draw on graph paper and harder to preserve in a compact home. A 32-inch clear door opening is only slightly wider than a typical finished interior opening after trim and stops reduce the passage. Door width also cannot be separated from approach space. The ADA guidance identifies 18 inches of latch-side clearance as common doorway planning, while The ADA doorway guidance describes 32 inches as the minimum clear width for a single wheelchair passage and 36 inches as a continuous width where possible. Widening the slab without checking the swing and latch side can leave the user unable to line up with the opening.
At the lavatory, preserve the approach zone rather than filling it with storage. A sink should be no higher than 34 inches, with at least 27 inches of knee clearance beneath it in many ADA-based guides. This accessibility planning summary connects door openings, sink height, and knee clearance with seated reach and operation.
| Dimension | ADA Requirement | Plain-Language Equivalent | Where It Applies |
|---|---|---|---|
| Turning space | 60 inches minimum | About the span across a large circular maneuvering zone | Central bathroom floor area |
| Fixture approach | 30 by 48 inches | A dedicated rectangle beside or in front of a fixture | Sink, toilet, and other accessible fixtures |
| Door opening | 32 inches clear minimum | Slightly wider than a typical finished interior opening | Bathroom entrance |
| Continuous passage | 36 inches where possible | More forgiving movement for chairs and walkers | Door approach and circulation routes |
| Toilet compartment | 60 inches wide, with depth of 56 inches for a wall-hung toilet or 59 inches for a floor-mounted toilet | A transfer zone that extends beyond the bowl | Toilet area |
Draw the room before choosing fixtures
Use graph paper at quarter-inch scale and draw finished wall faces, not framing centerlines. Show the door slab open and closed, then place the 60-inch turning circle where the user must maneuver. Add the 30-by-48-inch fixture clearances and mark every overlap. A taped layout on the subfloor often exposes a conflict before a fixture is ordered.
In a private residence, some ADA dimensions serve as firm compliance benchmarks, while others may be adapted to the user, local code, and existing construction. Flexibility does not justify removing maneuvering space. If the user can test the layout with the actual wheelchair before demolition, do it.
Standard 16-inch-on-center framing can support grab-bar backing, but the spacing may put blocking in the wrong bay. Older Michigan plaster walls leave less room for corrections. Resolve backing, plumbing, electrical locations, and finished wall thickness before tile and wallboard conceal the work.
Turning Radius Beyond the Minimum
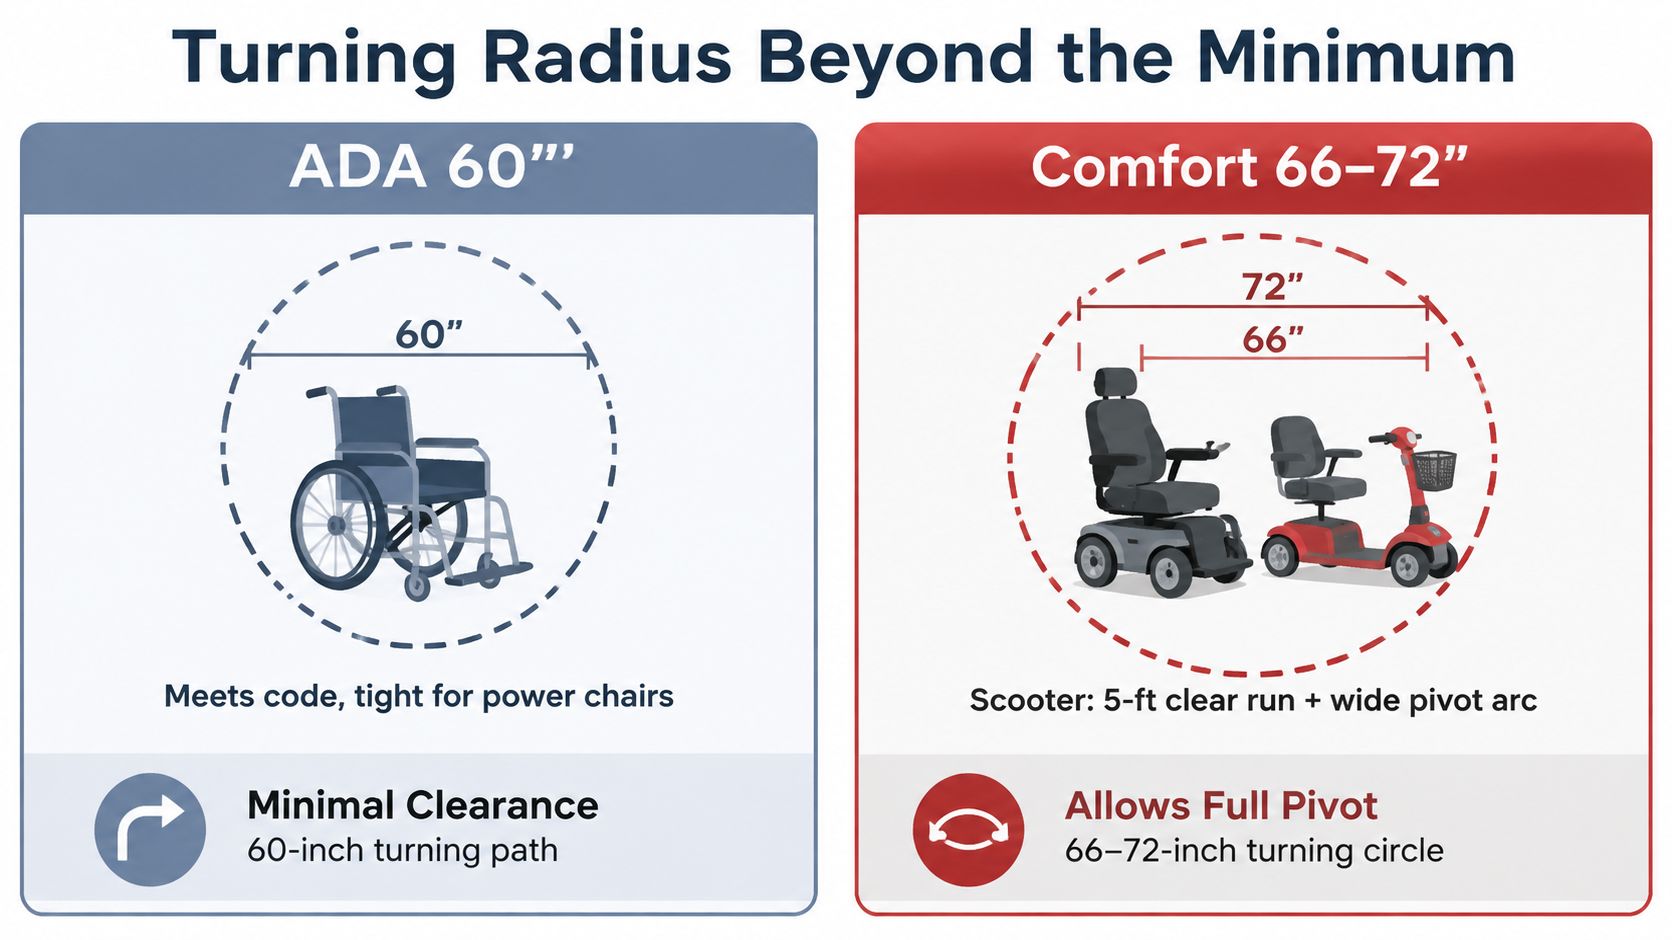
A 60-inch turning circle is the familiar baseline, but it may feel tight for a power wheelchair or scooter. The Canada Mortgage and Housing Corporation's accessibility guidance notes that a full turn commonly uses 60 by 60 inches, while power wheelchairs or scooters may need 72 by 72 inches. Its bathroom renovation guide connects turning space with the ability to enter, rotate, and exit independently.
The chair matters more than the codebook. A compact manual chair may complete a turn where a power chair needs a larger arc, and a mid-size scooter may require a 5-foot clear run before it can pivot without clipping the vanity or shower wall. The right plan starts with the actual device, including footrests, joystick controls, and the user's preferred transfer side.
Three strategies for tight rooms
When the full circle won't fit, I look at the user's movement pattern rather than forcing every fixture into a theoretical diagram.
- T-turn: A 60-by-60-inch T-shaped clear floor space can allow a series of forward and reverse movements where a circular turn doesn't fit.
- Three-point turn: In a compact 5-by-7-foot layout, the user may enter, reposition near the open wall, and turn through several controlled movements.
- Single-direction entry: The user enters facing the transfer area and backs out, avoiding a full spin inside the room.
None of these approaches is automatically better. A user who operates a power chair independently may find repeated reversing frustrating, while a caregiver may need a wider open area beside the toilet. The plan has to match actual routines.
In one Kalamazoo ranch bathroom, moving the vanity 14 inches into an adjacent closet recovered the turning area without taking space from the shower. The improvement came from changing the room's edge, not from buying a smaller chair or an unusually narrow fixture.
Practical rule: If the user can test the layout with the real wheelchair before demolition, do it. A paper circle can confirm dimensions, but only a real chair reveals joystick clearance, footrest conflicts, and the turning path that feels natural.
Curbless Showers and Wet Room Engineering
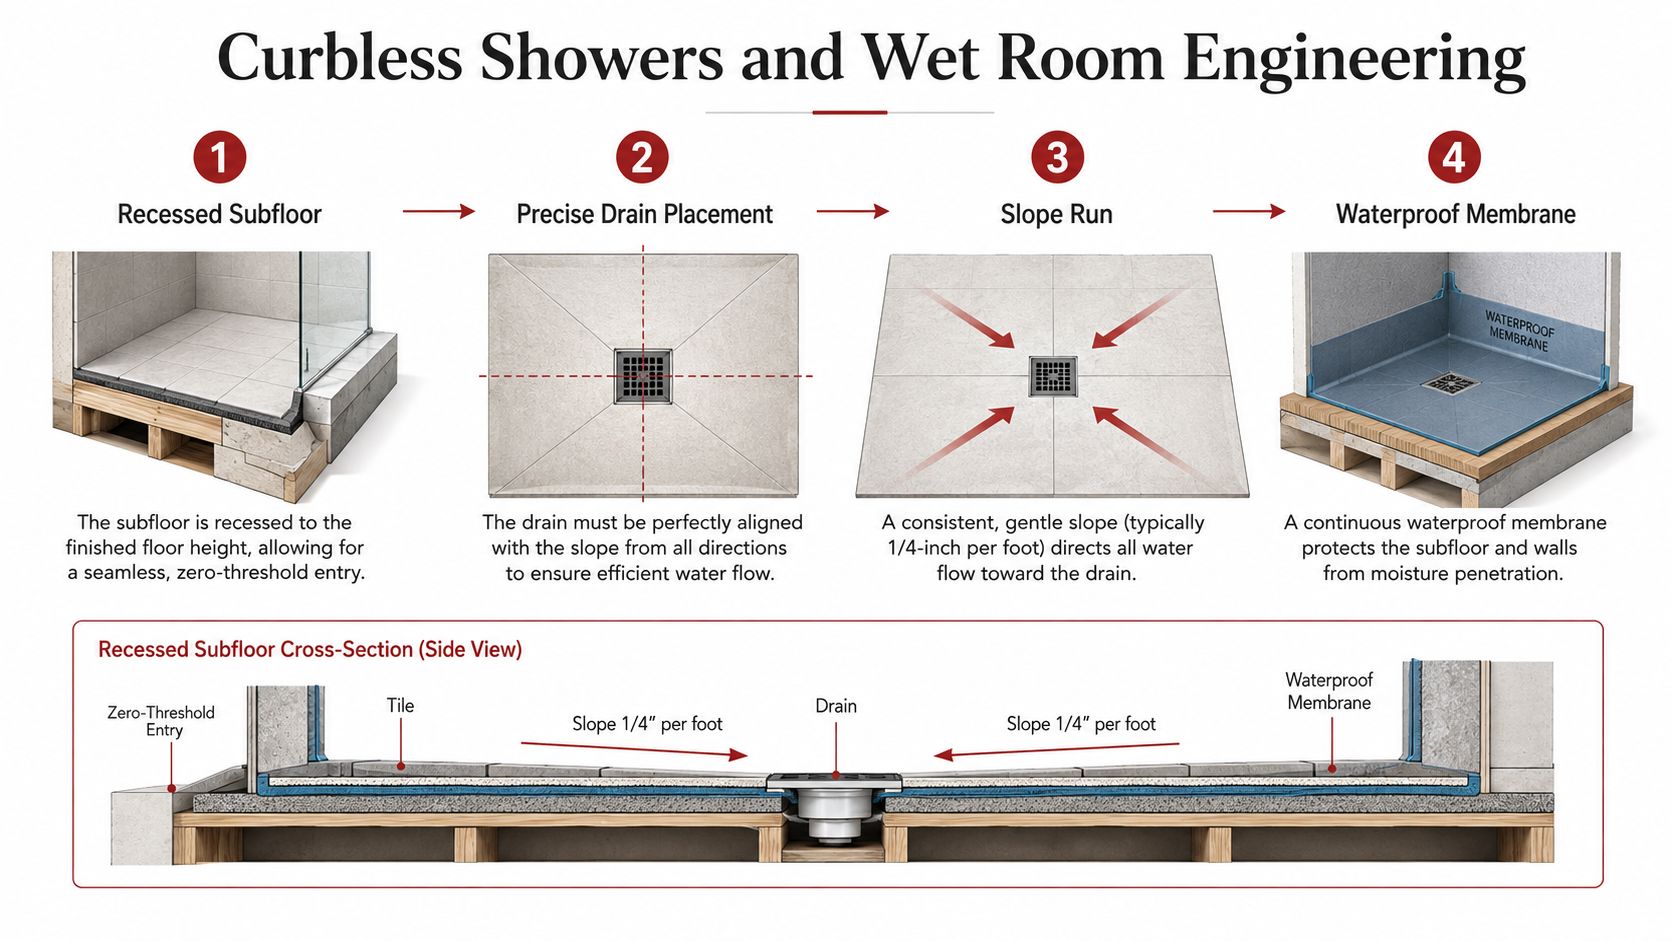
A curbless shower is a floor and drainage system, not a tile style. The entry only works when the subfloor, drain position, waterproofing, slope, and splash control are coordinated before the finished surface goes down.
A recessed subfloor creates the depth needed for a zero-threshold transition. If the structure can't be recessed, the design may require a low-profile ramp or another carefully detailed transition. The drain can sit along the back wall as a linear drain, or it can be centered so the floor slopes from multiple directions. Either approach can work, but the slope must lead water consistently to the drain without leaving a dry ridge or creating a trip edge.
The planning guide for accessible restrooms emphasizes stable, usable layouts, while this accessible restroom planning document provides practical guidance for positioning grab bars and controls. In a home, that guidance has to be coordinated with framing depth, joist direction, waterproofing, and the user's transfer path.
Keep water away from the transfer zone
A swinging shower seat can extend into the spray pattern, so the showerhead, handheld wand, valve, and seat need to be considered together. Controls should be reachable from outside the main spray zone, allowing the user to start the water before transferring into the wet area. A pocket placement for the valve can also keep controls accessible without forcing a reach across the seat.
Large-format tile reduces grout lines, but it doesn't eliminate the need for a properly formed slope. Continuous flooring can make wheelchair movement easier and simplify cleaning, yet the installer still has to control splashing at the open entry with shower length, glass placement, a curtain, or a combination of details.
Before tile covers the assembly, verify the recessed floor depth, drain elevation, slope direction, membrane continuity, shower seat clearance, valve reach, and transition into the main bathroom. Water testing and a dry layout inspection are cheaper than correcting puddles, soft subfloor areas, or a wheelchair path that narrows after installation.
Grab Bars, Shower Seats, and Hardware Placement
A grab bar is useful only when its location, length, diameter, backing, and transfer direction match the person using it. In a tight Southwest Michigan bathroom, a bar that looks centered may sit on the wrong approach side, or its mounting points may fall between studs. Measure the transfer motion first, then set the hardware around it.
Common ADA-based guidance places grab bars at 33 to 36 inches above the finished floor. Shower bars often position the lower end around 24 to 26 inches, depending on the bar arrangement and transfer need. These bars support balance, repositioning, and transfers, not only emergency recovery.
| Element | ADA Spec | Residential Tip |
|---|---|---|
| General grab-bar height | 33 to 36 inches | Set the final height around the user's transfer motion, not visual symmetry |
| Back-wall shower bar | 36-inch minimum length | Keep it aligned with the seat and transfer direction |
| Side-wall shower bar | 42-inch minimum length | Continue it far enough to support entry and repositioning |
| Shower seat | 17 to 19 inches high | Match the seat to the user's transfer height and leg strength |
| Entrance bar | 39 to 41 inches high | Use a vertical bar to support pull-in transfers |
| Bar diameter | 1.25 to 1.5 inches | Select a product the user can wrap their hand around securely |
| Wall clearance | 1.5 inches behind the bar | Prevent knuckle contact with the finished wall |
| Load rating | 250 pounds | Confirm the rated capacity and the manufacturer's installation method |
Reinforce before closing the walls
A folding shower seat changes the room's working geometry. At 17 to 19 inches, the seat, side bar, handheld shower, and control should support one transfer sequence. Place the valve where the user can reach it without leaning through the spray or twisting around the seat.
The toilet needs the same layout discipline. Set a side-wall bar where the user can push or pull during transfer, then assess whether a rear-wall bar adds lateral stability. A wall-hung toilet can increase floor clearance, but it cannot create a missing side approach or fix a door swing that blocks the route.
Older plaster walls and inconsistent framing call for planned blocking. Add solid backing at every anticipated bar location before closing the wall. Surface-mounted shortcuts can leave the bar misaligned, overload weak fasteners, or force tile repairs after the bathroom is finished. Dry-fit the seat and bars with the wheelchair or transfer equipment in place, because a few inches can determine whether the hardware supports the user or occupies wall space.
ADA Minimum Versus Aging in Place Comfort
An ADA-minimum layout and a comfort-first aging-in-place bathroom may share the same basic principles, but they make different trade-offs. The minimum approach protects a 60-inch turning area and 30-by-48-inch fixture clearances. A comfort-first plan may preserve the same core zones while opening the door, enlarging the turning area, and giving a caregiver room to assist.
The difference becomes clearer when the user's equipment or strength changes. A power wheelchair, a bariatric user, or a person who needs side assistance may find minimum clearances restrictive even when the room technically meets a baseline. The ADA guide from American Specialties is useful for understanding the distinction between prescribed clearances and the practical challenges of adapting an existing home.
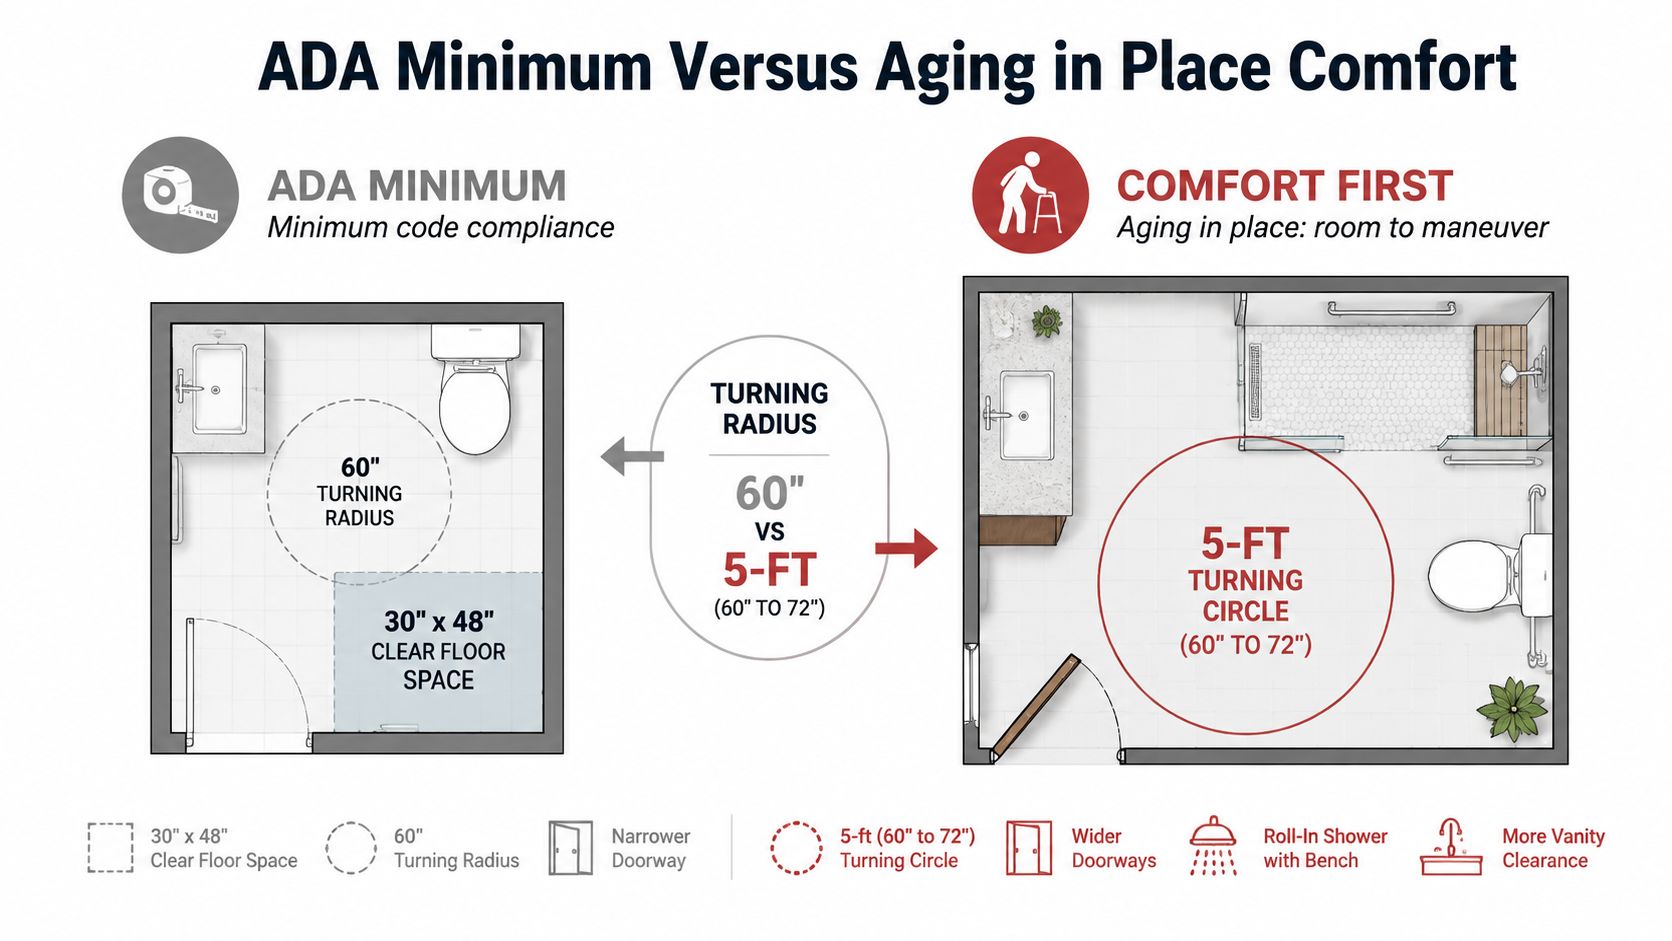
| Design decision | ADA minimum approach | Comfort-first approach |
|---|---|---|
| Turning area | 60-inch circle or an approved T-shaped space | A larger zone that may support a 60 to 72-inch turning range |
| Door | 32-inch clear opening | A wider opening, often with a pocket or outward swing |
| Toilet | Transfer clearances planned around the fixture | More room for a caregiver or a changing transfer method |
| Shower | Accessible entry with coordinated clearances | A larger roll-in area, seat, and reduced transition |
| Toilet height | User-specific fixture selection | A comfort-height toilet around 17 to 19 inches when appropriate |
Match the plan to the time horizon
For a five-year horizon, a carefully measured minimum layout may be reasonable if the user's chair and transfer method are stable. For a lifetime plan, spending more on a pocket door, structural backing, wider circulation, and a curbless floor can prevent destructive rework later.
Those choices add scope. Pocket doors need framing and hardware, curbless showers may require structural coordination, and grab-bar blocking can mean opening walls. The payoff is not a promised future outcome. It's a bathroom that can adapt without forcing the household to start over.
Daily activities such as bathing, toileting, and grooming determine whether someone can remain independent at home. For broader context, this resource on the significance of ADLs at home explains why ordinary routines matter in home-care planning.
Real Southwest Michigan Layouts That Work
A 1930s Kalamazoo bungalow often brings plaster walls, compact rooms, and plumbing that wasn't planned around a wheelchair. In one representative layout, a 28-inch doorway and a rear-load toilet consumed the only usable turning spot. The solution wasn't a luxury fixture package. The vanity shifted to a 21-inch-depth open shelf, and a pocket door removed the swing from the maneuvering area.
That kind of change works because it treats the wall and door as part of the accessibility system. Open shelving can reduce projection, but it has to remain stable, keep supplies reachable, and avoid creating sharp corners. The pocket door creates useful floor area, but the framing must be coordinated with electrical wiring, plumbing, and the wall's structural needs.
A 1990s Portage ranch presented a different challenge. The existing 5-by-8-foot guest bath used a tub footprint that prevented a clean turn. Reallocating that area to a 60-by-42-inch curbless shower, moving the toilet 14 inches off the back wall onto a 2-by-6 bump-out, and installing a wall-hung sink created a true turning zone beside the lavatory.
Local construction changes the answer
Southwest Michigan homes often hide the hardest constraints below the finished floor. A first-floor bathroom over a basement may allow access to a wet stack, while a slab makes toilet relocation more disruptive. Old galvanized supply risers can complicate fixture changes, and cast iron DWV may resist a quick drain move.
Plaster walls create another decision. If the existing wall stays, a contractor may need to open selective areas for blocking or use carefully engineered surface solutions. If the wall is already being removed, installing full backing during rough framing is usually more straightforward.
Kalamazoo, Portage, and Battle Creek projects also have permit touchpoints that depend on the scope and local requirements. An aging-in-place contractor who understands local housing stock can identify whether a small move, such as reversing the door swing, shortening a trap arm, or removing a shower curb, will reclaim more usable clearance than a full plumbing relocation.
The best small-bathroom plans rarely come from one standard diagram. They come from measuring the actual chair, exposing the actual structure, and choosing the move that protects the user's transfer path.
Planning Your Remodel and Budget With Confidence
Accessible remodeling becomes easier to budget when the work is staged in the same order it will be built. Start with measurements, then resolve the floor plan, then price the construction scope. Estimating finishes before deciding whether the toilet moves is how homeowners end up comparing the wrong projects.
A practical planning sequence
- Tape out the room: Mark the turning zone and each fixture's clear floor space directly on the subfloor or existing floor.
- Test the entry: Check the clear door opening, latch-side approach, swing direction, and hallway connection with the actual wheelchair or walker.
- Choose the bathing strategy: Compare a curbless shower with a low-profile ramped entry, considering structure, drainage, waterproofing, and splash control.
- Locate the supports: Confirm blocking for shower bars, toilet bars, a folding seat, and any future support hardware before closing the walls.
- Set fixture heights: Select the sink, toilet, shower seat, controls, mirror, shelves, and towel storage around seated reach and transfer needs.
- Confirm rough-ins: Resolve toilet flange location, vanity plumbing, drain routing, electrical circuits, lighting, ventilation, and heating before ordering finishes.
- Rough-price the scope: Separate demolition, framing, plumbing, electrical, waterproofing, tile, fixtures, hardware, permits, and finish work so the estimate reflects the actual plan.
Identify the price-sensitive work
Some line items can change the project scope quickly. A pocket door may require new framing and hardware. Grab-bar blocking in existing walls may require selective demolition. A curbless shower with a linear drain demands careful subfloor, waterproofing, and tile coordination.
Toilet relocation is another major variable. Moving a toilet on a slab differs from moving one over a basement, and cast iron DWV can require more invasive work than newer plastic drainage. An electrical review may also uncover panel or circuit work, including a possible upgrade from 100 to 200 amps when the remodel adds required loads. Lighting, ventilation, heating, and dedicated bathroom circuits should be priced with the accessibility work rather than treated as afterthoughts.
For an early budget check, use the Trademaster Construction instant pricing tool to size the project before requesting detailed local bids. Treat the result as an initial planning figure, then have contractors verify the measurements, structure, plumbing access, permit needs, and finish selections.
Trademaster Construction helps Southwest Michigan homeowners plan accessible bathroom remodels around real wheelchair clearances, curbless shower construction, grab-bar reinforcement, and practical fixture placement. Visit Trademaster Construction to discuss a bathroom in Kalamazoo, Portage, or a nearby community and turn your measured layout into a buildable plan.

